

是什么
ES5提供的数组的方法。
reduce() 方法接收一个函数作为回调函数(accumulator),数组中的每个值(从左到右)开始缩减(其实就是从左往右开始对每个数执行回调函数),最终为一个值。
PS: 回调函数的返回结果类型和传入的初始值相同
语法以及参数
arr.reduce( callback(accumulator, currentValue,index ,array ) ,initialValue )
1
initialValue 可选
如果有的话则作为,第一次调用 callback函数时的第一个参数的值。
如果没有提供初始值,callback则使用数组的第一个元素,作为第一次调用的初始值。
在没有初始值的空数组上调用 reduce 将报错。
accumulator
默认传入上一次调用回调函数的的返回值。
初始值: initialValue存在的话,则是initialValue 若没有则是数组的第一个元素
currentValue
数组中正在处理的元素。
index 可选
数组中正在处理的当前元素的索引。 如果提供了initialValue,则起始索引号为0,否则从索引1起始。
array可选
调用reduce()的数组
一个小小的例子
例1 无initialValue
var arr = [1, 2, 3, 4, 5];
sum = arr.reduce(function(result, cur, index, arr) {
console.log(result, cur, index,arr);
return result+ cur;
})
console.log(sum) // 最后的结果是15
result cur index arr
第1次 1 2 1 [1, 2, 3, 4, 5]
第2次 3 3 2 [1, 2, 3, 4, 5]
第3次 6 4 3 [1, 2, 3, 4, 5]
第4次 10 5 4 [1, 2, 3, 4, 5]
例2 有initialValue 传入10
var arr = [1, 2, 3, 4, 5];
sum = arr.reduce(function(result, cur, index, arr) {
console.log(result, cur, index,arr);
return result+ cur;
},10)
console.log(sum) // 最后的结果是25
result cur index arr
第1次 10 1 0 [1, 2, 3, 4, 5]
第2次 11 2 1 [1, 2, 3, 4, 5]
第3次 13 3 2 [1, 2, 3, 4, 5]
第4次 16 4 3 [1, 2, 3, 4, 5]
第5次 20 5 4 [1, 2, 3, 4, 5]
回调函数的返回值
上面的例子返回的都是一个整型数字,如果希望返回其他类型的数据呢?
这个就跟accumulator的初始值有关系了。
下面的例子我们传入的是一个object {sum: 0}
var items = [0,1,2,3,4];
var reducer = function add(sumT, item) {
console.log(sumT)
sumT.sum = sumT.sum + item;
return sumT;
};
var total = items.reduce(reducer, {sum: 0});
console.log(total); // {sum:1130}
运行结果
{sum: 0}
{sum: 1}
{sum: 3}
{sum: 6}
{sum: 10}
reduce()的应用
如果您想订阅本博客内容,每天自动发到您的邮箱中, 请点这里
了解一个技术,首先要了解这个技术产生的背景及解决的问题,而不应该只是单纯的知道该怎么用。之前的状态可能就是只是为了了解而了解,并不知道实际产生的原因及带来的好处,所以今天就来总结一下。
来看百度百科的定义
模块化程序设计是指在进行程序设计时将一个大程序按照功能划分为若干小程序模块,每个小程序模块完成一个确定的功能,并在这些模块之间建立必要的联系,通过模块的互相协作完成整个功能的程序设计方法。
比如 java 的 import,C# 的 using。我的理解是通过模块化编程,可以将不同的功能独立出来,修改某个功能时不会对其他功能产生影响。
来看下面一个例子
// A.js function sayWord(type){ if(type === 1){
        console.log("hello");
    }else if(type === 2){
        console.log("world");
    }
} // B.js function Hello(){ sayWord(1);
} // C.js Hello()
假设上面三个文件,B.js 引用了 A.js 里面的内容,C.js 又引用了 B.js 里面的内容,如果编写 C.js 的人只知道引用了 B.js,那他就不会引用 A.js 就会导致程序出错,而且文件的引用顺序也不能出错。给整体代码的调试修改带来不便。
还有个问题,上述代码暴露了两个全局变量,容易造成全局变量的污染
AMD 即 Asynchronous Module Definition(异步模块定义)。采取异步加载的方式加载模块,模块的加载不会影响它后面的语句执行。而且只有用到的时候才会去加载相关文件,属于浏览器端的标准
假设下面这种情况
// util.js define(function(){ return {
        getFormatDate:function(date,type){ if(type === 1){ return '2018-08-9' } if(type === 2){ return '2018 年 8 月 9 日' }
        }
    }
}) // a-util.js define(['./util.js'],function(util){ return {
        aGetFormatDate:function(date){ return util.getFormatDate(date,2)
        }
    }
}) // a.js define(['./a-util.js'],function(aUtil){ return {
        printDate:function(date){ console.log(aUtil.aGetFormatDate(date))
        }
    }
}) // main.js require(['./a.js'],function(a){ var date = new Date()
    a.printDate(date)
})
console.log(1); // 使用 // <script src = "/require.min.js" data-main="./main.js"></script>
页面上先打印 1,然后才会打印 2018 年 8 月 9 日。因此 AMD 的加载并不会影响后续的语句执行。
如果不是异步加载会出现什么情况呢
var a = require('a');
console.log(1)
后面的语句需要等待 a 加载完成才能执行,如果加载时间过长,整个程序都会卡在这。因此,浏览器不能同步加载资源,这也是 AMD 的产生背景。
AMD 是在浏览器端实现模块化开发的规范。由于该规范不是 JavaScript 原始支持的,使用 AMD 规范进行开发的时候需要引入第三方的库函数,也就是 RequireJS。
RequireJS 主要解决的问题
下面来看看如何使用 require.js
要想使用 require.js,首先要 define
// ? 代表该参数可选 define(id?, dependencies?, factory);
factory:为模块初始化要执行的函数或对象。如果为函数,它应该只被执行一次。如果是对象,此对象应该为模块的输出值。
具体的规范说明可以参考 AMD (中文版)
举个例子,创建一个名为 “alpha” 的模块,使用了 require,exports,和名为 “beta” 的模块:
define("alpha", ["require", "exports", "beta"], function (require, exports, beta) { exports.verb = function() { return beta.verb(); //Or: return require("beta").verb();
       }
   });
一个返回对象的匿名模块:
define(["alpha"], function (alpha) { return {
         verb: function(){ return alpha.verb() + 2;
         }
       };
   });
一个没有依赖性的模块可以直接定义对象:
define({
     add: function(x, y){ return x + y;
     }
   });
如何使用
AMD 采用 require 语句加载模块
require([module],callback);
例如
require(['./a.js'],function(a){ var date = new Date()
    a.printDate(date)
})
具体的使用方法如下
// util.js define(function(){ return {
        getFormatDate:function(date,type){ if(type === 1){ return '2018-08-09' } if(type === 2){ return '2018 年 8 月 9 日' }
        }
    }
}) // a-util.js define(['./util.js'],function(util){ return {
        aGetFormatDate:function(date){ return util.getFormatDate(date,2)
        }
    }
}) // a.js define(['./a-util.js'],function(aUtil){ return {
        printDate:function(date){ console.log(aUtil.aGetFormatDate(date))
        }
    }
}) // main.js require(['./a.js'],function(a){ var date = new Date()
    a.printDate(date)
}) // 使用 // <script src = "/require.min.js" data-main="./main.js"></script>
假设这里有 4 个文件,util.js,a-util.js 引用了 util.js,a.js 引用了 a-util.js,main.js 引用了 a.js。
其中,data-main 属性的作用是加载网页程序的主模块。
上例演示了一个主模块最简单的写法,默认情况下,require.js 假设依赖和主模块在同一个目录。
使用 require.config() 方法可以对模块的加载行为进行自定义。require.config() 就写在主模块(main.js)的头部,参数是一个对象,这个对象的 paths 属性指定各个模块的加载路径
require.config({
    paths:{ "a":"src/a.js", "b":"src/b.js" }
})
还有一种方法是改变基础目录(baseUrl)
require.config({

    baseUrl: "src",

    paths: { "a": "a.js", "b": "b.js",

    }

  });
commonJS 是 nodejs 的模块化规范,现在被大量用在前端,由于构建工具的高度自动化,使得使用 npm 的成本非常低。commonJS 不会异步加载 JS,而是同步一次性加载出来
在 commonJS 中,有一个全局性的方法 require(),用于加载模块,例如
const util = require('util');
然后,就可以调用 util 提供的方法了
const util = require('util'); var date = new date();
util.getFormatDate(date,1);
commonJS 对于模块的定义分三种,模块定义(exports),模块引用(require)和模块标示(module)
exports() 对象用于导出当前模块的变量或方法,唯一的导出口。require() 用来引入外部模块。module 对象代表模块本身。
举个栗子
// util.js module.exports = {
    getFormatDate:function(date, type){ if(type === 1){ return '2017-06-15' } if(type === 2){ return '2017 年 6 月 15 日' }
    }
} // a-util.js const util = require('util.js')
module.exports = {
    aGetFormatDate:function(date){ return util.getFormatDate(date,2)
    }
}
或者下面这种方式
 // foobar.js // 定义行为 function foobar(){ this.foo = function(){ console.log('Hello foo');
        } this.bar = function(){ console.log('Hello bar');
          }
 } // 把 foobar 暴露给其它模块 exports.foobar = foobar; // main.js //使用文件与模块文件在同一目录 var foobar = require('./foobar').foobar,
test = new foobar();
test.bar(); // 'Hello bar'
ES6 模块的设计思想是尽量静态化,使得编译时就能确定模块的依赖关系,以及输入和输出的变量,而 CommonJS 和 AMD 模块都只能在运行时确定这些关系。如 CommonJS 加载方式为 “运行时加载”,ES6 的加载方式为 “编译时加载” 或者静态加载,即 ES6 可以在编译时就完成模块加载,效率比 CommonJS 模块的加载方式高。
ES6 模块自动采用严格模式,不管有没有在模块头部加上 “use strict”。
ES6 export 语句输出的接口与其对应的值是动态绑定关系,即通过该接口可以取到模块内部实时的值。而 CommonJS 模块输出的是值的缓存,不存在动态更新。
ES6 与 CommonJS 模块的差异
第二个差异是因为 CommonJS 加载的是一个对象(即 Module.exports 属性),该对象只有在脚本运行结束时才会生成,而 ES6 模块不是对象,它的对外接口只是一种静态定义,在代码静态解析阶段就会生成。
CommonJS 采用了服务器优先的策略,使用同步方式加载模块,而 AMD 采用异步加载的方式。所以如果需要使用异步加载 js 的话建议使用 AMD,而当项目使用了 npm 的情况下建议使用 CommonJS。
蓝蓝设计( www.lanlanwork.com )是一家专注而深入的界面设计公司,为期望卓越的国内外企业提供卓越的UI界面设计、BS界面设计 、 cs界面设计 、 ipad界面设计 、 包装设计 、 图标定制 、 用户体验 、交互设计、 网站建设 、平面设计服务。
如果您想订阅本博客内容,每天自动发到您的邮箱中, 请点这里
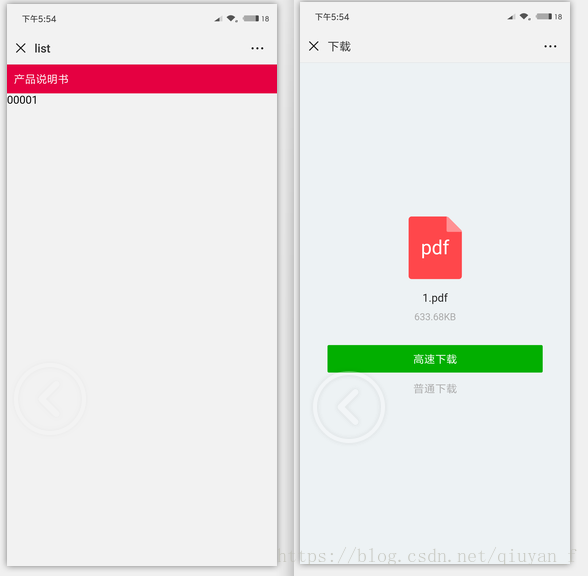
1.说下需求:点击标题 跳转 预览的pdf 页,下载功能 可选【最好有】。
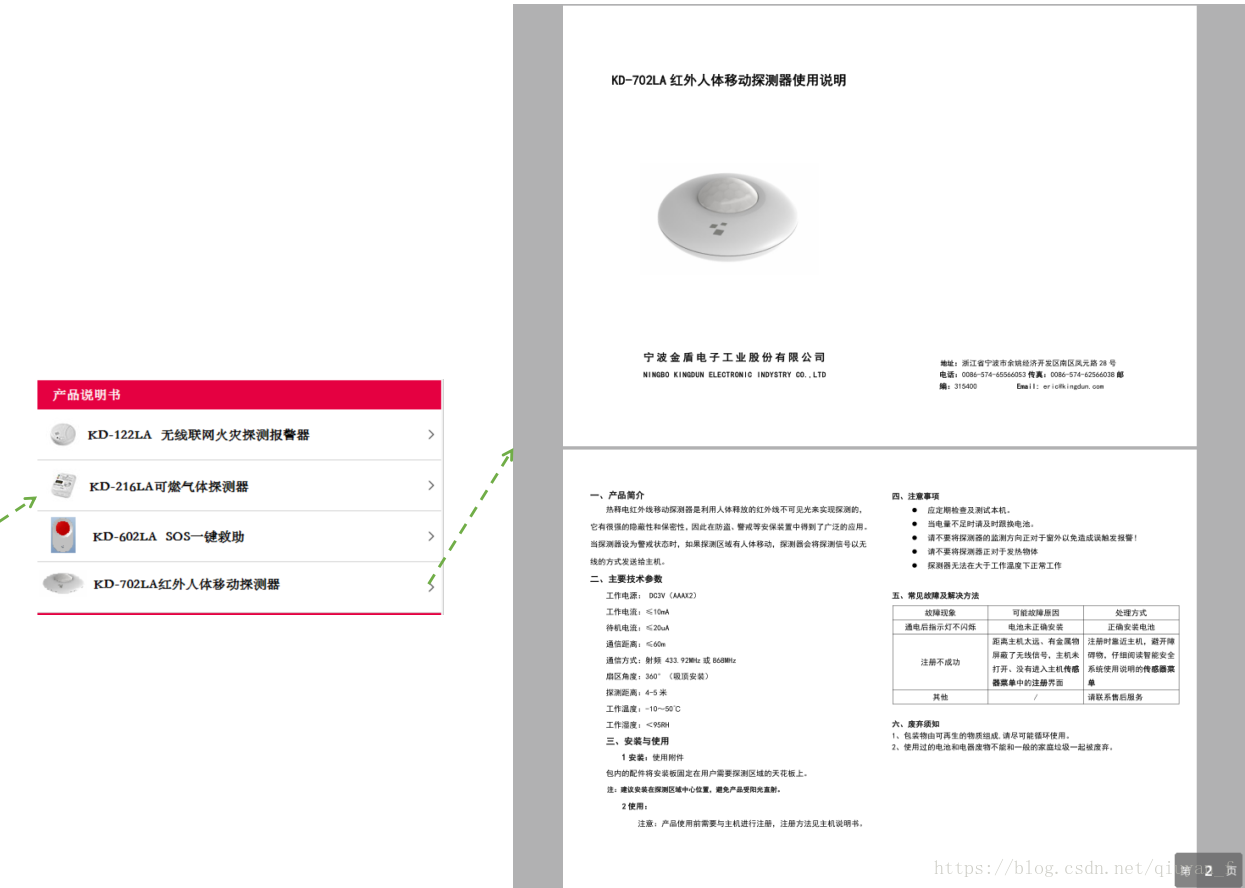
2.实现结果 :
3.代码实现:
依赖pdf.js 【需要下载完整 控件】
下载官网:http://mozilla.github.io/pdf.js/
点击 ‘Download ’ 到下载页
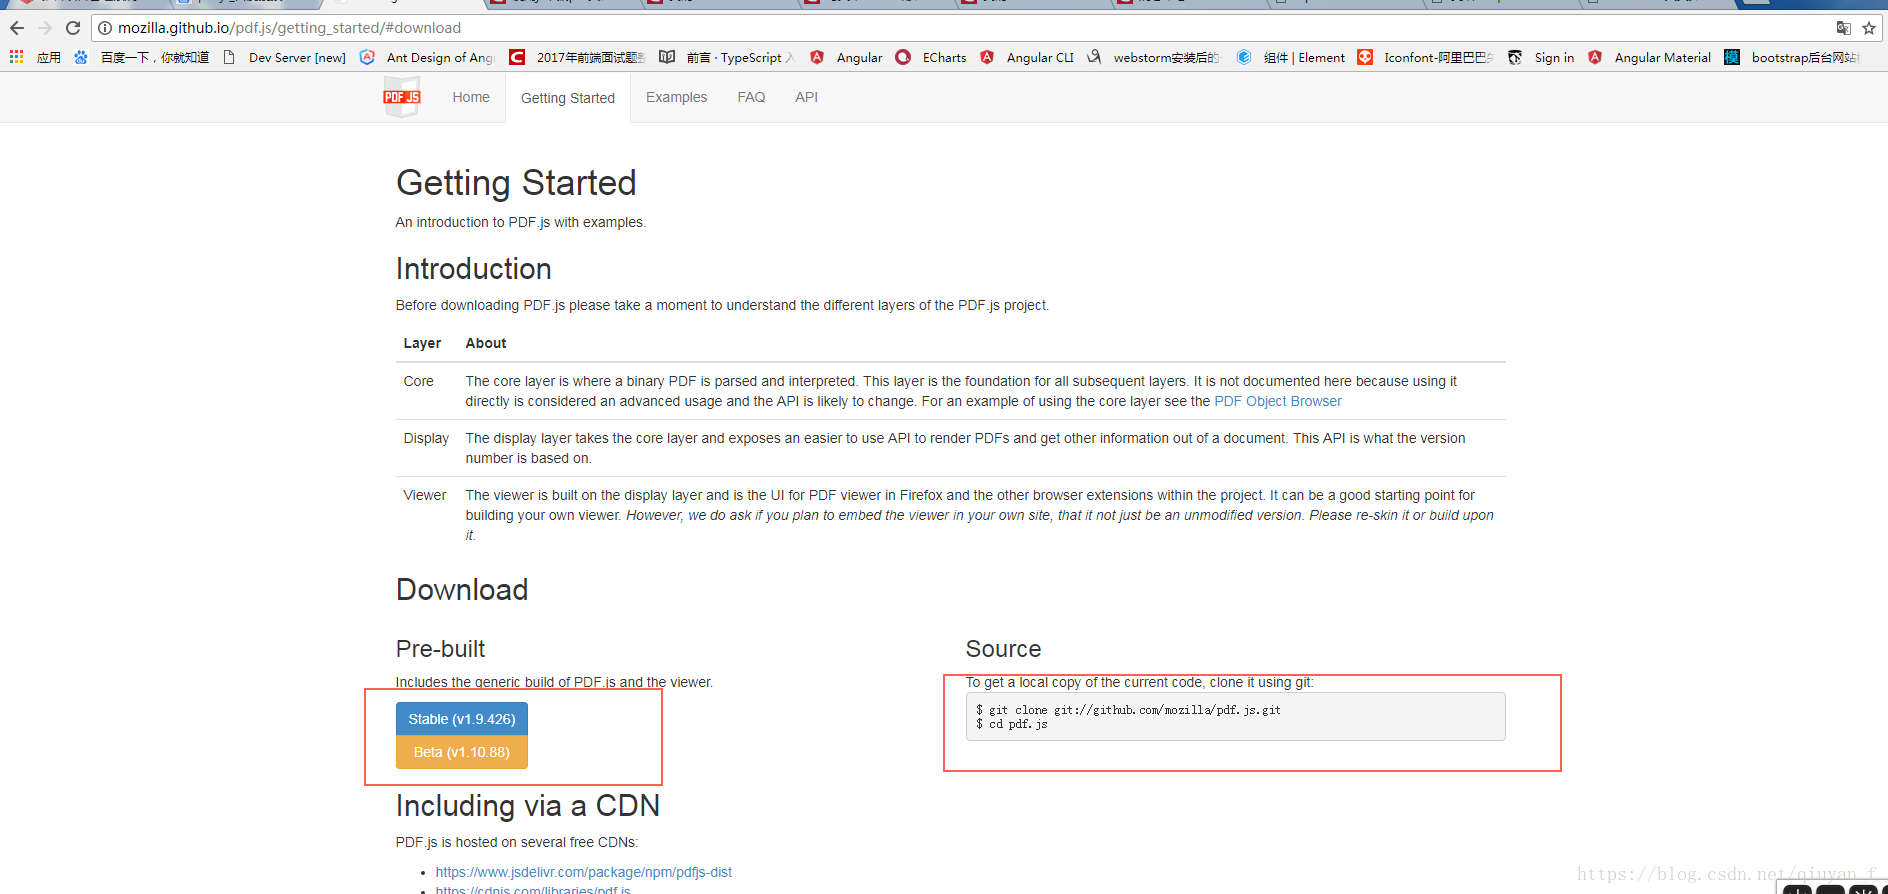
git 克隆 或者下载。
下载后文件长这样:

【重点在后面 项目如何部署组装】
1.新建一个空项目 把文件放到项目根目录下:
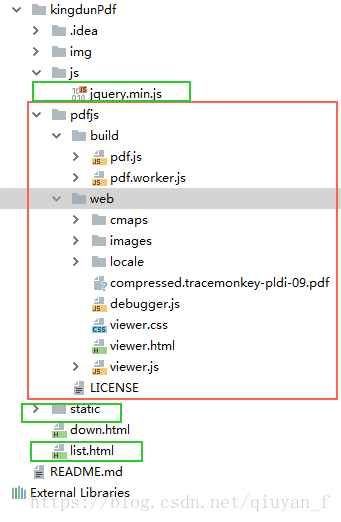
红色圈里 是官网下载的 就改个文件名字,然后拖进项目里,完全不用动里面任何文件记住,有需要另说。
绿色是我写的【dowwn.html 是测试文件;static 放pdf 文件】 下面贴代码:
list.html
-
<!DOCTYPE html>
-
<html lang="en">
-
<head>
-
<meta charset="UTF-8">
-
<meta name="viewport" content="width=device-width, initial-scale=1.0, user-scalable=0, minimum-scale=1.0, maximum-scale=1.0">
-
<meta name="apple-mobile-web-app-capable" content="yes">
-
<meta name="apple-touch-fullscreen" content="yes">
-
<meta name="full-screen" content="yes">
-
<meta name="apple-mobile-web-app-status-bar-style" content="black">
-
<meta name="format-detection" content="telephone=no">
-
<meta name="format-detection" content="address=no">
-
<title>list</title>
-
<style>
-
*{
-
margin: 0;
-
padding: 0;
-
}
-
.title{
-
background: #e50041;
-
color: #ffffff;
-
font-size: 16px;
-
}
-
.title{
-
padding:10px 10px ;
-
}
-
ul{
-
padding:0px 10px 10px 10px ;
-
}
-
li{
-
list-style: none;
-
border-bottom: 1px solid #eeeeee;
-
height: 50px;
-
line-height:50px;
-
}
-
a{
-
text-decoration: none;
-
color: #000;
-
}
-
.leftImg{
-
width: 30px;
-
vertical-align: middle;
-
-
}
-
.next{
-
float: right;
-
/*vertical-align: middle;*/
-
margin-top: 4.5%;
-
-
}
-
</style>
-
</head>
-
<body>
-
<p class="title">产品说明书</p>
-
<ul>
-
<li dataSrc = 'KD-122LA火灾探测报警器说明书.pdf' onclick="fun(this)">
-
<img class="leftImg" src="img/1.png" alt=""> <span href="">KD-122LA火灾探测报警器说明书ccc</span> <img class="next" src="img/next.png" alt="">
-
</li>
-
<li dataSrc = 'KD-212LA可燃气体探测器说明书.pdf' onclick="fun(this)">
-
<img class="leftImg" src="img/1.png" alt=""> <span href="">KD-212LA 可燃气体探测器说明书</span> <img class="next" src="img/next.png" alt="">
-
</li>
-
<li dataSrc = 'KD-216LA可燃气体探测器说明书.pdf' onclick="fun(this)">
-
<img class="leftImg" src="img/1.png" alt=""> <span href="">KD-216LA可燃气体探测器说明书</span> <img class="next" src="img/next.png" alt="">
-
</li>
-
<li dataSrc = 'Kd-122LA_KD-601系统遥控器使用说明.pdf' onclick="fun(this)">
-
<img class="leftImg" src="img/1.png" alt=""> <span href="">Kd-122LA KD-601系统遥控器使用说明</span> <img class="next" src="img/next.png" alt="">
-
</li>
-
<li dataSrc = 'KD-602LA_SOS一键救助使用说明书.pdf' onclick="fun(this)">
-
<img class="leftImg" src="img/1.png" alt=""> <span href="">KD-602LA SOS一键救助使用说明书</span> <img class="next" src="img/next.png" alt="">
-
</li>
-
<li dataSrc = 'KD-701LA_溢水探测器使用说明书.pdf' onclick="fun(this)">
-
<img class="leftImg" src="img/1.png" alt=""> <span href="">KD-701LA 溢水探测器使用说明书</span> <img class="next" src="img/next.png" alt="">
-
</li>
-
<li dataSrc = 'KD-702LA红外人体移动探测器说明书.pdf' onclick="fun(this)">
-
<img class="leftImg" src="img/1.png" alt=""> <span href="">KD-702LA红外人体移动探测器说明书</span> <img class="next" src="img/next.png" alt="">
-
</li>
-
<li dataSrc = 'KD-703LA_门窗探测器使用说明书.pdf' onclick="fun(this)">
-
<img class="leftImg" src="img/1.png" alt=""> <span href="">KD-703LA 门窗探测器使用说明书</span> <img class="next" src="img/next.png" alt="">
-
</li>
-
<li dataSrc = 'KD-805A_WiFi系统主机使用说明书_V1.00.pdf' onclick="fun(this)">
-
<img class="leftImg" src="img/1.png" alt=""> <span href="">KD-805A WiFi系统主机使用说明书_V1.00</span> <img class="next" src="img/next.png" alt="">
-
</li>
-
<li dataSrc = 'WIFI智慧家庭安防系统操作说明书_v0.01.pdf'onclick="fun(this)">
-
<img class="leftImg" src="img/1.png" alt=""> <span href="">WIFI智慧家庭安防系统操作说明书_v0.01</span> <img class="next" src="img/next.png" alt="">
-
</li>
-
-
-
</ul>
-
<script src="js/jquery.min.js"></script>
-
<script>
-
function fun(e){
-
// console.log(e);
-
var dataSrc = $(e).attr('dataSrc');
-
// console.log(dataSrc);
-
// sessionStorage.setItem('dataSrc',dataSrc);
-
// window.location.href='index.html'
-
var urlSrc = 'http://testweixin.kingdun.net.cn/pdf/static/'+dataSrc;
-
$.ajax({
-
url: urlSrc,
-
type: "get",
-
success: function(xhr, data){
-
if (navigator.userAgent.indexOf('Android') > -1) {
-
//判断移动端是android 还是ios ,若是android 则要借助pdf插件
-
window.location.href = "http://testweixin.kingdun.net.cn/pdf/pdfjs/web/viewer.html?file="+urlSrc;
-
} else {
-
//ios直接打开pdf
-
//window.location.href = url;
-
window.location.href = "http://testweixin.kingdun.net.cn/pdf/pdfjs/web/viewer.html?file="+urlSrc;
-
}
-
},
-
error: function(){
-
//window.location.href = '${ctx}/core/user.androidPdf.do?mid='+mid+"&name="+storagename+"&realname="+realname;
-
window.location.href = "http://testweixin.kingdun.net.cn/pdf/js/web/viewer.html?file="+urlSrc;
-
}
-
});
-
}
-
</script>
-
</body>
-
-
</html>
完毕!
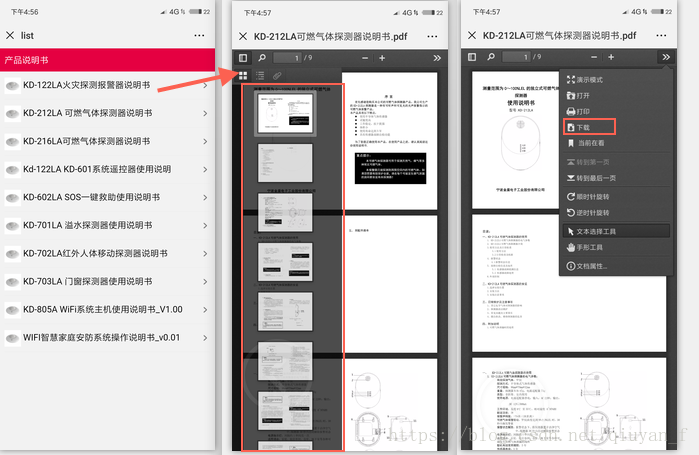
注释:window.location.href = "http://testweixin.kingdun.net.cn/pdf/pdfjs/web/viewer.html? 直接跳转到 万能的pdf 组件里的html 页,该有的 国际化和下载打印功能 人家都写好了!
-
<!DOCTYPE html>
-
<html lang="en">
-
<head>
-
<meta charset="UTF-8">
-
<meta name="viewport" content="width=device-width, initial-scale=1.0, user-scalable=0, minimum-scale=1.0, maximum-scale=1.0">
-
<meta name="apple-mobile-web-app-capable" content="yes">
-
<meta name="apple-touch-fullscreen" content="yes">
-
<meta name="full-screen" content="yes">
-
<meta name="apple-mobile-web-app-status-bar-style" content="black">
-
<meta name="format-detection" content="telephone=no">
-
<meta name="format-detection" content="address=no">
-
<title>list</title>
-
<style>
-
*{
-
margin: 0;
-
padding: 0;
-
}
-
.title{
-
background: #e50041;
-
color: #ffffff;
-
font-size: 16px;
-
}
-
.title{
-
padding:10px 10px ;
-
}
-
ul{
-
padding:0px 10px 10px 10px ;
-
}
-
li{
-
list-style: none;
-
border-bottom: 1px solid #eeeeee;
-
height: 50px;
-
line-height:50px;
-
}
-
a{
-
text-decoration: none;
-
color: #000;
-
}
-
.leftImg{
-
width: 30px;
-
vertical-align: middle;
-
-
}
-
.next{
-
float: right;
-
/*vertical-align: middle;*/
-
margin-top: 4.5%;
-
-
}
-
</style>
-
</head>
-
<body>
-
<p class="title">产品说明书</p>
-
-
<a href="static/1.pdf">00001</a>
-
-
-
</body>
-
-
</html>
-
哈哈,直接a 标签 href 跳转 pdf文件;也是ok的哦!【苹果手机:直接预览;;;安卓:下载 链接 】
1.Json的格式
其实json就是对象。源生的js代码并没有类的概念。对象救就是object。对象有自己的属性,也可以有自己的方法。json是一种轻量级的存储和交换信息的语言。他有自己的格式。
较为简单的json。里面只有简单的对象,key+value的形式:
每个元素之间用逗号隔开。调用每个key的值可用语句。例如:CellInfo.UEAmunt,就可取出其中的值。
较为复杂的json。里面包含了对象。
例如这个UEGroup1,里面的元素不仅有简单的key+value,还包含了三个对象。对象里的元素用{}括起来,彼此之间用逗号隔开。想具体访问某个元素的值也是通过逐层key,例如:UEGrooup1.DBR1.DLPackageSize
动态的往json只增加元素,增加对象。
前面说的几个都是静态的,提前写好的。那如果临时想加一个元素,例如在Cellinfo这个json中相加一个number的元素:
CellInfo.number=10;
对于往json中添加对象。例如我们想把Cellinfo和UEGroup1这两个object作为两个元素加入到另外一个大的json中:
2.json的发送
json写好后,发送给后台。至于后台怎么处理数据我们不关心。发送json的函数如下:
}
参数分别是后台的地址,变量,方法。变量就是我们自己写好的json,方法默认为post。例如我们想发刚刚的PETInfo
$.post('http://10.140.160.64:3012/users/ueinfo', PETInfo);
数据的发送、并获取结果的实例:
需求描述:用户填写一系列的输入框,前端获取数据,封装成json并发送给服务器,服务器会返回一个返回值,表示状态。前端需要展示这个内容提示客户。
3.json在本地的存储
存储数据有很多方法。这里我用的是localStorage。localStorage与cookie的区别如下:
① cookie在浏览器与服务器之间来回传递。
sessionStorage和localStorage不会把数据发给服务器,仅在本地保存
②数据有效期不同:
cookie只在设置的cookie过期时间之前一直有效,即使窗口或浏览器关闭。
sessionStorage:仅在当前浏览器窗口关闭前有效。
localStorage 始终有效,长期保存。
③cookie数据还有路径的概念,可以限制cookie只属于某个路径下。
存储大小也不同,cookie数据不能超过4k,sessionStorage和localStorage 虽然也有存储大小的限制,但比cookie大得多,可以达到5M或更大。
④ 作用域不用
sessionStorage不在不同的浏览器窗口中共享;
localStorage在所有同源窗口中都是共享的;
cookie也是在所有同源窗口中都是共享的;
WebStorage 支持事件通知机制,可以将数据更新的通知发送给监听者。Web Storage 的 api 接口使用更方便。
用localstage存储json的实例:
将json取出来:
为什么说能使用html/css解决的问题就不要使用JS呢?两个字,因为简单。简单就意味着更快的开发速度,更小的维护成本,同时往往具有更好的体验,下面介绍几个实例。
导航高亮是一种很常见的问题,包括当前页面的导航在菜单里面高亮和hover时高亮。你可以用js控制,但是用一点CSS技巧就可以达到这个目的,不需要使用JS。
![]()
![]()
在正常态时,每个导航的默认样式为:
JavaScript自推出后就大受开发者的青睐,基于JavaScript的开发工具(这里包含大量的JS开发资源,包括前端、框架、通用类等)不计其数,开发者们可以灵活选择,轻松构建应用。本文分享了十款的JavaScript开发工具,喜欢的话就赶紧mark!
蓝蓝 http://www.lanlanwork.com