首页

js获取video任意时间的画面截图

seo达人

如果您想订阅本博客内容,每天自动发到您的邮箱中, 请点这里

首先就是要把视频加载出来,然后使用canvas.getContext(‘2d’).drawImage(videoElement, 0, 0, canvas.width, canvas.height);获取到当前视频时间的截图,需要不同时间的video视频图,设置video的currentTime(单位秒),然后videoElement这个对象信息会实时更新。

如果是视频是在阿里云OSS上就更方便了,poster=“http://a-image-demo.oss-cn-qingdao.aliyuncs.com/demo.mp4?x-oss-process=video/snapshot,t_6000,m_fast”

如果是要获取上传本地视频预览图,可采用下面的方法,但有兼容性问题,目前测试移动端安卓机只有Chrome浏览器支持,微信和QQ浏览器都无法响应本地视频的canplay事件。

<div contenteditable="true" id="in-box" style="width:1000px;margin: 20px auto;"></div>
<div style="width:1000px;margin: 20px auto;">        
   <input type="file" name="" accept="video/*" id="upload-ipt">
   <div class="review" id="out-box"></div>
</div>

function getVideoImage() {
    var obj_file = document.getElementById("upload-ipt");
    var file = obj_file.files[0];
    var blob = new Blob([file]), // 文件转化成二进制文件
        url = URL.createObjectURL(blob); //转化成url
    if (file && /video/g.test(file.type)) {
        var $video = $('<div><video controls src="' + url + '"></video></div><div>&nbsp;</div>');
        //后面加一个空格div是为了解决在富文本中按Backspace时删除无反应的问题
        $('#in-box').html($video);
        var videoElement = $("video")[0];
        videoElement.addEventListener("canplay", function (_event) {
            var canvas = document.createElement("canvas");                    
            canvas.width = videoElement.videoWidth;
            canvas.height = videoElement.videoHeight;
            console.log(videoElement.videoWidth)
            canvas.getContext('2d').drawImage(videoElement, 0, 0, canvas.width, canvas.height);
            var img = document.createElement("img");
            img.src = canvas.toDataURL("image/png");
            $("#out-box").html(img);
            URL.revokeObjectURL(this.src); // 释放createObjectURL创建的对象
            console.log("loadedmetadata")
        });
    }else{
        alert("请上传一个视频文件!");
        obj_file.value = ""
    }
};
蓝蓝设计www.lanlanwork.com )是一家专注而深入的界面设计公司,为期望卓越的国内外企业提供卓越的UI界面设计、BS界面设计 、 cs界面设计 、 ipad界面设计 、 包装设计 、 图标定制 、 用户体验 、交互设计、 网站建设 平面设计服务

javascript对数组和json数组的操作

seo达人

如果您想订阅本博客内容,每天自动发到您的邮箱中, 请点这里

<!DOCTYPE html>
<html lang="en">
<head>
    <meta charset="UTF-8">
    <title>javascript数组操作</title>
    <script type="application/javascript" src="lib/jquery.min.js"></script>
</head>
<body>
<h2>javascript操作数组</h2>
<input type="button" value="js数组" "jsArrays();">
<br>
<input type="button" value="json数组1" "jsonArrays();">
</body>
<script type="application/javascript">
//数组操作
    function jsArrays() {
    //创建一个javascript数组
        var a=new Array();
        a.push('a');
        a.push('b');
        a.push('c');
        //往数组添加三个元素
        alert(a);
        //利用indexof可以指出该元素在数组中所在位置
        alert('a index of a'+a.indexOf('a'));
        //利用jquery对数组进行便利
        $(a).each(function (index,row) {
            alert('index is '+index);
            alert('row is '+row);
        })
    }
    //json数组操作
    function jsonArrays() {
    //首先也是创建一个json数组
        var a=new Array();
        a.push({a:1});
        a.push({a:2});
        a.push({a:3});
        //同样的往数组添加三个元素
        //alert出的结果是[{object,object},{object,object},{object,object}]
        alert('a is '+a);
        //利用JSON的方法将json数组转换为字符串这时候alert的就是json字符串了
        alert(JSON.stringify(a));
        //直接获取json数组第一个元素的值,此时知道json的key是a
        alert(a[0].a);
        //遍历json数组第一个元素的key,这时候可以alert出的结果是a,同样的可以得出对应的value
        for(var key in a[1]){
            alert('key is '+key);
            alert('value is '+a[0][key]);
        }
        //用jquery对json数组进行遍历
        $(a).each(function (index,row) {
            for(var key in row){
                alert('each key is '+key);
                alert('each value is '+row[key]);
            }
        })
    }
</script>
</html>
蓝蓝设计www.lanlanwork.com )是一家专注而深入的界面设计公司,为期望卓越的国内外企业提供卓越的UI界面设计、BS界面设计 、 cs界面设计 、 ipad界面设计 、 包装设计 、 图标定制 、 用户体验 、交互设计、 网站建设 平面设计服务

调试移动端网页工具Weinre使用整理

seo达人

一、Weinre 说明


Weinre的本意是Web Inspector Remote,它是一种远程调试工具。功能与Firebug、Webkit inspector类似,可以帮助我们即时更改页面元素、样式,调试JS等。


使用Weinre工具,Weinre的本意是Web Inspector Remote,它是一种远程调试工具:


1.它可以将远程的页面经过代理在PC上调试页面元素、样式,JS。


2.可以监听页面内部的Ajax请求等。


3.可以监听页面加载成功时候的Console控制台输出


官网首页:http://people.apache.org/~pmuellr/weinre/docs/latest/


Weinre的原理


三个端的含义:客户端(client):本地的WebInspector,远程调试客户端。服务端(agent):本地的HTTPServer,为目标页面与客户端建立通信。目标页面(target):被调试的页面,页面已嵌入weinre的远程js。


调试过程:


客户端将指令(请求DOM、执行js)post到代理服务端,目标页面定时(大概5s)从服务端get指令,然后将结果post回服务端,最终客户端定时从服务端get结果。


PS:由于Weinre的客户端是基于Web Inspector开发,而Web Inspector只兼容WebKit核心的浏览器,所以只能在Chrome/Safari浏览器打开Weinre客户端进行调试。


二、Weinre安装和使用


1.weinre是基于NodeJs,因此首先要安装NodeJs,然后使用npm命令安装weinre


npm -g install weinre

2.运行,启动weinre服务器,默认端口8080


node.exe node_modules\weinre\weinre --boundHost -all-

node.exe node_modules\weinre\weinre --boundHost  192.168.1.125 

在windows下,系统防火墙可能会弹出是否允许其访问网络的提示,点击充许即可。

3.从浏览器访问,http://localhost:8080,或者,http://192.168.1.125:8080,显示如下表示启动服务器监视成功


三、Weinre需要监听调试的Web页面配置处理


1.在所有页面引入js文件


2.特别说明,当前js文件的域名需要指定为本机的IP地址,因为在手机模拟器中无法访问电脑‘localhost’


更多:


cordova-plugin-whitelist 协议白名单配置整理 


VS Code插件安装位置


Visual Studio Code插件之Atom One Dark Syntax Theme


相关参考文章:


http://blog.csdn.net/freshlover/article/details/42640253


http://www.cnblogs.com/diva/p/3995674.html

蓝蓝设计www.lanlanwork.com )是一家专注而深入的界面设计公司,为期望卓越的国内外企业提供卓越的UI界面设计、BS界面设计 、 cs界面设计 、 ipad界面设计 、 包装设计 、 图标定制 、 用户体验 、交互设计、 网站建设 平面设计服务

豆瓣API实践项目-前言-0

seo达人

如果您想订阅本博客内容,每天自动发到您的邮箱中, 请点这里

这是一个 app从获取获取数据 用于显示的经典实践项目,数据来源于 豆瓣官方公开的api接口:https://developers.douban.com/wiki/?title=movie_v2


先上图:


项目使用了如下第三方library:

下拉刷新:Android-PullToRefresh

网络数据加载:android-async-http

图片加载:universal-image-loader


后面的博客,会把项目的制作流程发出来

豆瓣API实践项目-前言-0(可下载源码): http://blog.csdn.net/mario_faker/article/details/79618210

豆瓣API实践项目-数据api接口-1:http://blog.csdn.net/mario_faker/article/details/79618235

豆瓣API实践项目-搭建项目基本框架-2:http://blog.csdn.net/mario_faker/article/details/79618245

豆瓣API实践项目-导入第三方library-3:http://blog.csdn.net/mario_faker/article/details/79618261

豆瓣API实践项目-单页细讲4: http://blog.csdn.net/mario_faker/article/details/79618272

豆瓣API实践项目-apk打包:http://blog.csdn.net/mario_faker/article/details/79618291


项目源代码下载地址:

http://download.csdn.net/download/mario_faker/10253201

或github:https://github.com/MarioFaker/DBMovie

蓝蓝设计www.lanlanwork.com )是一家专注而深入的界面设计公司,为期望卓越的国内外企业提供卓越的UI界面设计、BS界面设计 、 cs界面设计 、 ipad界面设计 、 包装设计 、 图标定制 、 用户体验 、交互设计、 网站建设 平面设计服务

Android5.0以后,materialDesign风格的加阴影和裁剪效果

seo达人

如果您想订阅本博客内容,每天自动发到您的邮箱中, 请点这里

5.0以后,materialDesign风格,出现了立体这种概念,高光,阴影,也就是Z轴,凸显层次;同时,裁剪view也变得方便简单了很多。
1,先说说阴影的实现。
方案1:在xml中设置 
xml中设置有两个方式,android:elevation="2dp" 
android:translationZ="2dp"这两句代码是可以同时并存的,而且是叠加的效果;当然只使用其中一个属性进行z轴的阴影设置也是OK的。

方案2:在代码中设置 
(下面说这个实现方式,其实就是轮廓的实现)

设置阴影,有一个需要注意的地方:
①:view的大小要比它的父布局小,才会有阴影效果,如果相同大小,是看不到阴影效果的; 
②:给图片设置阴影的时候,如果这种图片的background属性是shape,那直接通过xml设置阴影是OK的,但是,如果是一张png或者其他格式的图片,直接通过xml设置android:elevation="2dp" 
android:translationZ="2dp"阴影是看不到效果的,得通过其他代码设置才行。。。**

2,view的轮廓,轮廓其实也是阴影
默认情况下,所有的view都是矩形的,虽然可以给view设置背景圆形的图片,即可以在界面显示出圆形的内容,但是view的大小实际上依然是矩形,并且设置的图片实际上也是矩形的,只是圆形以外的区域是透明色。 
如果根据view大小来生成对应的阴影,就会出现很奇怪的效果,(一个看起来圆形的view展示出的确实一个矩形的阴影)我了解决这个问题,view增加了一个新的描述来指明内容显示的形状,这就是 轮廓

轮廓的实现
①通过shape设置的背景,view会自动根据shape的形状进行轮廓判定,
②通过color设置的背景,view默认其轮廓和view的大小一样。
③但是通过图片进行背景设置,view则无法获知轮廓的形状,这个时候就需要手动进行指定了。
1
2
3
一:在xml中可以通过android:outlineProvider来指定轮廓的判定方式: 
1,none即使设置了Z属性,也不会显示阴影 
2,background会按照背景来设置阴影形状 
3,bounds会按照view的大小来描绘阴影

**对于①和②这种情况,也是可以通过设置`android:outlineProvider`
来改变阴影的形状以及轮廓外观的。**

对于③这种背景是一张png或者其他格式的图片的情况,
`android:outlineProvider=“background”`
是没有效果的,属性设置成`android:outlineProvider=bounds`
虽然也是有效果的,但是阴影轮廓是一个方形的轮廓,
并不是我们想要的效果了。

不设置`android:outlineProvider`属性就更没有效果了。
1
2
3
4
5
6
7
8
9
10
对于这种使用了png图片作为背景的view加阴影轮廓的时候情况解决办法也非常简单,解决办法就是:
就通过Java代码设置,也就是说,一个圆形的png图(我们知道,看起来是圆形的,
但是它其实还是方形的图片,只是圆形之外的区域是透明不可见的),
 通过Java代码设置轮廓,就会显示出圆形的阴影轮廓了。
1
2
3
具体实现,继续看: 
二:在代码中,课通过setOutlineProvider来指定一个view的轮廓。 
对于③这种情况在代码中设置轮廓才会有效果。

TextView textView= findViewById(R.id.tv);
ViewOutlineProvider viewOutlineProvider=new ViewOutlineProvider() {
            @Override
            public void getOutline(View view, Outline outline) {
         //x,y轴表示位置,后两个参数表示长,宽 
               outline.setOval(0,0,textView.getWidth(),textView.getHeight());
            }
        };
textView.setOutlineProvider(viewOutlineProvider);
1
2
3
4
5
6
7
8
9
强调:
如果采用圆形图片作为背景,即使在xml布局中指定android:outlineProvider=“background”,也不会显示阴影,设置为android:outlineProvider=bounds,虽然也有效果,但是效果很差,所以一般都是通过代码来指定轮廓显示。

1,一个shape圆形作为背景,设置阴影,设置android:outlineProvider的4种属性的效果:


2,一个圆形png作为背景,设置阴影,设置android:outlineProvider的4种属性的效果:


3,一个png作为背景,设置阴影,通过代码设置的效果:


3,view的裁剪
裁剪,默认的ImageView是矩形的,很多时候,需要的是圆角的ImageView或者圆形的ImageView,这就需要裁剪view了。

实现,裁剪圆形:

final TextView textView= findViewById(R.id.tv);

ViewOutlineProvider viewOutlineProvider=new ViewOutlineProvider() {
            @Override
            public void getOutline(View view, Outline outline) {
                //设置圆形oval
                outline.setOval(0,0,textView.getWidth(),textView.getHeight());
            }
        };
//设置裁剪
textView.setClipToOutline(true);
1
2
3
4
5
6
7
8
9
10
11
实现,裁剪圆角矩形:

final TextView textView= findViewById(R.id.tv);

ViewOutlineProvider viewOutlineProvider=new ViewOutlineProvider() {
            @Override
            public void getOutline(View view, Outline outline) {
                //设置圆角矩形
               outline.setRoundRect(0,0,view.getWidth(),view.getHeight(),25);
            }
        };
textView.setOutlineProvider(viewOutlineProvider);
//设置裁剪
蓝蓝设计www.lanlanwork.com )是一家专注而深入的界面设计公司,为期望卓越的国内外企业提供卓越的UI界面设计、BS界面设计 、 cs界面设计 、 ipad界面设计 、 包装设计 、 图标定制 、 用户体验 、交互设计、 网站建设 平面设计服务

TabLayout 全面总结

seo达人

如果您想订阅本博客内容,每天自动发到您的邮箱中, 请点这里

一、简介

TabLayout提供了一个水平布局用于展示tabs,继承自HorizontalScrollView。一般与Viewpager结合使用实现页面和标签联动的效果,是时下APP中非常常用的一个控件


二、基本用法

  1. 添加design依赖

    compile 'com.android.support:design:25.3.1'

    1
  2. xml引用
  3. xml中添加tab

    <android.support.design.widget.TabLayout

        android:id="@+id/tab_layout"

        android:layout_width="match_parent"

        android:layout_height="wrap_content">

        <android.support.design.widget.TabItem

            android:layout_width="wrap_content"

            android:layout_height="wrap_content"

            android:text="Tab1"/>

        <android.support.design.widget.TabItem

            android:layout_width="wrap_content"

            android:layout_height="wrap_content"

            android:text="Tab2"/>

        <android.support.design.widget.TabItem

            android:layout_width="wrap_content"

            android:layout_height="wrap_content"

            android:text="Tab3"/>

        <android.support.design.widget.TabItem

            android:layout_width="wrap_content"

            android:layout_height="wrap_content"

            android:text="Tab4"/>

    </android.support.design.widget.TabLayout>

    1

    2

    3

    4

    5

    6

    7

    8

    9

    10

    11

    12

    13

    14

    15

    16

    17

    18

    19

    20

    21
  4. 代码中添加tab

    <android.support.design.widget.TabLayout

        android:id="@+id/tab_layout"

        android:layout_width="match_parent"

        android:layout_height="wrap_content">

    </android.support.design.widget.TabLayout>

    1

    2

    3

    4

    5

    // tablayout,Tab是TabLayout的内部类,且Tab的构造方法是包访问权限

    TabLayout tabLayout = (TabLayout) findViewById(R.id.tab_layout);

    tabLayout.addTab(tabLayout.newTab().setText("Tab1"));

    tabLayout.addTab(tabLayout.newTab().setText("Tab2"));

    tabLayout.addTab(tabLayout.newTab().setText("Tab3"));

    tabLayout.addTab(tabLayout.newTab().setText("Tab4"));

    1

    2

    3

    4

    5

    6


    三、属性详解

    <declare-styleable name="TabLayout">

        <!--指示器颜色-->

        <attr name="tabIndicatorColor" format="color"/>

        <!--指示器高度-->

        <attr name="tabIndicatorHeight" format="dimension"/>

        <!--tabs距TabLayout开始位置的偏移量,但app:tabMode="scrollable"才生效-->

        <attr name="tabContentStart" format="dimension"/>

        <!--仅是Tab背景,设置TabLayout背景用android:background-->

        <attr name="tabBackground" format="reference"/>

        <!--默认fixed,所有Tab只能在屏幕内显示,超出会被挤压;scrollable,tab数量多会超出屏幕,可滑动-->

        <attr name="tabMode">

            <enum name="scrollable" value="0"/>

            <enum name="fixed" value="1"/>

        </attr>

        <!--默认fill,tab填满TabLayout,但tabMode=“fixed”才生效;center,tabs位于TabLayout的中间-->

        <attr name="tabGravity">

            <enum name="fill" value="0"/>

            <enum name="center" value="1"/>

        </attr>

        <!--Tab的最小宽度-->

        <attr name="tabMinWidth" format="dimension"/>

        <!--Tab的最大宽度-->

        <attr name="tabMaxWidth" format="dimension"/>

        <!--Tab文本设置样式-->

        <attr name="tabTextAppearance" format="reference"/>

        <!--Tab未选中字体颜色-->

        <attr name="tabTextColor" format="color"/>

        <!--Tab选中字体颜色-->

        <attr name="tabSelectedTextColor" format="color"/>

        <!--Tab内填充相关-->

        <attr name="tabPaddingStart" format="dimension"/>

        <attr name="tabPaddingTop" format="dimension"/>

        <attr name="tabPaddingEnd" format="dimension"/>

        <attr name="tabPaddingBottom" format="dimension"/>

        <attr name="tabPadding" format="dimension"/>

    </declare-styleable>

    1

    2

    3

    4

    5

    6

    7

    8

    9

    10

    11

    12

    13

    14

    15

    16

    17

    18

    19

    20

    21

    22

    23

    24

    25

    26

    27

    28

    29

    30

    31

    32

    33

    34

    35

    36

    使用示例


     <android.support.design.widget.TabLayout

        android:id="@+id/tab_layout"

        android:layout_width="match_parent"

        android:layout_height="wrap_content"

        app:tabIndicatorColor="@color/colorPrimaryDark"

        app:tabIndicatorHeight="2dp"

        app:tabContentStart="50dp"

        app:tabBackground="@color/colorAccent"

        app:tabMode="scrollable"

        app:tabGravity="fill"

        app:tabTextAppearance="@style/MyTabTextAppearance"

        app:tabTextColor="@android:color/black"

        app:tabSelectedTextColor="@android:color/white"/>

    1

    2

    3

    4

    5

    6

    7

    8

    9

    10

    11

    12

    13

    <style name="MyTabTextAppearance" parent="TextAppearance.Design.Tab">

        <item name="textAllCaps">false</item>

        <item name="android:textSize">18sp</item>

    </style>

    1

    2

    3

    4


    四、图文混排,Tab中添加图片
  5. 通过SpannableString设置图片

    @NonNull

    private SpannableString setImageSpan(String string,int drawableId) {

        SpannableString ss = new SpannableString("  "+string);

        Drawable drawable = ContextCompat.getDrawable(this, drawableId);

        drawable.setBounds(0,0,drawable.getIntrinsicWidth(),drawable.getIntrinsicHeight());

        ImageSpan imageSpan = new ImageSpan(drawable);

        ss.setSpan(imageSpan,0,1, Spanned.SPAN_INCLUSIVE_EXCLUSIVE);

        return ss;

    }

    1

    2

    3

    4

    5

    6

    7

    8

    9

    TabLayout tabLayout = (TabLayout) findViewById(R.id.tab_layout);

    tabLayout.addTab(tabLayout.newTab().setText(setImageSpan("Tab1",R.drawable.ic_home)));

    tabLayout.addTab(tabLayout.newTab().setText(setImageSpan("Tab2",R.drawable.ic_info)));

    ……

    1

    2

    3

    4


    我们会发现个问题,通过ImageSpan设置的图片和文字没有对齐,先百度到一个可用方法解决:重写ImageSpan的draw()方法


    package com.strivestay.tablayoutdemo;


    import android.graphics.Bitmap;

    import android.graphics.Canvas;

    import android.graphics.Paint;

    import android.graphics.drawable.Drawable;

    import android.support.annotation.NonNull;

    import android.text.style.ImageSpan;


    public class CenterImageSpan extends ImageSpan {

        public CenterImageSpan(Drawable drawable) {

            super(drawable);


        }


        public CenterImageSpan(Bitmap b) {

            super(b);

        }


        @Override

        public void draw(@NonNull Canvas canvas, CharSequence text, int start, int end, float x, int top, int y, int bottom,

                         @NonNull Paint paint) {


            Drawable b = getDrawable();

            Paint.FontMetricsInt fm = paint.getFontMetricsInt();

            int transY = (y + fm.descent + y + fm.ascent) / 2 - b.getBounds().bottom / 2;//计算y方向的位移

            canvas.save();

            canvas.translate(x, transY);//绘制图片位移一段距离

            b.draw(canvas);

            canvas.restore();

        }

    }

    1

    2

    3

    4

    5

    6

    7

    8

    9

    10

    11

    12

    13

    14

    15

    16

    17

    18

    19

    20

    21

    22

    23

    24

    25

    26

    27

    28

    29

    30

    31

    32

    33

    将上面的ImageSpan替换为现在的CenterImageSpan,即可实现图文混排时对齐


  6. 通过Tab.setCustomView()设置图片
  7. 自定义view布局

    <?xml version="1.0" encoding="utf-8"?>

    <LinearLayout

        xmlns:android="http://schemas.android.com/apk/res/android"

        android:layout_width="wrap_content"

        android:layout_height="wrap_content"

        android:orientation="vertical"

        android:gravity="center">

        <ImageView

            android:id="@+id/iv"

            android:layout_width="wrap_content"

            android:layout_height="wrap_content"

            android:src="@drawable/ic_home"/>

        <TextView

            android:id="@+id/tv"

            android:layout_width="wrap_content"

            android:layout_height="wrap_content"

            android:layout_margin="2dp"

            android:textSize="16sp"

            android:text="首页"/>

    </LinearLayout>

    1

    2

    3

    4

    5

    6

    7

    8

    9

    10

    11

    12

    13

    14

    15

    16

    17

    18

    19

    20
  8. 代码设置

     TabLayout tabLayout = (TabLayout) findViewById(R.id.tab_layout);

    tabLayout.addTab(tabLayout.newTab().setCustomView(setCustomView(R.drawable.ic_home,"首页")));

    tabLayout.addTab(tabLayout.newTab().setCustomView(setCustomView(R.drawable.ic_info,"资讯")));

    tabLayout.addTab(tabLayout.newTab().setCustomView(setCustomView(R.drawable.ic_live,"直播")));

    tabLayout.addTab(tabLayout.newTab().setCustomView(setCustomView(R.drawable.ic_me,"我")));

    1

    2

    3

    4

    5

     private View setCustomView(int drawableId,String tabText) {

        View view = View.inflate(this, R.layout.item_tab, null);

        ImageView iv = (ImageView) view.findViewById(R.id.iv);

        TextView tv = (TextView) view.findViewById(R.id.tv);

        iv.setImageResource(drawableId);

        tv.setText(tabText);

        return view;

    }

    1

    2

    3

    4

    5

    6

    7

    8


    五、TabLayout与Viewpager联动
  9. xml设置TabLayout和Viewpager

    第一种:TabLayout放置在Viewpager的上方,放在AppbarLayout中会有阴影效果


    <?xml version="1.0" encoding="utf-8"?>

    <android.support.design.widget.CoordinatorLayout

        xmlns:android="http://schemas.android.com/apk/res/android"

        xmlns:app="http://schemas.android.com/apk/res-auto"

        xmlns:tools="http://schemas.android.com/tools"

        android:id="@+id/main_content"

        android:layout_width="match_parent"

        android:layout_height="match_parent"

        android:fitsSystemWindows="true"

        tools:context="com.strivestay.tablayoutdemo.MainActivity">


        <android.support.design.widget.AppBarLayout

            android:id="@+id/appbar"

            android:layout_width="match_parent"

            android:layout_height="wrap_content"

            android:paddingTop="@dimen/appbar_padding_top"

            android:theme="@style/AppTheme.AppBarOverlay">


            <android.support.v7.widget.Toolbar

                android:id="@+id/toolbar"

                android:layout_width="match_parent"

                android:layout_height="?attr/actionBarSize"

                android:background="?attr/colorPrimary"

                app:layout_scrollFlags="scroll|enterAlways"

                app:popupTheme="@style/AppTheme.PopupOverlay">


            </android.support.v7.widget.Toolbar>


            <android.support.design.widget.TabLayout

                android:id="@+id/tab_layout"

                android:layout_width="match_parent"

                android:layout_height="wrap_content"

                app:tabIndicatorColor="@color/colorAccent"

                app:tabIndicatorHeight="2dp"

                app:tabBackground="@android:color/white"

                app:tabTextAppearance="@style/MyTabTextAppearance"

                app:tabTextColor="@android:color/black"

                app:tabSelectedTextColor="@android:color/holo_blue_light">

            </android.support.design.widget.TabLayout>


        </android.support.design.widget.AppBarLayout>


        <android.support.v4.view.ViewPager

            android:id="@+id/container"

            android:layout_width="match_parent"

            android:layout_height="match_parent"

            app:layout_behavior="@string/appbar_scrolling_view_behavior"/>


        <android.support.design.widget.FloatingActionButton

            android:id="@+id/fab"

            android:layout_width="wrap_content"

            android:layout_height="wrap_content"

            android:layout_gravity="end|bottom"

            android:layout_margin="@dimen/fab_margin"

            app:srcCompat="@android:drawable/ic_dialog_email"/>


    </android.support.design.widget.CoordinatorLayout>

    1

    2

    3

    4

    5

    6

    7

    8

    9

    10

    11

    12

    13

    14

    15

    16

    17

    18

    19

    20

    21

    22

    23

    24

    25

    26

    27

    28

    29

    30

    31

    32

    33

    34

    35

    36

    37

    38

    39

    40

    41

    42

    43

    44

    45

    46

    47

    48

    49

    50

    51

    52

    53

    54

    55

    56

    57

    58


    第二种:TabLayout直接放在Viewpager,无阴影


    <android.support.v4.view.ViewPager

        android:id="@+id/container"

        android:layout_width="match_parent"

        android:layout_height="match_parent"

        app:layout_behavior="@string/appbar_scrolling_view_behavior">

        <android.support.design.widget.TabLayout

            android:id="@+id/tab_layout"

            android:layout_width="match_parent"

            android:layout_height="wrap_content"

            app:tabIndicatorColor="@color/colorAccent"

            app:tabIndicatorHeight="2dp"

            app:tabBackground="@android:color/white"

            app:tabTextAppearance="@style/MyTabTextAppearance"

            app:tabTextColor="@android:color/black"

            app:tabSelectedTextColor="@android:color/holo_blue_light">

        </android.support.design.widget.TabLayout>

    </android.support.v4.view.ViewPager>

    1

    2

    3

    4

    5

    6

    7

    8

    9

    10

    11

    12

    13

    14

    15

    16

    17


  10. 为Viewpager创建适配器

    /

      fragment

     
    /

    public static class PlaceholderFragment extends Fragment {

        private static final String ARG_SECTION = "section";


        public PlaceholderFragment() {

        }


        public static PlaceholderFragment newInstance(String section) {

            PlaceholderFragment fragment = new PlaceholderFragment();

            Bundle args = new Bundle();

            args.putString(ARG_SECTION, section);

            fragment.setArguments(args);

            return fragment;

        }


        @Override

        public View onCreateView(LayoutInflater inflater, ViewGroup container,

                                 Bundle savedInstanceState) {

            View rootView = inflater.inflate(R.layout.fragment_main, container, false);

            TextView textView = (TextView) rootView.findViewById(R.id.section_label);

            textView.setText(getArguments().getString(ARG_SECTION));

            return rootView;

        }

    }


    /


      pagerAdapter

     
    /

    public class SectionsPagerAdapter extends FragmentPagerAdapter {

        String[] tabs = {"首页","资讯","直播","我"};


        public SectionsPagerAdapter(FragmentManager fm) {

            super(fm);

        }


        @Override

        public Fragment getItem(int position) {

            return PlaceholderFragment.newInstance(tabs[position]);

        }


        @Override

        public int getCount() {

            return tabs.length;

        }


        @Override

        public CharSequence getPageTitle(int position) {

            return tabs[position];

        }

    }

    1

    2

    3

    4

    5

    6

    7

    8

    9

    10

    11

    12

    13

    14

    15

    16

    17

    18

    19

    20

    21

    22

    23

    24

    25

    26

    27

    28

    29

    30

    31

    32

    33

    34

    35

    36

    37

    38

    39

    40

    41

    42

    43

    44

    45

    46

    47

    48

    49

    50

    51

    52

    主要是重写getPageTitle()方法


  11. 代码设置 TabLayout和Viewpager绑定

     // tablayout

    TabLayout tabLayout = (TabLayout) findViewById(R.id.tab_layout);


    // vp

    mViewPager = (ViewPager) findViewById(R.id.container);

    mSectionsPagerAdapter = new SectionsPagerAdapter(getSupportFragmentManager());

    mViewPager.setAdapter(mSectionsPagerAdapter);


    // 绑定,要在viewpager设置完数据后,调用此方法,否则不显示 tabs文本

    tabLayout.setupWithViewPager(mViewPager);

    1

    2

    3

    4

    5

    6

    7

    8

    9

    10

    调用setupWithViewPager()方法,则使用TabLayout.addtab()方法无效,TabLayout会清除之前添加的所有tabs,并将根据Viewpager的页数添加Tab,Tab标题为对应页通过getPageTitle()返回的文本


  12. 图文混排
  13. 同上,使用SpannableString

    修改Adapter如下:


    /*

     
    pagerAdapter

     */

    public class SectionsPagerAdapter extends FragmentPagerAdapter {


        String[] tabs = {"首页","资讯","直播","我"};

        int[] imgs = {R.drawable.ic_home,R.drawable.ic_info,R.drawable.ic_live,R.drawable.ic_me};


        public SectionsPagerAdapter(FragmentManager fm) {

            super(fm);

        }


        @Override

        public Fragment getItem(int position) {

            return PlaceholderFragment.newInstance(tabs[position]);

        }


        @Override

        public int getCount() {

            return tabs.length;

        }


        @Override

        public CharSequence getPageTitle(int position) {

    //            return tabs[position];

            return setImageSpan(tabs[position],imgs[position]);

        }

    }

    1

    2

    3

    4

    5

    6

    7

    8

    9

    10

    11

    12

    13

    14

    15

    16

    17

    18

    19

    20

    21

    22

    23

    24

    25

    26

    27

    28

    setImageSpan()方法同上


  14. 同上,使用Tab.setCustomView()

    修改pagerAdapter如下:


    /

      pagerAdapter

     
    /

    public class SectionsPagerAdapter extends FragmentPagerAdapter {


        String[] tabs = {"首页","资讯","直播","我"};

        int[] imgs = {R.drawable.ic_home,R.drawable.ic_info,R.drawable.ic_live,R.drawable.ic_me};


        public SectionsPagerAdapter(FragmentManager fm) {

            super(fm);

        }


        @Override

        public Fragment getItem(int position) {

            return PlaceholderFragment.newInstance(tabs[position]);

        }


        @Override

        public int getCount() {

            return tabs.length;

        }


        @Override

        public CharSequence getPageTitle(int position) {

    //            return tabs[position];

    //            return setImageSpan(tabs[position],imgs[position]);

            return null;

        }


        /


          设置自定义view

         
    @param position

          @return

         
    /

        public View setCustomView(int position) {

            View view = View.inflate(getApplicationContext(), R.layout.item_tab, null);

            ImageView iv = (ImageView) view.findViewById(R.id.iv);

            TextView tv = (TextView) view.findViewById(R.id.tv);

            iv.setImageResource(imgs[position]);

            tv.setText(tabs[position]);

            return view;

        }

    }

    1

    2

    3

    4

    5

    6

    7

    8

    9

    10

    11

    12

    13

    14

    15

    16

    17

    18

    19

    20

    21

    22

    23

    24

    25

    26

    27

    28

    29

    30

    31

    32

    33

    34

    35

    36

    37

    38

    39

    40

    41

    42

    43

    代码修改如下:


    …………

    // 绑定,要在viewpager设置完数据后,调用此方法,否则不显示 tabs文本

    tabLayout.setupWithViewPager(mViewPager);


    // 为绑定viewpager后的TabLayout的tabs设置自定义view

    for (int i = 0; i < mSectionsPagerAdapter.getCount(); i++) {

        tabLayout.getTabAt(i).setCustomView(mSectionsPagerAdapter.setCustomView(i));

    }

    1

    2

    3

    4

    5

    6

    7

    8

    发现问题:我使用的仍然是上面的item_tab,但是只显示图片,不显示文字如下


    翻了翻源码,也没发现有对Tab的标题有特别的设置;后来,就感觉是不是颜色问题,给item_tab中的textview加上属性android:textColor="@android:color/black",就显示出来了


    六、FlycoTabLayout

    这是一个不错的TabLayout开源项目,效果挺好,可以了解一下。


    蓝蓝设计www.lanlanwork.com )是一家专注而深入的界面设计公司,为期望卓越的国内外企业提供卓越的UI界面设计、BS界面设计 、 cs界面设计 、 ipad界面设计 、 包装设计 、 图标定制 、 用户体验 、交互设计、 网站建设 平面设计服务

jQuery中的Ajax操作

seo达人

如果您想订阅本博客内容,每天自动发到您的邮箱中, 请点这里

jQuery对Ajax操作进行了封装,常用的方法包括 $.get(),$.post(),$.ajax()。 
分别对其进行介绍

$.get()
$.get()方法使用GET方式来进行异步请求。
$.get()结构
$.get(url,[. data][. callback][. type])
1
$.get()方法参数解释
参数名称 类型 说明
url String 请求的HTML页的url地址
data(可选) Object 发送至服务器的key/value数据会作为QueryString附加到请求的url中
callback(可选) Function 载入成功时回调函数(只有当Response的返回状态是success才调用该方法)自动将请求结果和状态传递给该方法
type(可选) String 服务器端返回内容的格式,包括xml、html、script、json、text和_default
示例 
json数据:data.json(后面的$.post()和$.ajax()方法都用这个数据)
{
    "name":"龙猫",
    "hobby":"睡觉",
    "friend":"加菲猫"
}

jq_get.html

<!DOCTYPE html>
<html lang="en">
<head>
    <meta charset="UTF-8">
    <title>Document</title>

</head>
<body>
    <input type="button" value="$.get方法" id="jQget">
    <div id="content"></div>
</body>
</html>
<!-- 导入jquery.js文件 -->
<script type="text/javascript" src="js/jquery.min.js"></script>
<script type="text/javascript">
    $(function(){
        $('#jQget').on('click',function(){

            /*

            参数1:url
                参数2:发送的数据 支持 直接写js对象的方式
                参数3:回调函数
                参数4:从服务端获取的 数据类型 可以不写
                注意
                    如果type 为json 
                        并且服务端返回的就是 json格式字符串
                        jq内部 会帮助我们自动转化
                        在回调函数中 获取的 实参 就是转化完成的 js对象 直接使用即可

                参数的 顺序 是更换的
                    但是 如果 把data 放到后面 会出现 无法传递数据的问题,
                    所以 不要擅自更换 严格按照 jq文档中的 顺序 进行使用
            */
            $.get('jq_get.php',{name:"jack",age:18},function(data){
                    console.log(data);

                    $('#content').html('name:'+data.name+'<br>'+'hobby:'+data.hobby+'<br>'+'friend:'+data.friend); 

            },'json');
        });

    });
</script>

jq_get.php (后面的$.post()和$.ajax()方法都用这个页面的内容,只是在html请求时分别对应的php页面)

<?php
    header('content-type:text/html;charset=utf-8');
    echo file_get_contents('datas/data.json');
?>

结果展示: 


$.post()方法
  它与$.get()方法的结构和使用方式都相同,不过它们之间仍然有以下区别:

GET请求会将参数跟在URL后进行传递,而POST请求则是作为HTTP消息的实体内容发送个Web服务器,当然,在Ajax中,这种区别对用户是不可见的。
GET方式对传输的数据有大小限制(通常不能大于2KB),而使用POST方式传递的数据量要比GET方式大得多(理论上不受限制,但是可以在服务端进行限制)。
GET方式请求的数据会被浏览器缓存起来,因此其他人就可以从浏览器的历史记录中读取这些数据,例如账号和密码等。在某种情况下,GET方式会带来严重的安全性问题,而POST方式相对来说就可以避免这些问题。(但是也是不安全的,所以密码之类的还是要加密的)
GET方式和POST方式传递的数据在服务器的获取方式也不相同。在PHP中,GET方式数据可以用$_GET[]获取,而POST可以用$_POST[]获取、两种方式都可以用$_REQUEST[]来获取。 
其实这完全是对这篇文章中post()和get()方法不同的总结啊!(点击查看) 
$.post()演示
<script type="text/javascript" src="js/jquery.min.js"></script>
<script type="text/javascript">
    $(function(){
        $('#jQpost').on('click',function(){
            // 跟$.get用法及其类似
            /*
                参数1:url
                参数2:发送的数据 支持 直接写js对象的方式
                参数3:回调函数
                参数4:从服务端获取的 数据类型 可以不写,如果写为json jq内部 会帮我们进行一个 JSON.parse()的转化 
            */
             $.post('jq_post.php',{name:"kong",age:18},function(data){
                    console.log(data);
             },'json');
        });
    });
</script>

$.ajax()
$.ajax()方法是jQuery最底层的Ajax实现
其结构为
$.ajax(options)
1
该方法只有1个参数,但在这个对象里包含了$.ajax()方法所需要的请求设置以及回调函数等信息,参数以key/value的形式存在,所有参数都是可选的,只写几个常用的参数,如下:

参数名称 类型 说明
url String 请求的HTML页的url地址
type String 请求方式,默认GET。注意其他的HTTP请求方法,例如PUT和DELETE也可以使用,但仅部分浏览器支持
data Object或String 发送到服务器的数据,如果已经不是字符串,将自动转换为字符串格式。
dataType String 服务器端返回内容的格式,包括xml、html、script、json、jsonp 、jQuery
beforeSend Function 发送请求前可以修改XMLHttpRequest对象的函数,例如添加自定义HTTP头。在beforeSend中如果返回false可以取消本次Ajax请求。XMLHttpRequest对象的唯一参数。
success Function 请求成功后嗲用的回调函数,有两个参数。
(1)由服务器返回,并根据dataType参数进行处理后的数据。
(2)描述状态的字符串。
function(data,textStatus){
        //data可能是xmlDoc、jsonObj、html、text等等。
        this//调用本次Ajax请求时传递的options参数
  }
error Function 请求失败时被调用的函数,该函数有3个参数,即
XMLHttpRequest对象、错误信息、捕获的错误对象(可选)。
Ajax事件函数如下。
function(XMLHttpRequest,textStatus,errorThrown){//通常情况下textStatus和errorThown只有其中一个包含信息
this;//调用本次Ajax请求时传递的options参数
}
示例
<script type="text/javascript" src="js/jquery.min.js"></script>
<script type="text/javascript">
    $(function(){
        $('#jqAjax').on('click',function(){
    /*
                常见参数:
                    url:请求的地址
                    success:请求成功的回调函数
                    type:不写是get 可以指定 get,post
                    dataType:数据的类型
                    data:发数据 可以写js对象
                    beforeSend:发送之前调用的匿名函数
                        可以return false 阻止该次请求
                        验证用户的数据 是否填了
                    error:请求失败以后 会调用
            */
            $.ajax({
                url:'jq_ajax.php',
                success:function(data){
                    console.log(data);
                    $('#box').append(data.name+'<br>'+data.hobby);
                },
                type:'post',
                dataType:'json',
                data:{"name":"张信哲","skill":"情歌王子"},
                beforeSend:function(){
                    console.log('发送之前调用');
                },
                error:function(){
                    console.log('请求失败了');
                }
            });
        });

    });
</script>
--------------------- 
作者:diligentkong 
来源:CSDN 
原文:https://blog.csdn.net/diligentkong/article/details/72851443 
版权声明:本文为博主原创文章,转载请附上博文链接!
蓝蓝设计www.lanlanwork.com )是一家专注而深入的界面设计公司,为期望卓越的国内外企业提供卓越的UI界面设计、BS界面设计 、 cs界面设计 、 ipad界面设计 、 包装设计 、 图标定制 、 用户体验 、交互设计、 网站建设 平面设计服务

ionic用插件(cordova-plugin-baidumaplocation)定位并调百度地图在上面显示

seo达人

如果您想订阅本博客内容,每天自动发到您的邮箱中, 请点这里

之前研究了定位,想用百度地图,但是用百度地图的 
JavaScript API里面的浏览器定位根本不行,要用插件,很多人说本身带的这个cordova-plugin-geolocation插件因为网络问题,只有ios可以用,然后找到了专门针对安卓的cordova-qdc-baidu-location插件,但是这个插件不知道是不是我使用的问题,得到的数据可以弹出来,但是数据并不像这个插件所说的数据格式是

{
  latitude : 纬度,
  lontitude: 经度, ... }
    
  • 1
  • 2
  • 3
  • 4
  • 5

这样的,而是字符串,不是json字符串,弄了半天还是取不到里面的关于经纬度的值,然后发现了现在的这个定位插件cordova-plugin-baidumaplocation这个插件返回的数据格式是json的,可以直接获取。 
因为网络配代理的原因,一直添加不上插件,今天才发现用cordova-plugin-baidumaplocation插件定位其实挺简单的。 
1.申请AK值。 
地址:http://lbsyun.baidu.com/ 
需要申请两个或者三个(配置ios),一个是js的,一个是android的(三个的话还有一个ios的,但是这边直接只写安卓的,其实ios是一样的) 
注:包名要一致 
2.添加插件. 
命令:

cordova plugin add cordova-plugin-baidumaplocation --variable ANDROID_KEY="<API_KEY_ANDROID>" --variable IOS_KEY="<API_KEY_IOS>"
    
  • 1

注意:是没有<>这种尖括号的。 
到此为止准备工作基本上晚了,开始代码部分: 
1.引入百度地图:

<script type="text/javascript" src="http://api.map.baidu.com/api?v=2.0&ak=nLsK9qUii8uBZlkPAQUozAf9mR5xNVZF"></script>
    
  • 1

这个引入是为了转化经纬度为地址和显示地图。 
2.在html页面上写两个 标签:

<button class="button" ng-click="getarea()">点击我获取地址百度</button> <div id='allmap' style=""></div>
    
  • 1
  • 2

div标签是为了放地图的。 
3.js部分:

$scope.getarea=function(){ //myaddr(116.324499,39.899216); // 进行定位 baidumap_location.getCurrentPosition(function (result) { var latitude=result.latitude; var lontitude=result.lontitude;
        myaddr(lontitude,latitude);
      }, function (error) { });
    } //根据定位得到的经纬度对地址进行解析 function myaddr(lontitude,latitude){ //alert("我的地址是:"+lontitude+","+latitude); // 百度地图API功能 var map = new BMap.Map("allmap"); var point = new BMap.Point(lontitude, latitude);//34.7534880000,113.6313490000 map.centerAndZoom(point, 12); var marker = new BMap.Marker(point); // 创建标注 map.addOverlay(marker); // 将标注添加到地图中 //把地址在地图上标出来 var geoc = new BMap.Geocoder();
      geoc.getLocation(point, function(rs){ var addrmsg=rs.address; //var addComp = rs.addressComponents;  //详细的分省市县街道的信息 //alert(addComp.province + ", " + addComp.city + ", " + addComp.district + ", " + addComp.street + ", " + addComp.streetNumber); var opts = {
          width : 200, // 信息窗口宽度 height: 50, // 信息窗口高度 } var infoWindow = new BMap.InfoWindow("地址:"+addrmsg, opts); //创建信息窗口对象  map.openInfoWindow(infoWindow,point); //开启信息窗口 }); 

    }
    
  • 1
  • 2
  • 3
  • 4
  • 5
  • 6
  • 7
  • 8
  • 9
  • 10
  • 11
  • 12
  • 13
  • 14
  • 15
  • 16
  • 17
  • 18
  • 19
  • 20
  • 21
  • 22
  • 23
  • 24
  • 25
  • 26
  • 27
  • 28
  • 29
  • 30
  • 31
  • 32
  • 33
  • 34
  • 35
  • 36
  • 37
  • 38
  • 39
  • 40
  • 41

4.css部分:其实可以不要的,这是因为地图中的地址显示的窗口看起来有点问题,虽然改了依旧不好看,但是功能实现了。

.BMap_pop{ top: 70px !important; } .BMap_bubble_content{ width: 95% !important; } .BMap_center{ top: 26px !important; }
    
  • 1
  • 2
  • 3
  • 4
  • 5
  • 6
  • 7
  • 8
  • 9

注:现在得到的地址是省市县街道地址,想得到诸如:北京市朝阳区XX大厦附近这样的地址的话还没有研究,等研究出来了再补上。 

蓝蓝设计www.lanlanwork.com )是一家专注而深入的界面设计公司,为期望卓越的国内外企业提供卓越的UI界面设计、BS界面设计 、 cs界面设计 、 ipad界面设计 、 包装设计 、 图标定制 、 用户体验 、交互设计、 网站建设 平面设计服务


js 模块化编程

seo达人

如果您想订阅本博客内容,每天自动发到您的邮箱中, 请点这里

了解一个技术,首先要了解这个技术产生的背景及解决的问题,而不应该只是单纯的知道该怎么用。之前的状态可能就是只是为了了解而了解,并不知道实际产生的原因及带来的好处,所以今天就来总结一下。

1. 什么是模块化编程

来看百度百科的定义

模块化程序设计是指在进行程序设计时将一个大程序按照功能划分为若干小程序模块,每个小程序模块完成一个确定的功能,并在这些模块之间建立必要的联系,通过模块的互相协作完成整个功能的程序设计方法。

比如 java 的 import,C# 的 using。我的理解是通过模块化编程,可以将不同的功能独立出来,修改某个功能时不会对其他功能产生影响。

2. 为什么要模块化

来看下面一个例子

// A.js function sayWord(type){ if(type === 1){
        console.log("hello");
    }else if(type === 2){
        console.log("world");
    }
} // B.js function Hello(){ sayWord(1);
} // C.js Hello()  
  • 1
  • 2
  • 3
  • 4
  • 5
  • 6
  • 7
  • 8
  • 9
  • 10
  • 11
  • 12
  • 13
  • 14
  • 15
  • 16

假设上面三个文件,B.js 引用了 A.js 里面的内容,C.js 又引用了 B.js 里面的内容,如果编写 C.js 的人只知道引用了 B.js,那他就不会引用 A.js 就会导致程序出错,而且文件的引用顺序也不能出错。给整体代码的调试修改带来不便。

还有个问题,上述代码暴露了两个全局变量,容易造成全局变量的污染

3. AMD

AMD 即 Asynchronous Module Definition(异步模块定义)。采取异步加载的方式加载模块,模块的加载不会影响它后面的语句执行。而且只有用到的时候才会去加载相关文件,属于浏览器端的标准

假设下面这种情况

// util.js define(function(){ return {
        getFormatDate:function(date,type){ if(type === 1){ return '2018-08-9' } if(type === 2){ return '2018 年 8 月 9 日' }
        }
    }
}) // a-util.js define(['./util.js'],function(util){ return {
        aGetFormatDate:function(date){ return util.getFormatDate(date,2)
        }
    }
}) // a.js define(['./a-util.js'],function(aUtil){ return {
        printDate:function(date){ console.log(aUtil.aGetFormatDate(date))
        }
    }
}) // main.js require(['./a.js'],function(a){ var date = new Date()
    a.printDate(date)
})
console.log(1); // 使用 // <script src = "/require.min.js" data-main="./main.js"></script>   
  • 1
  • 2
  • 3
  • 4
  • 5
  • 6
  • 7
  • 8
  • 9
  • 10
  • 11
  • 12
  • 13
  • 14
  • 15
  • 16
  • 17
  • 18
  • 19
  • 20
  • 21
  • 22
  • 23
  • 24
  • 25
  • 26
  • 27
  • 28
  • 29
  • 30
  • 31
  • 32
  • 33
  • 34
  • 35
  • 36
  • 37
  • 38
  • 39
  • 40
  • 41
  • 42

页面上先打印 1,然后才会打印 2018 年 8 月 9 日。因此 AMD 的加载并不会影响后续的语句执行。

如果不是异步加载会出现什么情况呢

var a = require('a');
console.log(1) 
  • 1
  • 2

后面的语句需要等待 a 加载完成才能执行,如果加载时间过长,整个程序都会卡在这。因此,浏览器不能同步加载资源,这也是 AMD 的产生背景。

AMD 是在浏览器端实现模块化开发的规范。由于该规范不是 JavaScript 原始支持的,使用 AMD 规范进行开发的时候需要引入第三方的库函数,也就是 RequireJS。

RequireJS 主要解决的问题

  • 使 JS 异步加载,避免页面失去响应
  • 管理代码之间的依赖性,有利于代码的编写和维护

下面来看看如何使用 require.js

要想使用 require.js,首先要 define

// ? 代表该参数可选 define(id?, dependencies?, factory); 
  • 1
  • 2
  • id:指的是定义的模块的名字
  • dependencies:是定义的模块所依赖模块的数组
  • factory:为模块初始化要执行的函数或对象。如果为函数,它应该只被执行一次。如果是对象,此对象应该为模块的输出值。

    具体的规范说明可以参考 AMD (中文版) 
    举个例子,创建一个名为 “alpha” 的模块,使用了 require,exports,和名为 “beta” 的模块:

define("alpha", ["require", "exports", "beta"], function (require, exports, beta) { exports.verb = function() { return beta.verb(); //Or: return require("beta").verb();
       }
   }); 
  • 1
  • 2
  • 3
  • 4
  • 5
  • 6
  • 7

一个返回对象的匿名模块:

define(["alpha"], function (alpha) { return {
         verb: function(){ return alpha.verb() + 2;
         }
       };
   }); 
  • 1
  • 2
  • 3
  • 4
  • 5
  • 6
  • 7

一个没有依赖性的模块可以直接定义对象:

define({
     add: function(x, y){ return x + y;
     }
   }); 
  • 1
  • 2
  • 3
  • 4
  • 5

如何使用

AMD 采用 require 语句加载模块

require([module],callback); 
  • 1
  • module:是一个数组,里面的成员是要加载的模块
  • callback:加载成功之后的回调函数

例如

require(['./a.js'],function(a){ var date = new Date()
    a.printDate(date)
}) 
  • 1
  • 2
  • 3
  • 4

具体的使用方法如下

// util.js define(function(){ return {
        getFormatDate:function(date,type){ if(type === 1){ return '2018-08-09' } if(type === 2){ return '2018 年 8 月 9 日' }
        }
    }
}) // a-util.js define(['./util.js'],function(util){ return {
        aGetFormatDate:function(date){ return util.getFormatDate(date,2)
        }
    }
}) // a.js define(['./a-util.js'],function(aUtil){ return {
        printDate:function(date){ console.log(aUtil.aGetFormatDate(date))
        }
    }
}) // main.js require(['./a.js'],function(a){ var date = new Date()
    a.printDate(date)
}) // 使用 // <script src = "/require.min.js" data-main="./main.js"></script>  
  • 1
  • 2
  • 3
  • 4
  • 5
  • 6
  • 7
  • 8
  • 9
  • 10
  • 11
  • 12
  • 13
  • 14
  • 15
  • 16
  • 17
  • 18
  • 19
  • 20
  • 21
  • 22
  • 23
  • 24
  • 25
  • 26
  • 27
  • 28
  • 29
  • 30
  • 31
  • 32
  • 33
  • 34
  • 35
  • 36
  • 37
  • 38
  • 39

假设这里有 4 个文件,util.js,a-util.js 引用了 util.js,a.js 引用了 a-util.js,main.js 引用了 a.js。

其中,data-main 属性的作用是加载网页程序的主模块。

上例演示了一个主模块最简单的写法,默认情况下,require.js 假设依赖和主模块在同一个目录。

使用 require.config() 方法可以对模块的加载行为进行自定义。require.config() 就写在主模块(main.js)的头部,参数是一个对象,这个对象的 paths 属性指定各个模块的加载路径

require.config({
    paths:{ "a":"src/a.js", "b":"src/b.js" }
}) 
  • 1
  • 2
  • 3
  • 4
  • 5
  • 6

还有一种方法是改变基础目录(baseUrl)

require.config({

    baseUrl: "src",

    paths: { "a": "a.js", "b": "b.js",

    }

  }); 
  • 1
  • 2
  • 3
  • 4
  • 5
  • 6
  • 7
  • 8
  • 9
  • 10
  • 11
  • 12

4. CommonJS

commonJS 是 nodejs 的模块化规范,现在被大量用在前端,由于构建工具的高度自动化,使得使用 npm 的成本非常低。commonJS 不会异步加载 JS,而是同步一次性加载出来

在 commonJS 中,有一个全局性的方法 require(),用于加载模块,例如

const util = require('util'); 
  • 1

然后,就可以调用 util 提供的方法了

const util = require('util'); var date = new date();
util.getFormatDate(date,1); 
  • 1
  • 2
  • 3

commonJS 对于模块的定义分三种,模块定义(exports),模块引用(require)和模块标示(module)

exports() 对象用于导出当前模块的变量或方法,唯一的导出口。require() 用来引入外部模块。module 对象代表模块本身。

举个栗子

// util.js module.exports = {
    getFormatDate:function(date, type){ if(type === 1){ return '2017-06-15' } if(type === 2){ return '2017 年 6 月 15 日' }
    }
} // a-util.js const util = require('util.js')
module.exports = {
    aGetFormatDate:function(date){ return util.getFormatDate(date,2)
    }
} 
  • 1
  • 2
  • 3
  • 4
  • 5
  • 6
  • 7
  • 8
  • 9
  • 10
  • 11
  • 12
  • 13
  • 14
  • 15
  • 16
  • 17
  • 18
  • 19

或者下面这种方式

 // foobar.js // 定义行为 function foobar(){ this.foo = function(){ console.log('Hello foo');
        } this.bar = function(){ console.log('Hello bar');
          }
 } // 把 foobar 暴露给其它模块 exports.foobar = foobar; // main.js //使用文件与模块文件在同一目录 var foobar = require('./foobar').foobar,
test = new foobar();
test.bar(); // 'Hello bar' 
  • 1
  • 2
  • 3
  • 4
  • 5
  • 6
  • 7
  • 8
  • 9
  • 10
  • 11
  • 12
  • 13
  • 14
  • 15
  • 16
  • 17
  • 18

5. ES6 Module

ES6 模块的设计思想是尽量静态化,使得编译时就能确定模块的依赖关系,以及输入和输出的变量,而 CommonJS 和 AMD 模块都只能在运行时确定这些关系。如 CommonJS 加载方式为 “运行时加载”,ES6 的加载方式为 “编译时加载” 或者静态加载,即 ES6 可以在编译时就完成模块加载,效率比 CommonJS 模块的加载方式高。

ES6 模块自动采用严格模式,不管有没有在模块头部加上 “use strict”。

ES6 export 语句输出的接口与其对应的值是动态绑定关系,即通过该接口可以取到模块内部实时的值。而 CommonJS 模块输出的是值的缓存,不存在动态更新。

ES6 与 CommonJS 模块的差异

  • CommonJS 模块输出的是一个值的复制,ES6 模块输出的是值的引用。
  • CommonJS 模块是运行时加载,ES6 模块是编译时输出接口。
  • CommonJS 中的 this 指向当前模块,ES6 模块 this 为 undefined

第二个差异是因为 CommonJS 加载的是一个对象(即 Module.exports 属性),该对象只有在脚本运行结束时才会生成,而 ES6 模块不是对象,它的对外接口只是一种静态定义,在代码静态解析阶段就会生成。

总结

CommonJS 采用了服务器优先的策略,使用同步方式加载模块,而 AMD 采用异步加载的方式。所以如果需要使用异步加载 js 的话建议使用 AMD,而当项目使用了 npm 的情况下建议使用 CommonJS。

蓝蓝设计www.lanlanwork.com )是一家专注而深入的界面设计公司,为期望卓越的国内外企业提供卓越的UI界面设计、BS界面设计 、 cs界面设计 、 ipad界面设计 、 包装设计 、 图标定制 、 用户体验 、交互设计、 网站建设 平面设计服务


微信小程序开发(四)获取用户openid

seo达人

如果您想订阅本博客内容,每天自动发到您的邮箱中, 请点这里

在小程序里面有两个地方获取用户的openid。 
一个是wx.login(OBJECT),第二个是wx.getUserInfo(OBJECT)。 
这里我使用的是第一种wx.login(OBJECT)

步骤

 wx.login({
  success: function(res) { if (res.code) { //  第一步: 获取code //发起网络请求 wx.request({
        url: '后台接口', // 获取openid data: {
          code: res.code
        }
      })
    } else {
      console.log('获取用户登录态失败!' + res.errMsg)
    }
  }
}); 
  • 1
  • 2
  • 3
  • 4
  • 5
  • 6
  • 7
  • 8
  • 9
  • 10
  • 11
  • 12
  • 13
  • 14
  • 15

后端的实现

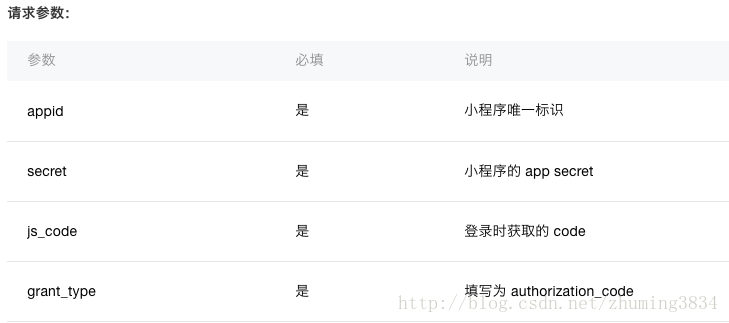
后端的实现就是后端调用这个接口:https://api.weixin.qq.com/sns/jscode2session?appid=APPID&secret=SECRET&js_code=JSCODE&grant_type=authorization_code。 
这里写图片描述

/*
 * 根据code获取微信用户的openid
 */ router.get('/api/getWxCode', function(req, res, next) { var param = req.query || req.params; var code = param.code; var urlStr = 'https://api.weixin.qq.com/sns/jscode2session?appid=' + wxConfig.AppID + '&secret=' + wxConfig.Secret + '&js_code=' + code + '&grant_type=authorization_code';
    request(urlStr, function (error, response, body) { if (!error && response.statusCode == 200) { var jsBody = JSON.parse(body); 
            jsBody.status = 100;
            jsBody.msg = '操作成功';
            res.end(JSON.stringify(jsBody));
        }
    })
}); 
  • 1
  • 2
  • 3
  • 4
  • 5
  • 6
  • 7
  • 8
  • 9
  • 10
  • 11
  • 12
  • 13
  • 14
  • 15
  • 16

具体实例

/**
 * 生命周期函数--监听页面加载
 */ onLoad: function (options) { var self = this;
  wx.login({
    success: function (res) { if (res.code) { //发起网络请求 wx.request({
          url: 'https://www.hgdqdev.cn/api/getWxCode',
          data: {
            code: res.code
          },
          success: function(res){ if(res.data.status == 100){ self.setData({
                openid: res.data.openid
              })
            }
          },
          fail: function(){ }
        })
      } else {
        console.log('获取用户登录态失败!' + res.errMsg)
      }
    }
  });
},

蓝蓝设计www.lanlanwork.com )是一家专注而深入的界面设计公司,为期望卓越的国内外企业提供卓越的UI界面设计、BS界面设计 、 cs界面设计 、 ipad界面设计 、 包装设计 、 图标定制 、 用户体验 、交互设计、 网站建设 平面设计服务


日历

链接

blogger

蓝蓝 http://www.lanlanwork.com

存档