2021-4-27 前端达人
不管哪种模式,前端路由都是客户端路由的实现方式,也就是当路径发生变化时,不会向服务器发送请求,是利用js监视路径的变化。然后根据不同的地址渲染不同的内容,如果需要服务器内容,会发送Ajax请求来获取。
https://music.163.com/#/discover/toplist 地址中会存在 # 号
https://music.163.com/discover/toplist 地址中没有# 类似于普通的地址,但是需要服务端配置支持
在 node 环境下,启用对history模式的支持可以通过 connect-history-api-fallback 这个中间件来完成
// 导入处理 history 模式的模块 const history = require('connect-history-api-fallback') // 导入 express const express = require('express') const app = express() // 注册处理 history 模式的中间件 app.use(history())
运行nginx服务器基本指令
启动
start nginx
重启
nginx -s reload
停止
nginx -s stop
location / { root  html; index  index.html index.htm; #新添加内容
     #尝试读取$uri(当前请求的路径),如果读取不到读取$uri/这个文件夹下的首页
     #如果都获取不到返回根目录中的 index.html
     try_files $uri $uri/ /index.html; }
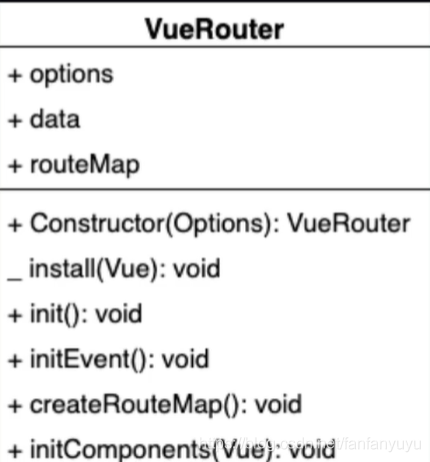
从上图,可以大致了解一下 VueRouter 这个类中的结构:
上半部分是属性,下半部分是方法,其中+ 是实例方法,- 是静态方法。
install 是用来实现Vue.use 插件机制的方法。
要实现install方法,首先先分析一下该方法要做的事情:
let _Vue; export default class VueRouter { static install(Vue) { // 1. 判断当前插件是否已经被安装 if(VueRouter.install.installed) return VueRouter.install.installed = true // 2. 把Vue构造函数记录到全局变量 _Vue = Vue // 3. 把创建Vue实例时候传入的router对象注入到所有的Vue实例上 // 利用混入让所有的vue实例加载router _Vue.mixin({ beforeCreate(){ // this.$options.name用来获取vue实例 data以外的属性 // new Vue( { router } ) if(this.$options.router) { _Vue.prototype.$router = this.$options.router } } }) } }
VueRouter 的构造函数要初始化三个属性,分别是: options、data、routeMap。
constructor(options){ this.options = options this.data = _Vue.observable({ current:'/' }) this.routeMap = {} }
接下来我们来实现VueRouter类中 createRouterMap 这个方法,它的作用就是把 options 中rules 路由规则解析出来以键值对的形式存储在routeMap上。
createRouterMap() { this.options.rules.forEach(route => this.routeMap[route.path] = route.component) }
下一步,来创建initComponents 方法,这个方法里我们要创建两个组件。分别是:RouterLink 和 RouterView
let _Vue; export default class VueRouter { static install(Vue) { // 1. 判断当前插件是否已经被安装 if (VueRouter.install.installed) return VueRouter.install.installed = true // 2. 把Vue构造函数记录到全局变量 _Vue = Vue // 3. 把创建Vue实例时候传入的router对象注入到所有的Vue实例上 // 利用混入让所有的vue实例加载router _Vue.mixin({ beforeCreate() { // this.$options.name用来获取vue实例 data以外的属性 // new Vue( { router } ) if (this.$options.router) { _Vue.prototype.$router = this.$options.router this.$options.router.init() } } }) } constructor(options) { this.options = options this.routeMap = {} this.data = _Vue.observable({ current: '/' }) } createRouterMap() { this.options.routes.forEach(route => this.routeMap[route.path] = route.component) } initComponents(Vue) { // 创建RouterLink组件 Vue.component('router-link', { props: { 'to': { type: String } }, template: `<a :href="to"><slot></slot></a>` }) } init() { this.createRouterMap() this.initComponents(_Vue) } }
用自己的VueRouter 替换掉官方的运行后,发现报错
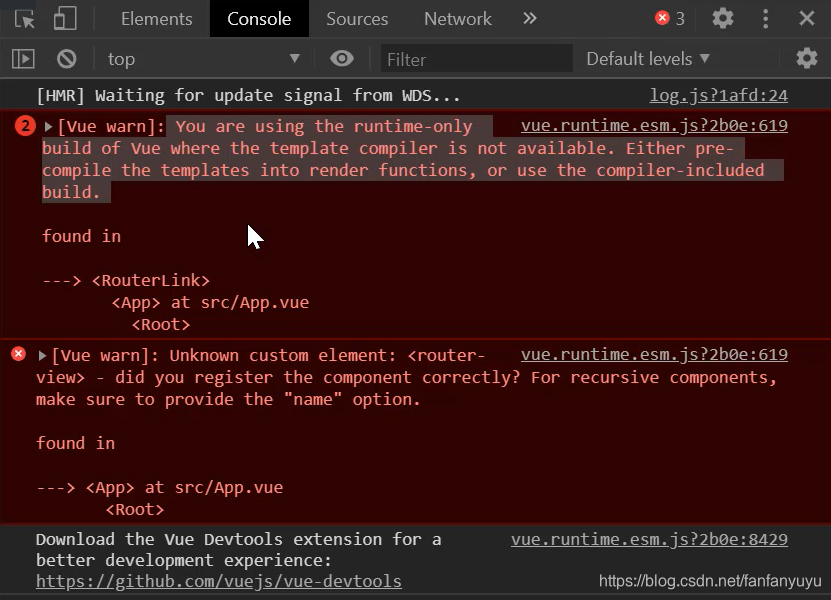
报错的意思是,运行时版本的Vue 不支持 tempalte 模板,需要打包的时候提前编译。
如果要让我们的template被支持可以使用完整版的Vue,完整包包含运行时和编译器,体积比运行时版本大10k左右,程序运行的时候把模板转换成render函数
@vue/cli 自动安装的就是 运行时版本
第一种方案——引入完整版Vue,可以在vue.config.js中 加入配置
module.exports = { runtimeCompiler: true }
第二种方案——使用render函数替换掉tempalte
render(h) { return h('a', { attrs: { href: this.to } }, [this.$slots.default]) } // template: `<a :href="to"><slot></slot></a>`
// 记录一下this let self = this Vue.component('router-view',{ render(h){ // routeMap以key value形式记录了path和component // data.current 记录了当前页面的path return h(self.routeMap[self.data.current]) } })
为了能够让链接成功完成跳转展示组件,我们需要对routerlink中的a标签添加点击事件
并且要在点击的时候,把最新的path更新到router实例的current上.
我们借助于history的pushState方法 该方法会修改浏览器地址栏中的地址,但不会向服务器发起请求,并且还可以将新地址记录在历史中
 Vue.component('router-link', { props: { 'to': { type: String } }, render(h) { return h('a', { attrs: { href: this.to }, on: { click: this.clickHandle } }, [this.$slots.default]) }, methods: { clickHandle(e) { history.pushState({}, "", this.to) // 把点击的链接地址 更新到 current 上 this.$router.data.current = this.to
                    e.preventDefault() } } // template: `<a :href="to"><slot></slot></a>` })
现在功能基本上已经差不多了,但是还存在一个小问题,就是当我们点击浏览器的前进或者后退按钮的时候,组件不能实现切换展示,主要思路就是通过添加popstate监听地址变化,下面我们来完善该功能
initEvent(){ // window.addEventListener("popstate",()=>{ this.data.current = window.location.pathname }) }
完整代码
let _Vue; export default class VueRouter { static install(Vue) { // 1. 判断当前插件是否已经被安装 if (VueRouter.install.installed) return VueRouter.install.installed = true // 2. 把Vue构造函数记录到全局变量 _Vue = Vue // 3. 把创建Vue实例时候传入的router对象注入到所有的Vue实例上 // 利用混入让所有的vue实例加载router _Vue.mixin({ beforeCreate() { // this.$options.name用来获取vue实例 data以外的属性 // new Vue( { router } ) if (this.$options.router) { _Vue.prototype.$router = this.$options.router
                    console.log(this.$options.router.init); this.$options.router.init() } } }) } constructor(options) { this.options = options this.routeMap = {} this.data = _Vue.observable({ current: '/' }) } createRouterMap() { this.options.routes.forEach(route => this.routeMap[route.path] = route.component) } initComponents(Vue) { // 创建RouterLink组件 Vue.component('router-link', { props: { 'to': { type: String } }, render(h) { return h('a', { attrs: { href: this.to }, on: { click: this.clickHandle } }, [this.$slots.default]) }, methods: { clickHandle(e) { history.pushState({}, "", this.to) // 把点击的链接地址 更新到 current 上 this.$router.data.current = this.to

     e.preventDefault() } } // template: `<a :href="to"><slot></slot></a>` }) let self = this Vue.component('router-view', { render(h) { // routeMap以key value形式记录了path和component // data.current 记录了当前页面的path return h(self.routeMap[self.data.current]) } }) } init() { this.createRouterMap() this.initComponents(_Vue) this.initEvent() } initEvent() { // window.addEventListener("popstate", () => { this.data.current = window.location.pathname }) } }


        转自:csdn 作者:Holyforsaken_FHC


        蓝蓝设计( www.lanlanwork.com )是一家专注而深入的界面设计公司,为期望卓越的国内外企业提供卓越的UI界面设计、BS界面设计 、 cs界面设计 、 ipad界面设计 、 包装设计 、 图标定制 、 用户体验 、交互设计、 网站建设 、平面设计服务
您可以选择一种方式赞助本站
支付宝转账赞助

蓝蓝 http://www.lanlanwork.com