


概要:区分这两种操作,可以很大程度上能避免丢失用户已操作的内容。在关闭视图之前保存用户的更改,使用文本标签而不是“X”图标,并在破坏性操作之前提供确认对话框。
一、让人迷惑的“X”图标
很久以前,“X”这个符号是用在地图上,标记“宝藏的藏身地”。但在今天的数字化界面中,“X”符号不再用来标记位置,而是被用来取消进程,或者关闭某个临时页面/弹框。但是如何确定“X”代表的是“取消” or “关闭”?有的时候可以确定,有时却模糊不清难以界定。
其实,主要的问题在于“X”图标缺少了文本标签。当同一个图标在不同的界面,却代表不同的含义,该图标的可用性就会受到影响,因为用户判断不了到底是什么含义。
二、为什么要区分“取消”与“关闭”
当用户单击/点击“X”按钮来关闭模态弹框或视图时,系统会完全取消该过程并清空之前所有操作,这让人沮丧,甚至抓狂。因为用户通常认为“X”图标表示取消或者关闭,所以区分这两种可能性对于交互的成功至关重要。
在某些情况下,区分取消 or 关闭并不重要。当一个弹窗占据你的大部分屏幕时,点击“X”按钮(尽可能快地),既可以关闭该模态,也可以取消它可能触发的任何进程。
但是,如果页面中包含正在运行的计时器,正在播放的音频,正在选择多个选项标签,或其他类型未保存的内容,那就很有必要说明“X”图标所代表的意义。因为用户可能打算让计时器或音频继续运行,或者希望立刻应用这些选好的选项标签,或保存正在进行的工作,同时希望关闭该视图继续其他操作。
例如:丝芙兰在结账过程中,使用模态窗口来展示用户可以添加到购物车的免费商品。在以下示例中,单击“ ADD(添加)”按钮选择商品后, 该按钮直接被变成了“ Remove(移除)”,看起来似乎商品已经被添加到购物车中了。但是,实际上当用户单击右上角的“X”图标后,该商品并不在购物车中。他需要再重复这个步骤,最后点击“Done(完成)”按钮,商品才会被加入购物车。
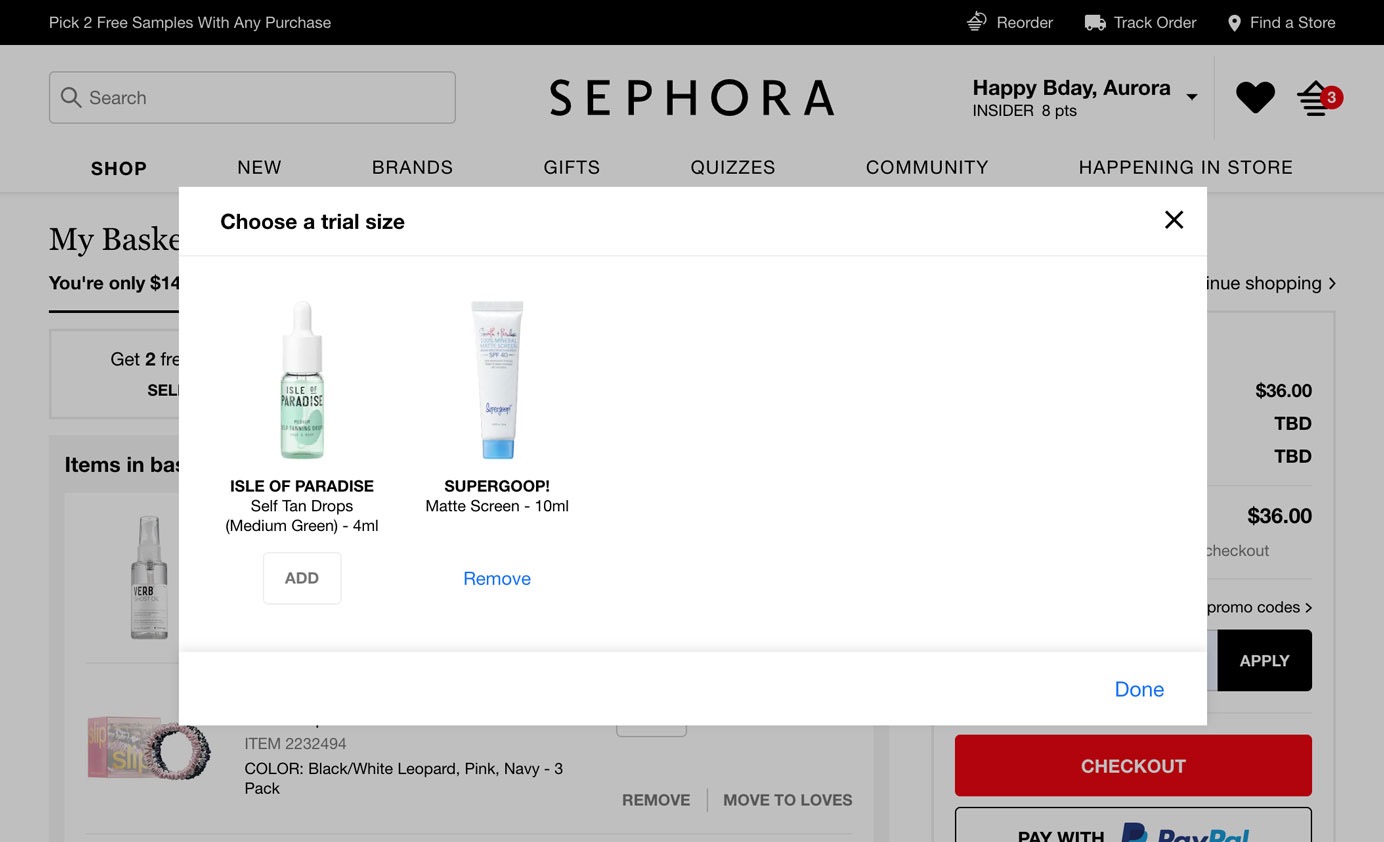
Sephora:单击右上角的"X"会取消选择这些试用商品整个过程。用户必须先单击“ADD”,再单击“Done”才能将商品添加到购物车。
三、如何避免丢失用户正在操作的内容
要避免丢失用户正在操作的内容,首先需要确定用户的意图 - 取消 or 关闭 - 并提供明确的选项。有以下几种方法:
· 主动要求用户确认他们的意图
· 使用明确的文本标签而不是模糊图标
· 显示两个不同的按钮:“X”图标表示关闭视图(可以自动保存页面内容/操作),而“取消”则代表放弃该过程
1、要求确认
如果用户在已经执行操作的模态弹框或页面视图中,点击“X”图标,UI则可以在关闭视图之前,直接询问用户是否应用该操作,来确认其意图。此解决方案非常适合会破坏用户工作的破坏性取消操作。例如,过滤器视图可能会被意外关闭,并且关闭会导致用户丢失其选定的选项。
这个问题在移动端界面上很常见,因为过滤器视图占用了很大的屏幕空间,这使用户很难或不能判断是否已经应用了那些选择。为了防止这种潜在的错误,在关闭过滤器视图之前,跟用户确认是否要应用这些选择并关闭视图,抑或是清除这些选择。例如:下图中,当用户选择后,点击“X”图标时,Lowes 会出现如下确认弹框。

左 :点击"X"图标或返回箭头,所有的选项都会被取消,并将用户带回上一个页面。右:点击“X”后,出现一个确认对话框,确认用户是应用还是取消筛选,然后再返回结果列表页。
同样,当用户关闭正在进行的课程时,语言学习应用- Duolingo 会显示一个确认对话框-课程进行中不能中途离开,除非确认“退出”。至少,该APP向用户传达了这一限制,同时他们也可以选择“取消”来继续课程。点击“X”按钮将结束当前课程。为了防止出错,结束前会出现一个确认对话框。
缺点:
a. 虽然确认对话框在避免“X”图标有歧义方面很有效,但它却添加了额外的步骤;
b 用户在按下“X”图标之前还是不知道它到底做了什么,代表什么意思,因此他们可能会对这个操作感到疑惑。
2、使用文本标签
不要完全依赖对话框来让用户确认模糊的“X”图标,而是使用明确的文本标签。文本可以消除歧义,并清楚地传达将发生的操作:取消与关闭。
Yelp的筛选页面在屏幕顶部提供了标有”Cancel(取消)“和”Reset(重制)“的按钮,在底部提供了一个大大的”Apply(应用)“按钮。类似地,Etsy中的 Filters视图提供了“Clear(清除)”和“Done(完成)”两个按钮。
注意:Etsy使用“Done”而不是“Apply”,因为过滤器一经选择就可以被应用,而这里是关于开关切换与否的建议。

(左)Yelp:Cancel、Reset 和 Apply 这三个文本标签既直接又清晰,这样用户就不太可能不小心关闭视图而丢失他们过滤器中的选择。(右)Etsy:Clear 为用户取消提供了一种清晰的方式。而点击 Done 则返回到“产品列表”页,其中的选择已经应用。
3、关闭并保存
如果必须使用“X”图标而不是文本标签(比如为了以节省空间,或者因为正在遵循团队的设计语言),请谨慎使用,并在用户完成前保存操作/内容。另外,可以提供一个单独的“取消”按钮,让用户在进程之外有一个紧急出口,并消除“X”(关闭 or 取消)在两种含义之间的歧义。
例如: Gmail会自动保存在非模态窗口中填写的邮件信息到草稿(Drafts)。这样的好处是,用户在需要折叠或关闭该窗口时,仍然保存原来的内容以便于下次继续编辑。将鼠标悬停在消息窗口右上角的“X”图标上时,会显示一段提示:Save & Close(保存到草稿并关闭)。此外,点击窗口右下角的“垃圾桶”图标可以删除该邮件 - 这个图标离顶部的“保存和关闭”选项很远,可以防止用户误点。
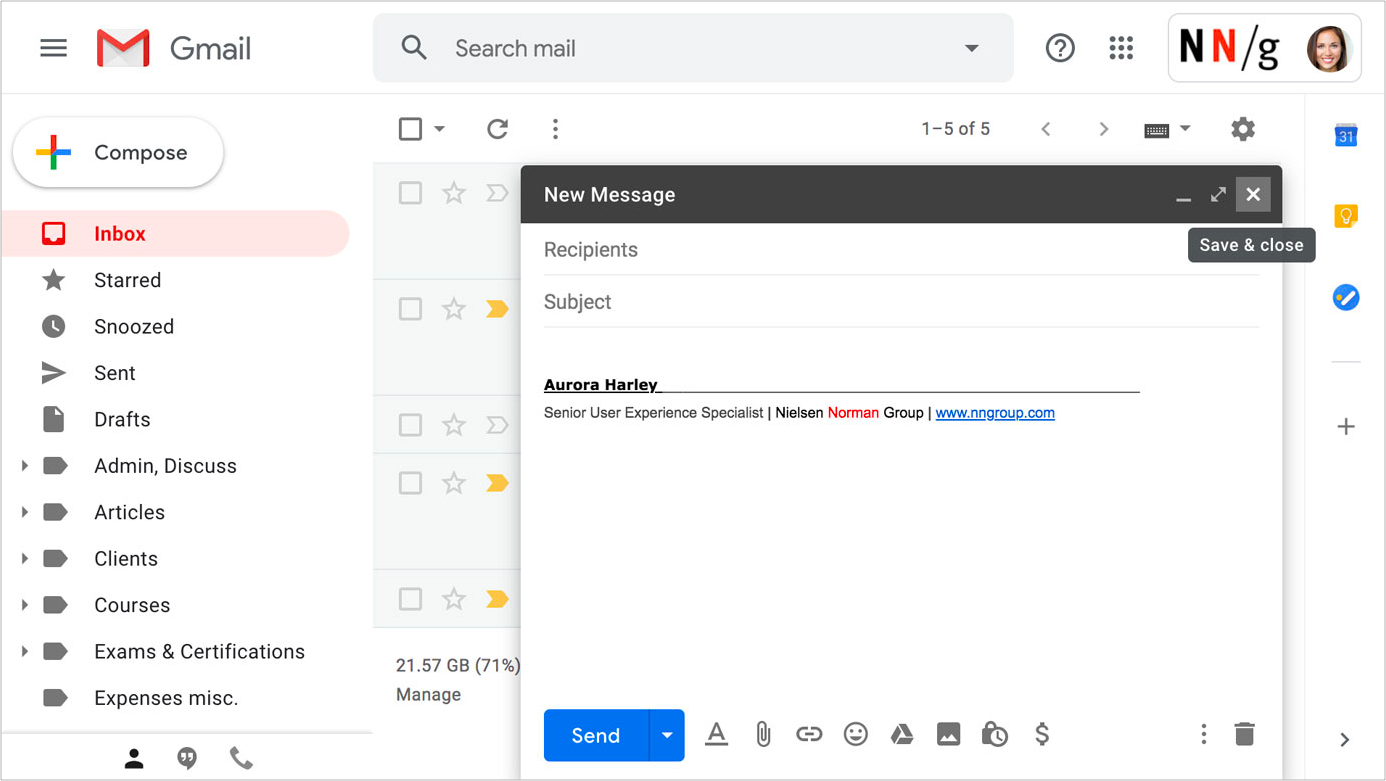
Gmail:Hover 透露, “X”图标是用于关闭窗口而不是删除草稿,它允许用户保存并关闭消息窗口而不会丢失刚刚正在编辑的邮件。
对于长进程或倾向于在后台运行的进程(如计时器),默认自动保存也是一种很好的解决方案。
例如,Glow Baby中,后台运行喂食或睡眠计时器时,用户还可以浏览APP的其他区域。因为这些计时器一般会运行很长一段时间。此功能还能让用户在APP中做其他的任务操作,例如记录之前换尿布的时间、浏览文章、逛论坛等。点击计时器视图中的“X”图标也只是关闭窗口并不会取消正在运行的计时器。
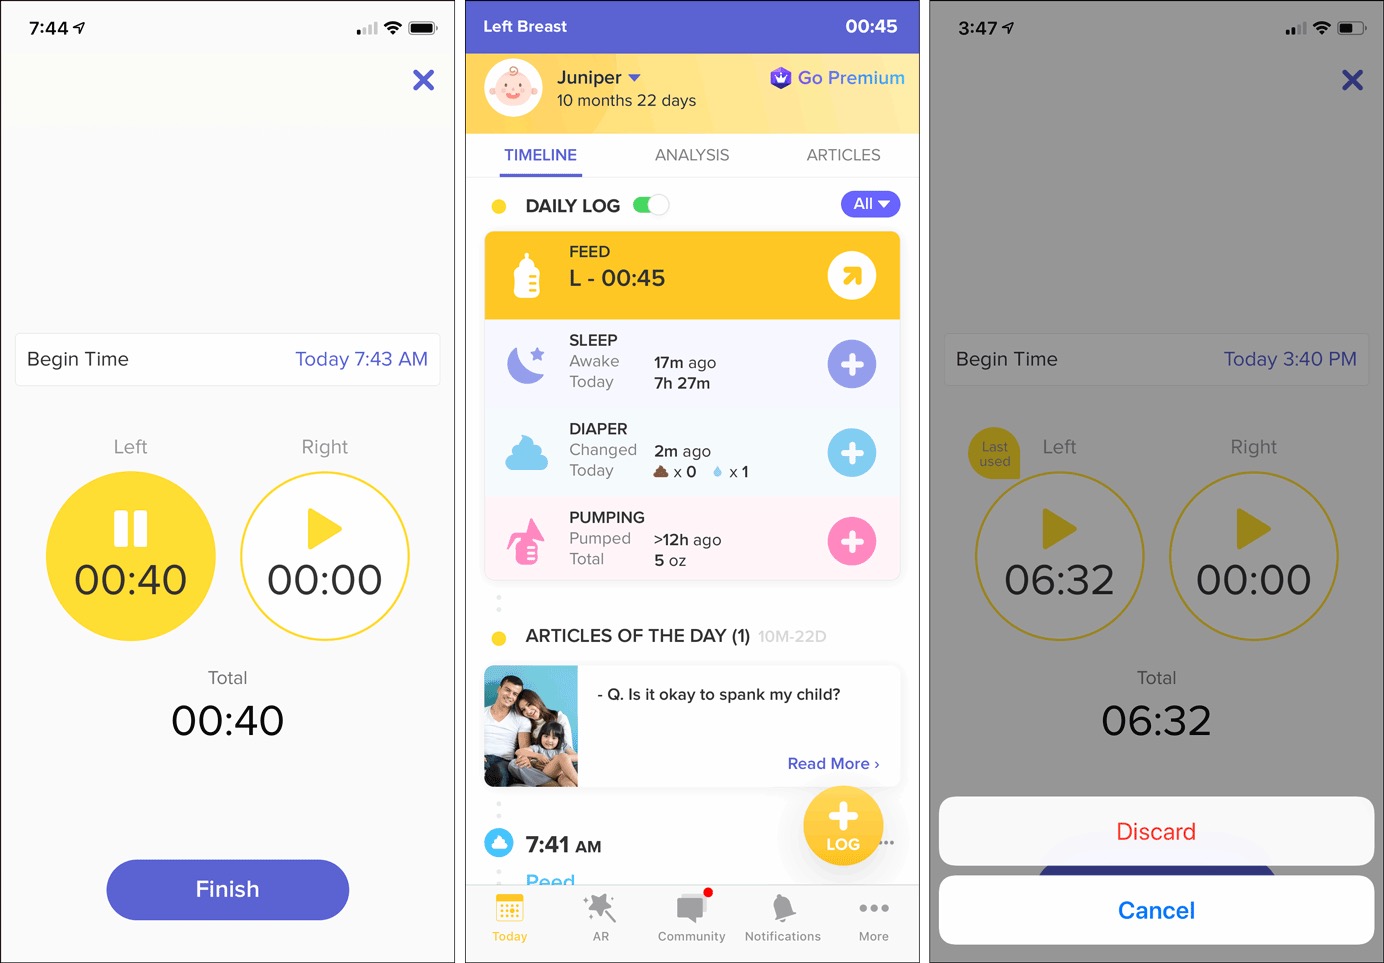
Glow Baby:(左)点击运行计时器视图中的“X”图标,在不停止计时器的情况下取消视图,从而允许用户继续使用APP记录其他类型的事件、参与社区讨论、阅读文章等。(中)运行计时器的状态显示在屏幕顶部的状态栏中。(右)在计时器暂停时点击“X”图标,弹出“放弃”或“取消”按钮以确认用户的真正意图。
请注意:在关闭前保存中间工作或维护正在进行的过程是主动的,但有时可能会与用户的意图相反:如果用户打算通过单击“X”按钮取消其选择,那自动应用这些选择可能会令人困惑和沮丧。
这就是为什么还必须有一个单独的“取消”按钮,给用户一个出口,而不是强迫他们必须关闭时自动保存。
四、结论
虽然“X”图标会造成模棱两可,而且经常导致可用性问题,但它不太可能马上从所有接口中消失。设计人员应该注意“X”图标的多重含义,消除“关闭”和“取消”之间的歧义,并提供确认对话框或自动保存等保护性措施,避免丢失任何用户正在操作的内容。
若存在疑问,请记住:先保存,再退出。
原文作者 | Aurora Harley
编辑作者 | WanSU
原文地址 | https://www.nngroup.com/articles/cancel-vs-close/
本文版权归原作者所有;仅供学习使用,转载请注明出处。
五、小思考
读上面这篇文章的一个小启发:
为什么手机验证码登录微信/淘宝时,验证码输入错误,二者都是用的模态对话框提示用户,而不是用Toast呢?
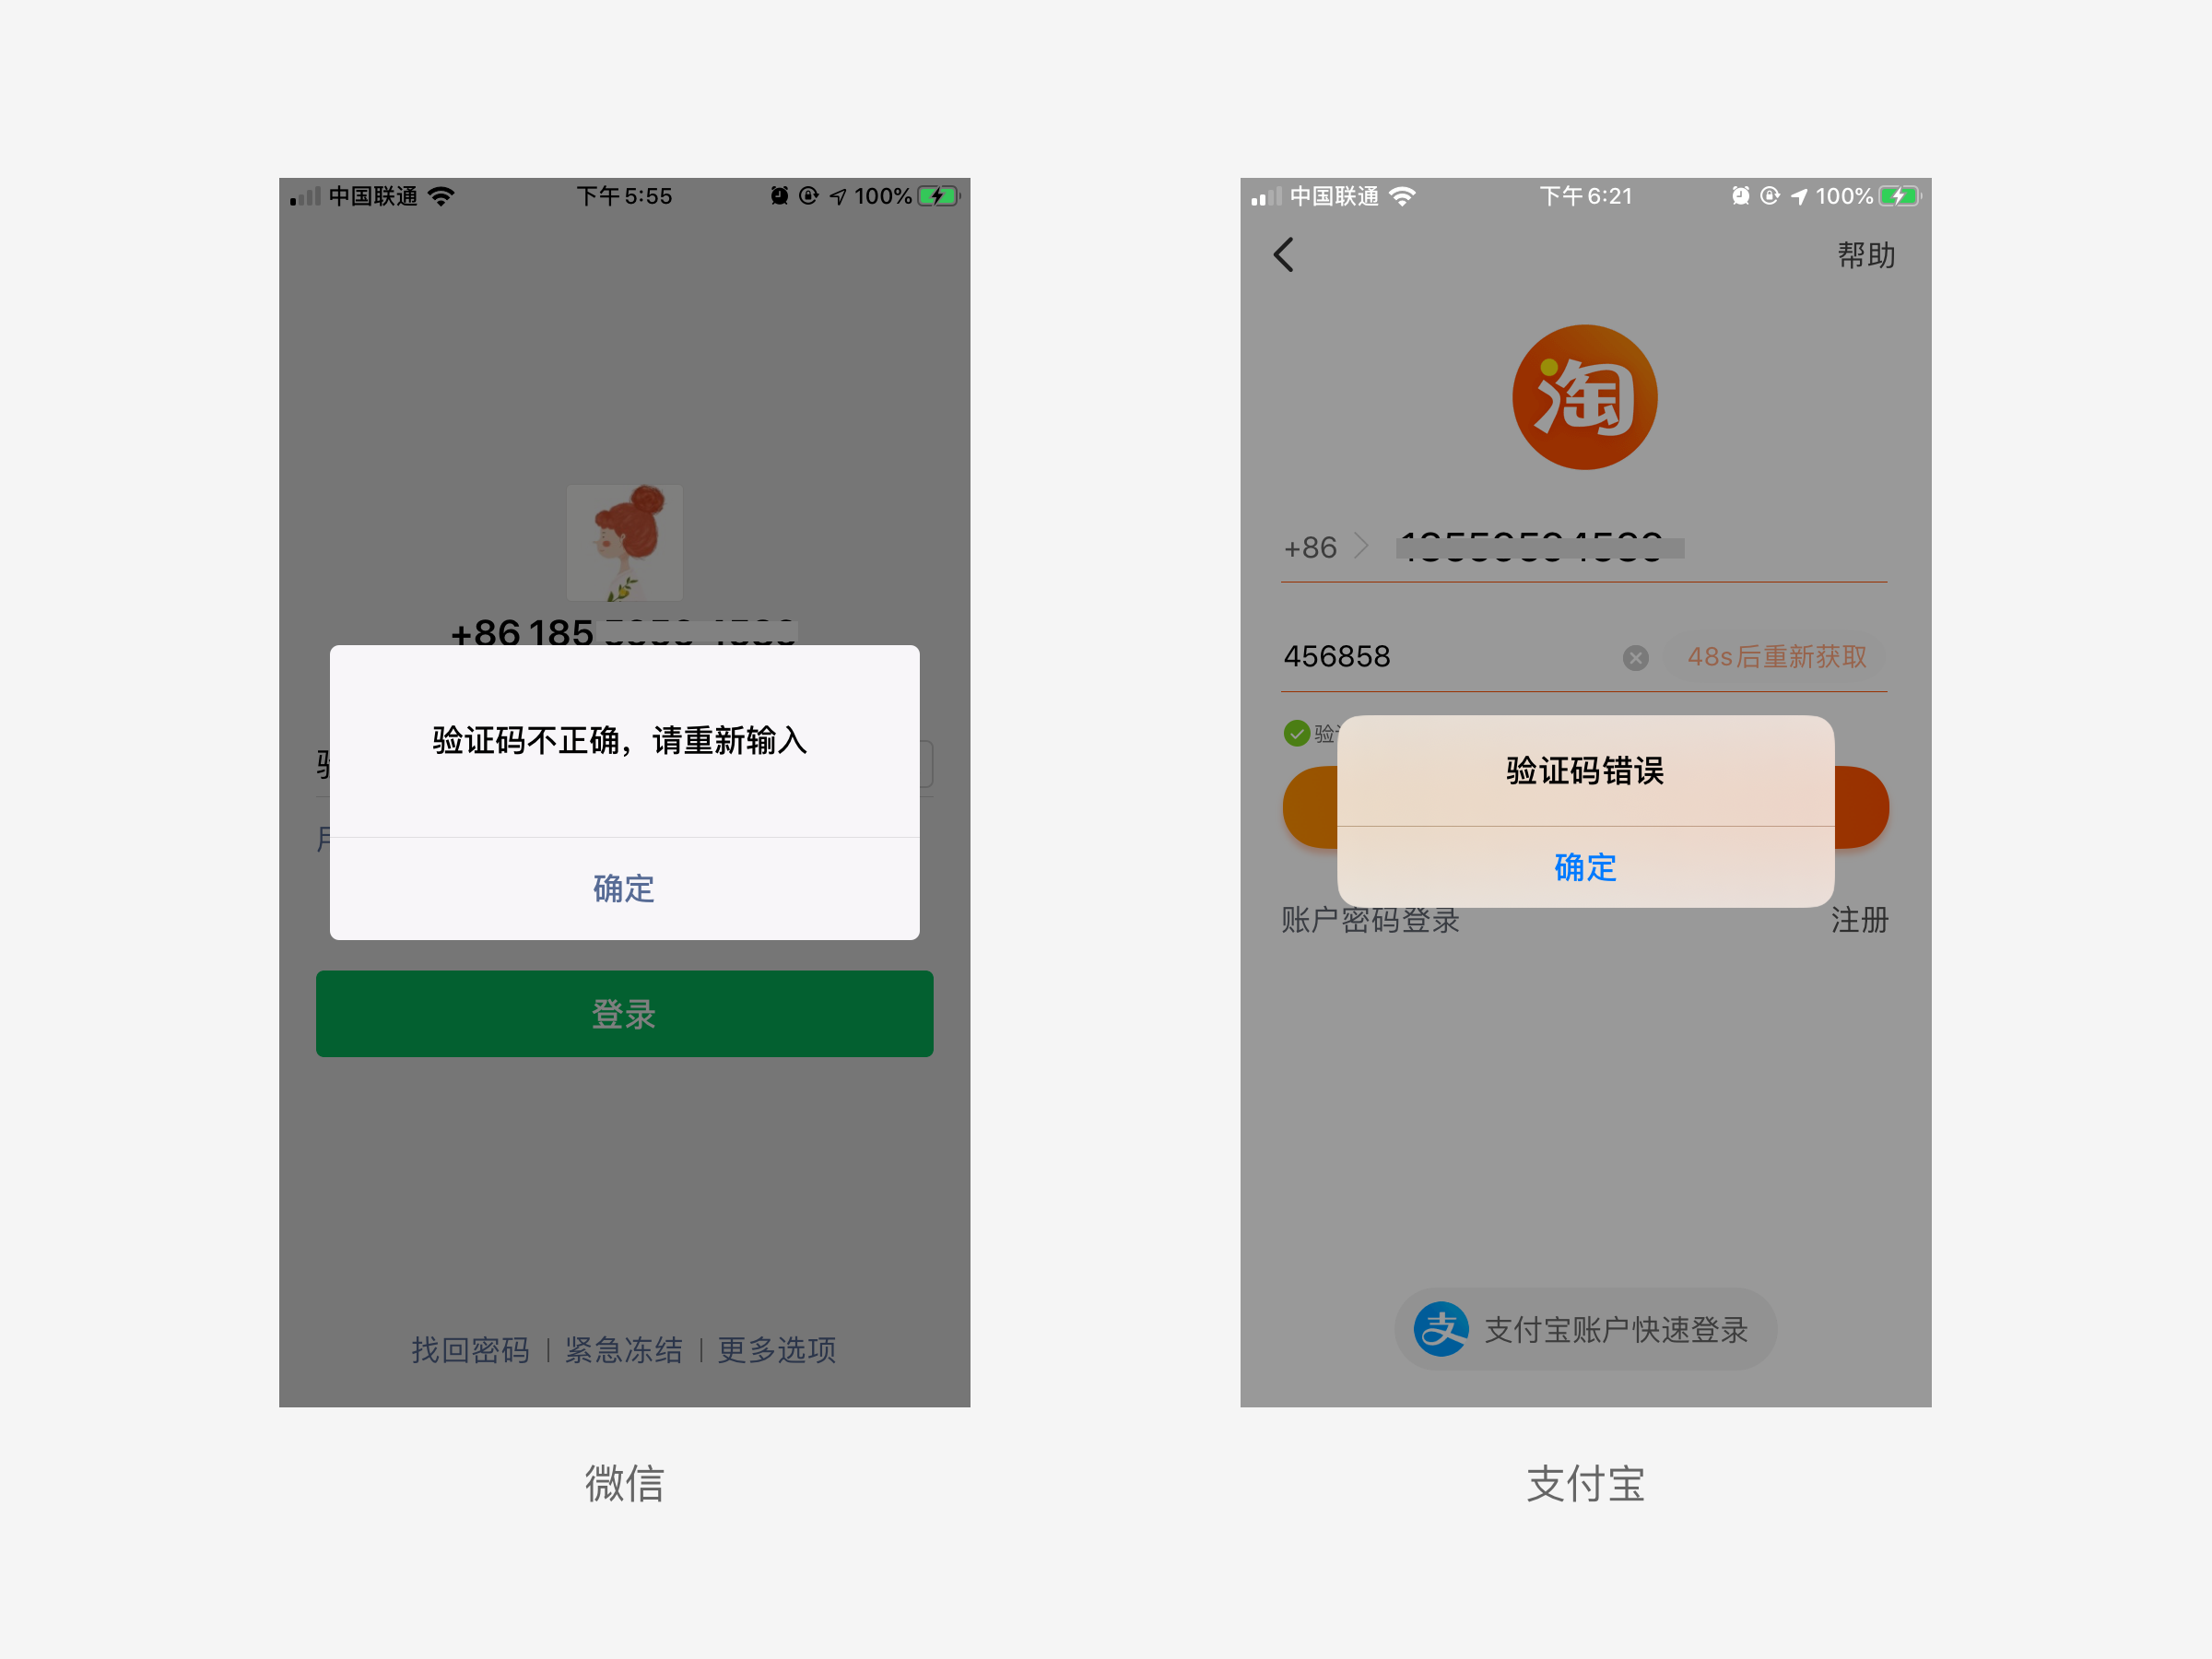
a. 微信和淘宝的用户群体都很庞大,几乎横跨所有年龄层。Toast出现又自动消失的交互体验,用户会感到不可控,尤其是对大龄、老龄的用户不够友好。
b. 也有悖于iOS人机交互指南中提到的“用户控制”这一原则,我想这也是iOS设计语言没有Toast这种控件的原因之一吧。
c. 而模态对话框虽然干扰性较强,但用户可以随时控制,在使用过程中是用户掌握主导权。
补充:Toast这一控件,原是Android系统的控件。但自Android 5.0 推出原质化设计后,Toast就被弱化,而是将 Snackbar 作为官方推荐的控件。如今在 Material Design中更是找不到 Toast的踪影。主要原因还是 Snackbar 在交互友好性方面比 Toast 要好,例如:支持手势交互、支持与CoordinatorLayout联动等。所以说 Toast都过时了呢,应该讲 Snackbar。