

参考 pm2从入门到精通
服务器上的项目需要保持稳定,即使发生故障项目也要自动重启以提供服务,这时需要托管工具对我们的项目进行托管。PM2正是这样一款工具,可以利用它来简化很多node应用管理的繁琐任务,如性能监控、自动重启、负载均衡等,而且使用非常简单。
$ npm install -g pm2
$ pm2 start app.js (--watch) # 加上watch参数后可以实时修改代码
$ pm2 list
$ pm2 stop <app name>
$ pm2 restart <app name>
$ pm2 delete <app name>
$ pm2 logs <app name>
$ pm2 logs
        蓝蓝设计( www.lanlanwork.com )是一家专注而深入的界面设计公司,为期望卓越的国内外企业提供卓越的UI界面设计、BS界面设计 、 cs界面设计 、 ipad界面设计 、 包装设计 、 图标定制 、 用户体验 、交互设计、 网站建设 、平面设计服务


        文章来源:网络某处。

分享此文一切功德,皆悉回向给文章原作者及众读者.

免责声明:蓝蓝设计尊重原作者,文章的版权归原作者。如涉及版权问题,请及时与我们取得联系,我们立即更正或删除。
什么是Unix时间戳(Unix timestamp): Unix时间戳(Unix timestamp),或称Unix时间(Unix time)、POSIX时间(POSIX time),是一种时间表示方式,定义为从格林威治时间1970年01月01日00时00分00秒起至现在的总秒数。Unix时间戳不仅被使用在Unix系统、类Unix系统中,也在许多其他操作系统中被广泛采用。
目前相当一部分操作系统使用32位二进制数字表示时间。此类系统的Unix时间戳最多可以使用到格林威治时间2038年01月19日03时14分07秒(二进制:01111111 11111111 11111111 11111111)。其后一秒,二进制数字会变为10000000 00000000 00000000 00000000,发生溢出错误,造成系统将时间误解为1901年12月13日20时45分52秒。这很可能会引起软件故障,甚至是系统瘫痪。使用64位二进制数字表示时间的系统(最多可以使用到格林威治时间292,277,026,596年12月04日15时30分08秒)则基本不会遇到这类溢出问题。
1.js获取当前时间戳的方法
var timestamp1 = Date.parse(new Date());
var timestamp2 = (new Date()).valueOf();
var timestamp3 = new Date().getTime();
第一种:获取的时间戳是把毫秒改成000显示,第二种和第三种是获取了当前毫秒的时间戳。
2.js获取制定时间戳的方法
var oldTime = (new Date("2015/06/23 08:00:20")).getTime()/1000;
getTime()返回数值的单位是毫秒。
1.Date toLocaleStdding方法
function getLocalTime(nS) { return new Date(parseInt(nS) * 1000).toLocaleStdding().replace(/:\d{1,2}$/,' ');
}
parseInt() 函数可解析一个字符串,并返回一个整数。
js中时间操作单位是毫秒。
toLocaleStdding() 方法可根据本地时间把 Date 对象转换为字符串,并返回结果。
replace() 方法用于在字符串中用一些字符替换另一些字符,或替换一个与正则表达式匹配的子串。
replace(/:\d{1,2}$/,' ')验证替换以:开始有一位或二位数字的结束字符串,就是秒;替换为空
显示如下:
![]()
所以我们可以利用正则表达式改变我们想要的日期格式。
2.Date 属性方法

function add0(m){return m<10?'0'+m:m } function format(shijianchuo)
{ //shijianchuo是整数,否则要parseInt转换 var time = new Date(shijianchuo); var y = time.getFullYear(); var m = time.getMonth()+1; var d = time.getddate(); var h = time.getHours(); var mm = time.getMinutes(); var s = time.getSeconds(); return y+'-'+add0(m)+'-'+add0(d)+' '+add0(h)+':'+add0(mm)+':'+add0(s);
}

蓝蓝设计( www.lanlanwork.com )是一家专注而深入的界面设计公司,为期望卓越的国内外企业提供卓越的UI界面设计、BS界面设计 、 cs界面设计 、 ipad界面设计 、 包装设计 、 图标定制 、 用户体验 、交互设计、 网站建设 、平面设计服务
文章来源:网络某处。
分享此文一切功德,皆悉回向给文章原作者及众读者.
免责声明:蓝蓝设计尊重原作者,文章的版权归原作者。如涉及版权问题,请及时与我们取得联系,我们立即更正或删除。
html:<span class="shaky">你在说什么( ,,´・ω・)ノ"(´っω・`。)</span>
css:.shaky { display: inline-block; padding: 1px; font-size: 12px; -webkit-transform-origin: center center; -ms-transform-origin: center center; transform-origin: center center; -webkit-animation-name: shaky-slow; -ms-animation-name: shaky-slow; animation-name: shaky-slow; -webkit-animation-duration: 4s; -ms-animation-duration: 4s; animation-duration: 4s; -webkit-animation-iteration-count: infinite; -ms-animation-iteration-count: infinite; animation-iteration-count: infinite; -webkit-animation-timing-function: ease-in-out; -ms-animation-timing-function: ease-in-out; animation-timing-function: ease-in-out; -webkit-animation-delay: 0s; -ms-animation-delay: 0s; animation-delay: 0s; -webkit-animation-play-state: running; -ms-animation-play-state: running; animation-play-state: running; } @-webkit-keyframes shaky-slow { 0% { -webkit-transform: translate(0px, 0px) rotate(0deg) } 2% { -webkit-transform: translate(-1px, 1.5px) rotate(1.5deg) } 4% { -webkit-transform: translate(1.3px, 0px) rotate(-0.5deg) } 6% { -webkit-transform: translate(1.4px, 1.4px) rotate(-2deg) } 8% { -webkit-transform: translate(-1.3px, -1px) rotate(-1.5deg) } 10% { -webkit-transform: translate(1.4px, 0px) rotate(-2deg) } 12% { -webkit-transform: translate(-1.3px, -1px) rotate(-2deg) } 14% { -webkit-transform: translate(1.5px, 1.3px) rotate(1.5deg) } 16% { -webkit-transform: translate(1.5px, -1.5px) rotate(-1.5deg) } 18% { -webkit-transform: translate(1.3px, -1.3px) rotate(-2deg) } 20% { -webkit-transform: translate(1px, 1px) rotate(-0.5deg) } 22% { -webkit-transform: translate(1.3px, 1.5px) rotate(-2deg) } 24% { -webkit-transform: translate(-1.4px, -1px) rotate(2deg) } 26% { -webkit-transform: translate(1.3px, -1.3px) rotate(0.5deg) } 28% { -webkit-transform: translate(1.6px, -1.6px) rotate(-2deg) } 30% { -webkit-transform: translate(-1.3px, -1.3px) rotate(-1.5deg) } 32% { -webkit-transform: translate(-1px, 0px) rotate(2deg) } 34% { -webkit-transform: translate(1.3px, 1.3px) rotate(-0.5deg) } 36% { -webkit-transform: translate(1.3px, 1.6px) rotate(1.5deg) } 38% { -webkit-transform: translate(1.3px, -1.6px) rotate(1.5deg) } 40% { -webkit-transform: translate(-1.4px, -1px) rotate(-0.5deg) } 42% { -webkit-transform: translate(-1.4px, 1.3px) rotate(-0.5deg) } 44% { -webkit-transform: translate(-1.6px, 1.4px) rotate(0.5deg) } 46% { -webkit-transform: translate(-2.1px, -1.3px) rotate(-0.5deg) } 48% { -webkit-transform: translate(1px, 1.6px) rotate(1.5deg) } 50% { -webkit-transform: translate(1.6px, 1.6px) rotate(1.5deg) } 52% { -webkit-transform: translate(-1.4px, 1.6px) rotate(0.5deg) } 54% { -webkit-transform: translate(1.6px, -1px) rotate(-2deg) } 56% { -webkit-transform: translate(1.3px, -1.6px) rotate(-2deg) } 58% { -webkit-transform: translate(-1.3px, -1.6px) rotate(0.5deg) } 60% { -webkit-transform: translate(1.3px, 1.6px) rotate(-0.5deg) } 62% { -webkit-transform: translate(0px, 0px) rotate(-1.5deg) } 64% { -webkit-transform: translate(-1.6px, -1.6px) rotate(-2deg) } 66% { -webkit-transform: translate(1.6px, -1.6px) rotate(0.5deg) } 68% { -webkit-transform: translate(0px, -1.6px) rotate(-2deg) } 70% { -webkit-transform: translate(-1.6px, 1px) rotate(1.5deg) } 72% { -webkit-transform: translate(-1.6px, 1.6px) rotate(2deg) } 74% { -webkit-transform: translate(1.3px, -1.6px) rotate(-0.5deg) } 76% { -webkit-transform: translate(1.4px, 1px) rotate(-0.5deg) } 78% { -webkit-transform: translate(-1px, 1.4px) rotate(2deg) } 80% { -webkit-transform: translate(1.4px, 1.6px) rotate(2deg) } 82% { -webkit-transform: translate(-1.6px, -1.6px) rotate(-0.5deg) } 84% { -webkit-transform: translate(-1.4px, 1.4px) rotate(-2deg) } 86% { -webkit-transform: translate(1px, 1.4px) rotate(-2deg) } 88% { -webkit-transform: translate(-1.4px, 1.4px) rotate(-1.5deg) } 90% { -webkit-transform: translate(-1.6px, -1.6px) rotate(-2deg) } 92% { -webkit-transform: translate(-1.6px, 1.6px) rotate(2deg) } 94% { -webkit-transform: translate(-1.6px, -1.6px) rotate(-2deg) } 96% { -webkit-transform: translate(-1.4px, 1.3px) rotate(-2deg) } 98% { -webkit-transform: translate(1.3px, 1px) rotate(-0.5deg) } } @keyframes shaky-slow { 0% { transform: translate(0px, 0px) rotate(0deg) } 2% { transform: translate(-1px, 1.5px) rotate(1.5deg) } 4% { transform: translate(1.3px, 0px) rotate(-0.5deg) } 6% { transform: translate(1.4px, 1.4px) rotate(-2deg) } 8% { transform: translate(-1.3px, -1px) rotate(-1.5deg) } 10% { transform: translate(1.4px, 0px) rotate(-2deg) } 12% { transform: translate(-1.3px, -1px) rotate(-2deg) } 14% { transform: translate(1.5px, 1.3px) rotate(1.5deg) } 16% { transform: translate(1.5px, -1.5px) rotate(-1.5deg) } 18% { transform: translate(1.3px, -1.3px) rotate(-2deg) } 20% { transform: translate(1px, 1px) rotate(-0.5deg) } 22% { transform: translate(1.3px, 1.5px) rotate(-2deg) } 24% { transform: translate(-1.4px, -1px) rotate(2deg) } 26% { transform: translate(1.3px, -1.3px) rotate(0.5deg) } 28% { transform: translate(1.6px, -1.6px) rotate(-1.5deg) } 30% { transform: translate(-1.3px, -1.3px) rotate(-1.5deg) } 32% { transform: translate(-1px, 0px) rotate(2deg) } 34% { transform: translate(1.3px, 1.3px) rotate(-0.5deg) } 36% { transform: translate(1.3px, 1.6px) rotate(1.5deg) } 38% { transform: translate(1.3px, -1.6px) rotate(1.5deg) } 40% { transform: translate(-1.4px, -1px) rotate(-0.5deg) } 42% { transform: translate(-1.4px, 1.3px) rotate(-0.5deg) } 44% { transform: translate(-1.6px, 1.4px) rotate(0.5deg) } 46% { transform: translate(-2.1px, -1.3px) rotate(-0.5deg) } 48% { transform: translate(1px, 1.6px) rotate(1.5deg) } 50% { transform: translate(1.6px, 1.6px) rotate(1.5deg) } 52% { transform: translate(-1.4px, 1.6px) rotate(0.5deg) } 54% { transform: translate(1.6px, -1px) rotate(-2deg) } 56% { transform: translate(1.3px, -1.6px) rotate(-2deg) } 58% { transform: translate(-1.3px, -1.6px) rotate(0.5deg) } 60% { transform: translate(1.3px, 1.6px) rotate(-0.5deg) } 62% { transform: translate(0px, 0px) rotate(-1.5deg) } 64% { transform: translate(-1.6px, -1.6px) rotate(-2deg) } 66% { transform: translate(1.6px, -1.6px) rotate(0.5deg) } 68% { transform: translate(0px, -1.6px) rotate(-2deg) } 70% { transform: translate(-1.6px, 1px) rotate(1.5deg) } 72% { transform: translate(-1.6px, 1.6px) rotate(2deg) } 74% { transform: translate(1.3px, -1.6px) rotate(-0.5deg) } 76% { transform: translate(1.4px, 1px) rotate(-0.5deg) } 78% { transform: translate(-1px, 1.4px) rotate(2deg) } 80% { transform: translate(1.4px, 1.6px) rotate(2deg) } 82% { transform: translate(-1.6px, -1.6px) rotate(-0.5deg) } 84% { transform: translate(-1.4px, 1.4px) rotate(-2deg) } 86% { transform: translate(1px, 1.4px) rotate(-2deg) } 88% { transform: translate(-1.4px, 1.4px) rotate(-1.5deg) } 90% { transform: translate(-1.6px, -1.6px) rotate(-2deg) } 92% { transform: translate(-1.4px, 1.6px) rotate(2deg) } 94% { transform: translate(-1.6px, -1.6px) rotate(-2deg) } 96% { transform: translate(-1.4px, 1.3px) rotate(-2deg) } 98% { transform: translate(1.3px, 1px) rotate(-0.5deg) } }
蓝蓝设计( www.lanlanwork.com )是一家专注而深入的界面设计公司,为期望卓越的国内外企业提供卓越的UI界面设计、BS界面设计 、 cs界面设计 、 ipad界面设计 、 包装设计 、 图标定制 、 用户体验 、交互设计、 网站建设 、平面设计服务
文章来源:网络某处。
分享此文一切功德,皆悉回向给文章原作者及众读者.
免责声明:蓝蓝设计尊重原作者,文章的版权归原作者。如涉及版权问题,请及时与我们取得联系,我们立即更正或删除。
注:服务器为CentOS 7.3.1611,使用Xshell6 + Xftp6工具完成服务器远程操作
通过Xshell连接服务器成功之后就可以开始以下工作
yum remove nodejs npm -y
然后手动进入以下目录删除相关文件
进入 /usr/local/lib 删除所有 node 和 node_modules文件夹
进入 /usr/local/include 删除所有 node 和 node_modules 文件夹
进入 /usr/local/bin 删除 node 的可执行文件
https://nodejs.org/en/download/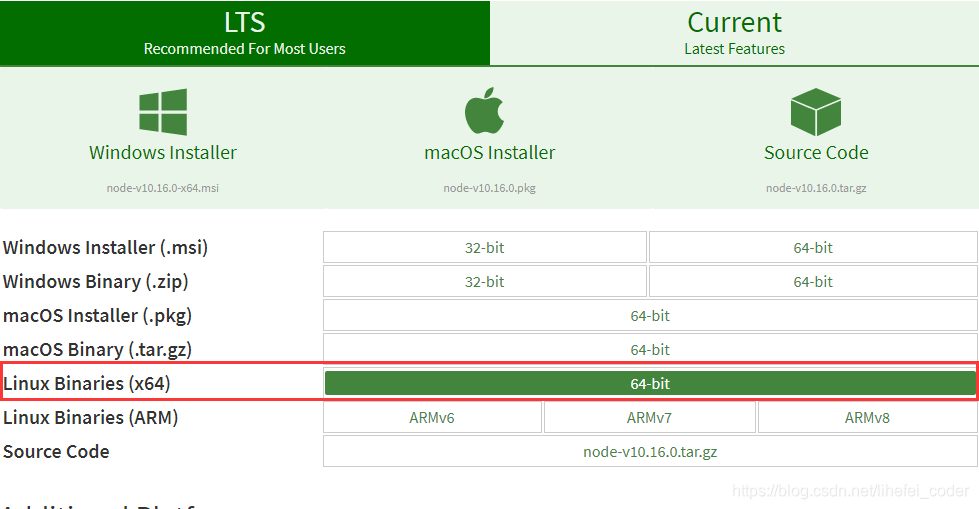
cd /usr/local/
wget https://nodejs.org/dist/v10.16.0/node-v10.16.0-linux-x64.tar.xz
xz -d node-v10.16.0-linux-x64.tar.xz
tar -xvf node-v10.16.0-linux-x64.tar
mv node-v10.16.0-linux-x64 nodejs
cd nodejs
ln -s /usr/local/nodejs/bin/node /usr/local/bin/node
ln -s /usr/local/nodejs/bin/npm /usr/local/bin/npm
如果不小心输错了路径,重新创建会提示:‘ln: 无法创建符号链接"/usr/local/bin/npm": 文件已存在’,输入rm /usr/local/bin/npm命令清除后可以重新创建
node -v
npm -v
npm install -g cnpm
ln -s /usr/local/nodejs/bin/cnpm /usr/local/bin/cnpm
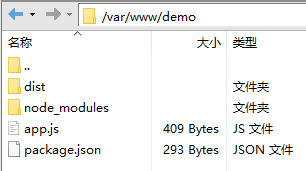
cd /var/www/
注:如果没有www目录就在var目录下输入命令mkdir www手动创建一个,并进入到www目录
mkdir demo
cd demo
npm init -y
注:这里的-y意思是省略创建过程中一直输yes的步骤
cnpm i express -D
mkdir app.js
const fs = require('fs'); //文件模块 const path = require('path'); //路径模块 const express = require('express'); //express框架模块 const app = express(); const hostName = '11.22.33.44'; //ip const port = 9999; //端口 app.use(express.static(path.resolve(__dirname, './dist'))); // 设置静态项目访问路径(此处的dist为webpack打包生成的项目文件夹名称) app.get('*', function(req, res) { const html = fs.readFileSync(path.resolve(__dirname, './dist/index.html'), 'utf-8'); // 设置所有访问服务请求默认返回index.html文件 res.send(html); }); app.listen(port, hostName, function() { console.log(`服务器运行在http://${hostName}:${port}`); });
npm run build
生成的dist文件夹就是我们需要部署到服务器上的项目

node app.js
如果能正常访问项目地址表示已经搭建成功。
请求后端接口跨域方案请见:
跨域代理方案1:Nginx使用教程
跨域代理方案2:Nodejs 中使用http-proxy-middleware实现代理跨域
在xshell里用node默认的启动方式有一个缺点,xshell退出后nodejs项目便会停止
使用pm2这个托管工具可以很好的解决这个问题,而且当代码有更改时会自动重启服务更新
1.首先多按两次ctrl +c结束之前的运行程序,接着输入下面的命令安装pm2并创建软链接
cnpm install pm2 -g
ln -s /usr/local/nodejs/bin/pm2 /usr/local/bin/pm2
2.然后输入下面的命令启动托管任务,abc为托管项目定义的名称
pm2 start app.js --name abc
以下为pm2常用命令说明
| 命令 | 功能 |
|---|---|
| pm2 start app.js --name abc | 启动(--name为定义任务名称的指令,abc为任务名称值) |
| pm2 start app.js --watch | 启动( --watch为监听应用目录的变化的指令) |
| pm2 restart app.js | 重启任务 |
| pm2 stop abc | 结束(abc为任务名称或id) |
| pm2 list | 查看所有任务列表 |
pm2基本功能命令
| 功能 | 命令 |
|---|---|
| 启动进程/应用 | pm2 start bin/abc 或 pm2 start app.js |
| 重命名进程/应用 | pm2 start app.js --name abc |
| 添加进程/应用 | pm2 start bin/abc --watch |
| 结束进程/应用 | pm2 stop abc |
| 结束所有进程/应用 | pm2 stop all |
| 删除进程/应用 | pm2 delete abc |
| 删除所有进程/应用 | pm2 delete all |
| 列出所有进程/应用 | pm2 list |
| 查看进程/应用详情 | pm2 show abc 或 pm2 describe abc |
| 查看进程/应用资源消耗 | pm2 monit |
| 查看进程/应用日志 | pm2 logs abc |
| 查看所有进程/应用日志 | pm2 logs |
| 重新启动进程/应用 | pm2 restart abc |
| 重新启动所有进程/应用 | pm2 restart all |
pm2使用教程参考链接:
https://www.cnblogs.com/chyingp/p/pm2-documentation.html
https://www.jb51.net/article/113398.htm
转自:csdn。作者:lihefei_coder
蓝蓝设计( www.lanlanwork.com )是一家专注而深入的界面设计公司,为期望卓越的国内外企业提供卓越的UI界面设计、BS界面设计 、 cs界面设计 、 ipad界面设计 、 包装设计 、 图标定制 、 用户体验 、交互设计、 网站建设 、平面设计服务
本文由小芭乐发表
首先举一个例子:
模拟在输入框输入后做ajax查询请求,没有加入防抖和节流的效果,这里附上完整可执行代码:
<!DOCTYPE html> <html lang="en"> <head> <meta charset="UTF-8"> <title>没有防抖</title> <style type="text/css"></style> <script type="text/javascript"> window.onload = function () { //模拟ajax请求 function ajax(content) { console.log('ajax request ' + content) } let inputNormal = document.getElementById('normal'); inputNormal.addEventListener('keyup', function (e) { ajax(e.target.value) }) } </script> </head> <body> <div> 1.没有防抖的输入: <input type="text" name="normal" id="normal"> </div> </body> </html> 效果:在输入框里输入一个,就会触发一次“ajax请求”(此处是console)。
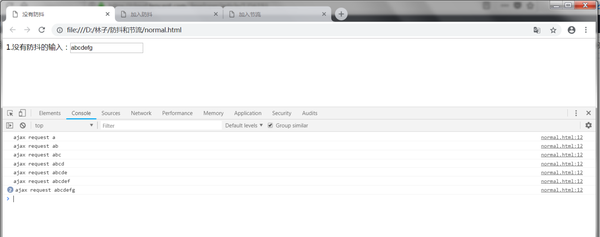
没有防抖和节流
缺点:浪费请求资源,可以加入防抖和节流来优化一下。
本文会分别介绍什么是防抖和节流,它们的应用场景,和实现方式。防抖和节流都是为了解决短时间内大量触发某函数而导致的性能问题,比如触发频率过高导致的响应速度跟不上触发频率,出现延迟,假死或卡顿的现象。但二者应对的业务需求不一样,所以实现的原理也不一样,下面具体来看看吧。
在事件被触发n秒后再执行回调函数,如果在这n秒内又被触发,则重新计时。
(1) 用户在输入框中连续输入一串字符后,只会在输入完后去执行最后一次的查询ajax请求,这样可以有效减少请求次数,节约请求资源;
(2) window的resize、scroll事件,不断地调整浏览器的窗口大小、或者滚动时会触发对应事件,防抖让其只触发一次;
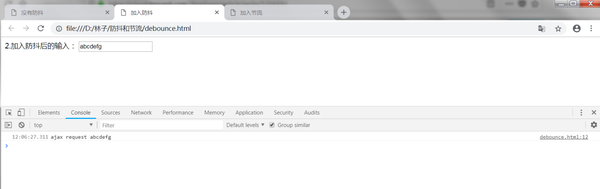
还是上述列子,这里加入防抖来优化一下,完整代码如下:
<!DOCTYPE html> <html lang="en"> <head> <meta charset="UTF-8"> <title>加入防抖</title> <style type="text/css"></style> <script type="text/javascript"> window.onload = function () { //模拟ajax请求 function ajax(content) { console.log('ajax request ' + content) } function debounce(fun, delay) { return function (args) { //获取函数的作用域和变量 let that = this let _args = args //每次事件被触发,都会清除当前的timeer,然后重写设置超时调用 clearTimeout(fun.id) fun.id = setTimeout(function () { fun.call(that, _args) }, delay) } } let inputDebounce = document.getElementById('debounce') let debounceAjax = debounce(ajax, 500) inputDebounce.addEventListener('keyup', function (e) { debounceAjax(e.target.value) }) } </script> </head> <body> <div> 2.加入防抖后的输入: <input type="text" name="debounce" id="debounce"> </div> </body> </html> 代码说明:
1.每一次事件被触发,都会清除当前的 timer 然后重新设置超时调用,即重新计时。 这就会导致每一次高频事件都会取消前一次的超时调用,导致事件处理程序不能被触发;
2.只有当高频事件停止,最后一次事件触发的超时调用才能在delay时间后执行;
效果:
加入防抖后,当持续在输入框里输入时,并不会发送请求,只有当在指定时间间隔内没有再输入时,才会发送请求。如果先停止输入,但是在指定间隔内又输入,会重新触发计时。
加入防抖
规定一个单位时间,在这个单位时间内,只能有一次触发事件的回调函数执行,如果在同一个单位时间内某事件被触发多次,只有一次能生效。
(1)鼠标连续不断地触发某事件(如点击),只在单位时间内只触发一次;
(2)在页面的无限加载场景下,需要用户在滚动页面时,每隔一段时间发一次 ajax 请求,而不是在用户停下滚动页面操作时才去请求数据;
(3)监听滚动事件,比如是否滑到底部自动加载更多,用throttle来判断;
还是上述列子,这里加入节流来优化一下,完整代码如下:
<!DOCTYPE html> <html lang="en"> <head> <meta charset="UTF-8"> <title>加入节流</title> <style type="text/css"></style> <script type="text/javascript"> window.onload = function () { //模拟ajax请求 function ajax(content) { console.log('ajax request ' + content) } function throttle(fun, delay) { let last, deferTimer return function (args) { let that = this; let _args = arguments; let now = +new Date(); if (last && now < last + delay) { clearTimeout(deferTimer); deferTimer = setTimeout(function () { last = now; fun.apply(that, _args); }, delay) } else { last = now; fun.apply(that, _args); } } } let throttleAjax = throttle(ajax, 1000) let inputThrottle = document.getElementById('throttle') inputThrottle.addEventListener('keyup', function (e) { throttleAjax(e.target.value) }) } </script> </head> <body> <div> 3.加入节流后的输入: <input type="text" name="throttle" id="throttle"> </div> </body> </html> 效果:实验可发现在持续输入时,会安装代码中的设定,每1秒执行一次ajax请求
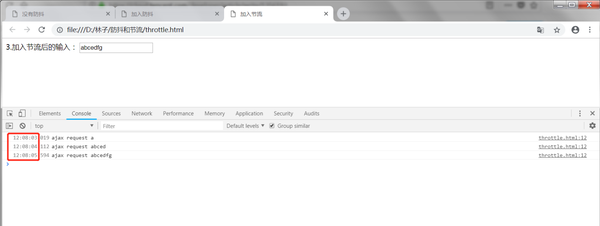
加入节流
总结下防抖和节流的区别:
-- 效果:
函数防抖是某一段时间内只执行一次;而函数节流是间隔时间执行,不管事件触发有多频繁,都会保证在规定时间内一定会执行一次真正的事件处理函数。
-- 原理:
防抖是维护一个计时器,规定在delay时间后触发函数,但是在delay时间内再次触发的话,都会清除当前的 timer 然后重新设置超时调用,即重新计时。这样一来,只有最后一次操作能被触发。
节流是通过判断是否到达一定时间来触发函数,若没到规定时间则使用计时器延后,而下一次事件则会重新设定计时器。
如有问题,欢迎指正。
转自知乎 原文链接:https://zhuanlan.zhihu.com/p/51608574
蓝蓝设计( www.lanlanwork.com )是一家专注而深入的界面设计公司,为期望卓越的国内外企业提供卓越的UI界面设计、BS界面设计 、 cs界面设计 、 ipad界面设计 、 包装设计 、 图标定制 、 用户体验 、交互设计、 网站建设 、平面设计服务
App界面设计对于设计师而言一直是盛久不衰的话题,尤其是如今越来越多的流量转移到了移动平台,使得更多的UI设计师涌入移动端领域,甚至出现了市场饱和的言论,对于从事移动端的UI设计师来讲,充满压力的同时又面临无限机遇,唯有不断的学习才能滋生出源源不断的设计灵感,站稳脚跟。
摹客想在这方面给各位设计师朋友做点什么,除了提供简单好用的设计工具,我们也整理了非常多的优秀设计案例,希望可以对设计师朋友有借鉴意义。这将会是一个系列的专题,我们以月为单位,整理了国内外设计师的优秀APP界面设计案例,我们是搬运工,更是好设计的传达者,希望你会喜欢。
接下来为大家分享精美的app UI设计案例:


--手机appUI设计--
更多精彩文章:
今天要用到服务器nginx,还需要把自己的vue的项目部署到服务器上去所以就写一下记录下来。
首先要去nginx官网下下载nginx:
下载地址:https://nginx.org/en/download.html

下载下来会是一个解压包,解压到你想放的文件夹下
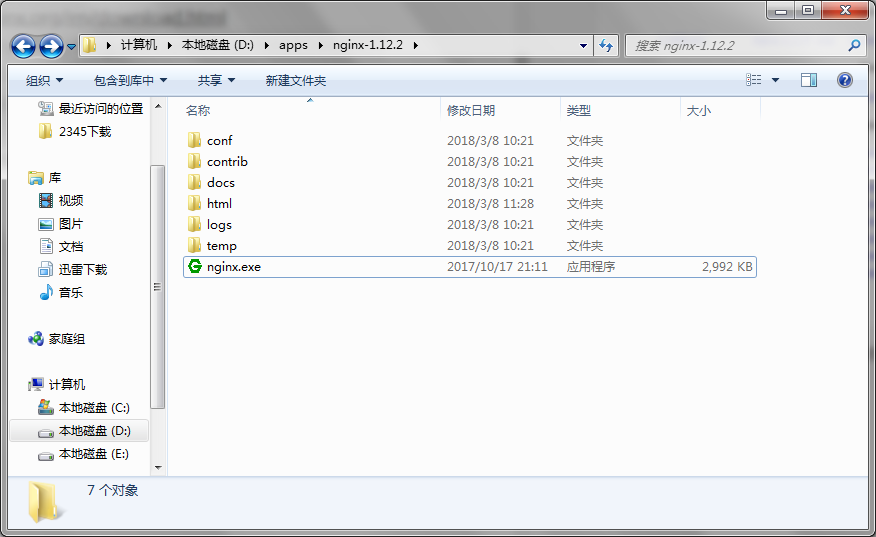
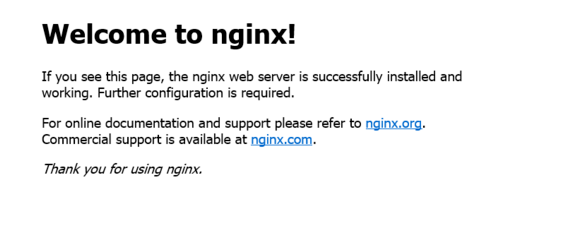
运行nginx.exe,然后打开浏览器输入localhost出来如下图片所示就说明成功了:
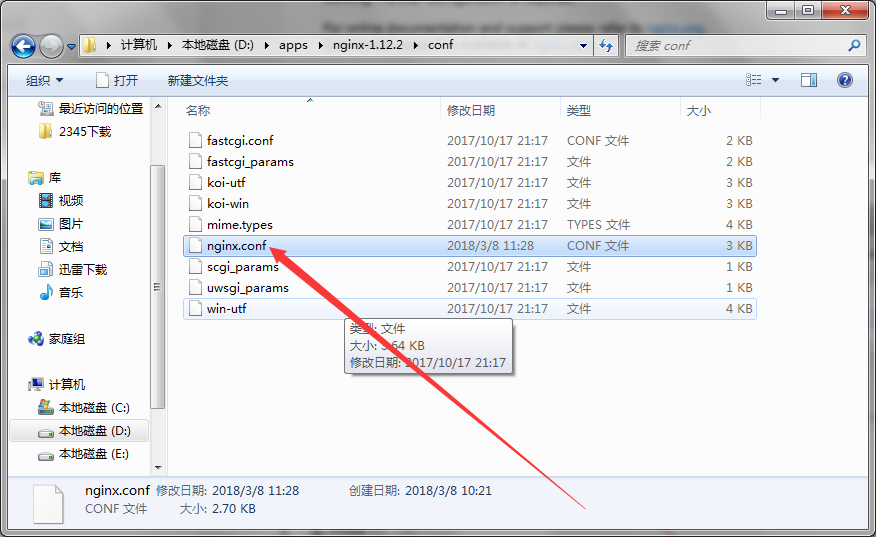
然后如果没有成功出来的话也不要慌不要怕,可能是你的端口被别的内容所占了这时你就打开你的nginx的目录下找到conf
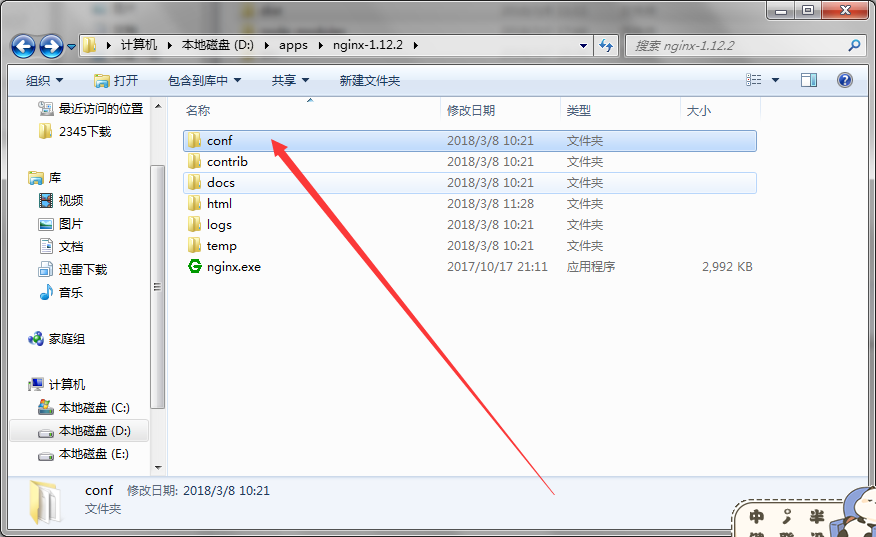
点击进去然后找到一个nginx.conf的文件
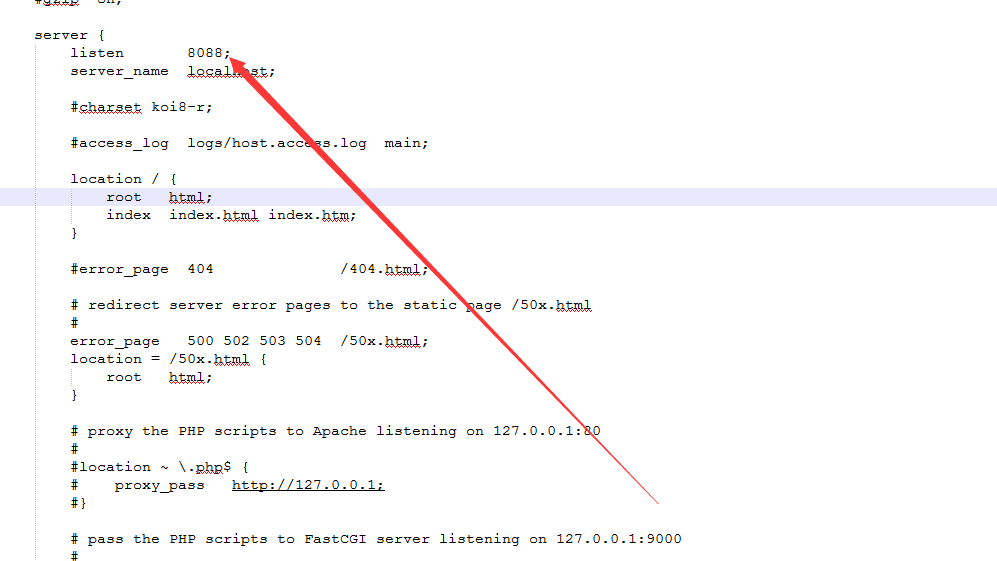
然后把它用编辑器的方式打开,打开之后找到这里的sever的listen就是你的端口号,默认的是80端口,你可以根据自己没有被占用的端口进行改写,改写完成之后保存然后打开你的localhost:你改写的端口号就OK了
 server {
            listen       8088;
            server_name  localhost;

            #charset koi8-r;

            #access_log  logs/host.access.log  main;

            location / {
                root   html;
                index  index.html index.htm;
        }
上面是安装配置nginx服务器的方法,下面就是如何把自己的vue项目部署到你所安装配置的nginx服务器上的步骤了:
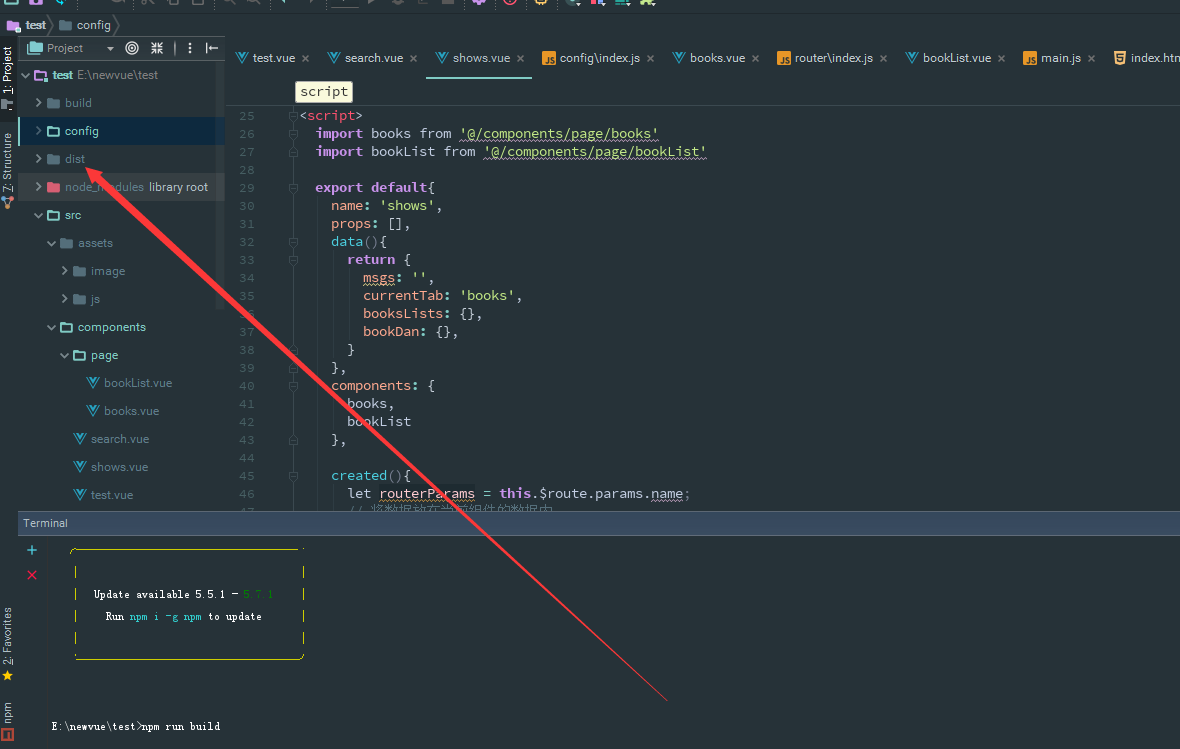
首先找到自己的vue的项目然后输入命令 npm run build 他会在你的vue目录下生成一个dist文件夹里面就是你的vue的项目
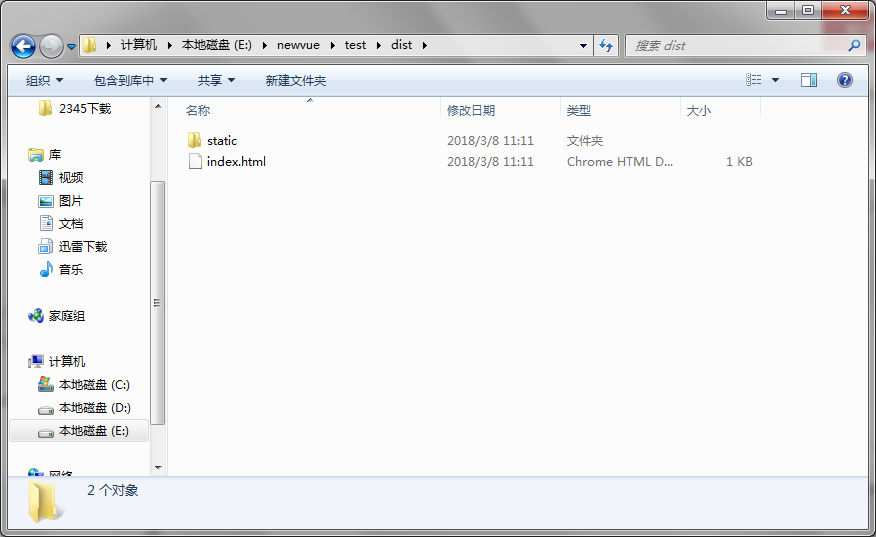
然后打开这个dist文件夹把里面的内容复制下来里面会有两个文件一个是index.html是主目录还有一个是static文件夹
把他们复制下来然后打开你的nginx的目录下的html文件里面会有两个默认文件直接删掉不要留,然后把你刚刚复制的文件粘贴进去
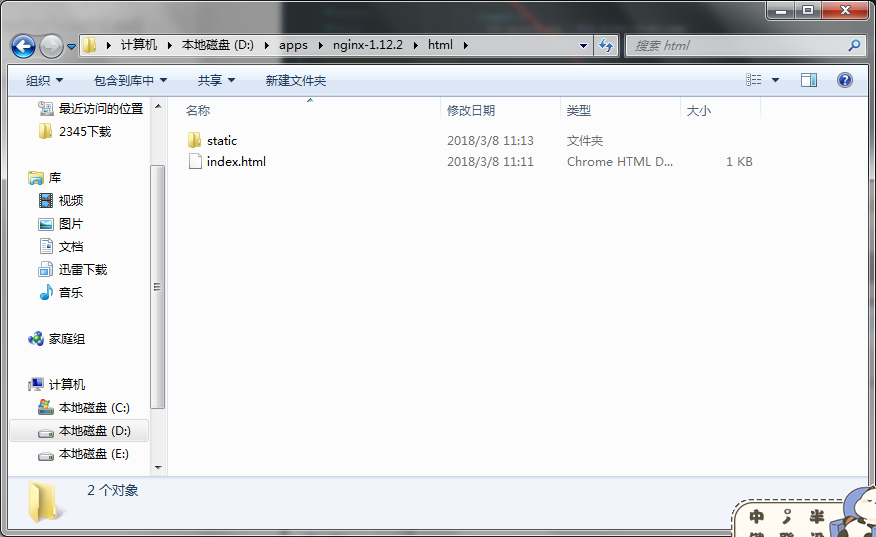
然后打开浏览器输入最开始改的端口号localhost:你所改的端口号回车;你就会看到自己的vue的项目跑起来了我的打开就是这样的咯:

这样就大功告成了~~~~~~~~~
转自:csdn 作者:前端的搬运工
蓝蓝设计( www.lanlanwork.com )是一家专注而深入的界面设计公司,为期望卓越的国内外企业提供卓越的UI界面设计、BS界面设计 、 cs界面设计 、 ipad界面设计 、 包装设计 、 图标定制 、 用户体验 、交互设计、 网站建设 、平面设计服务
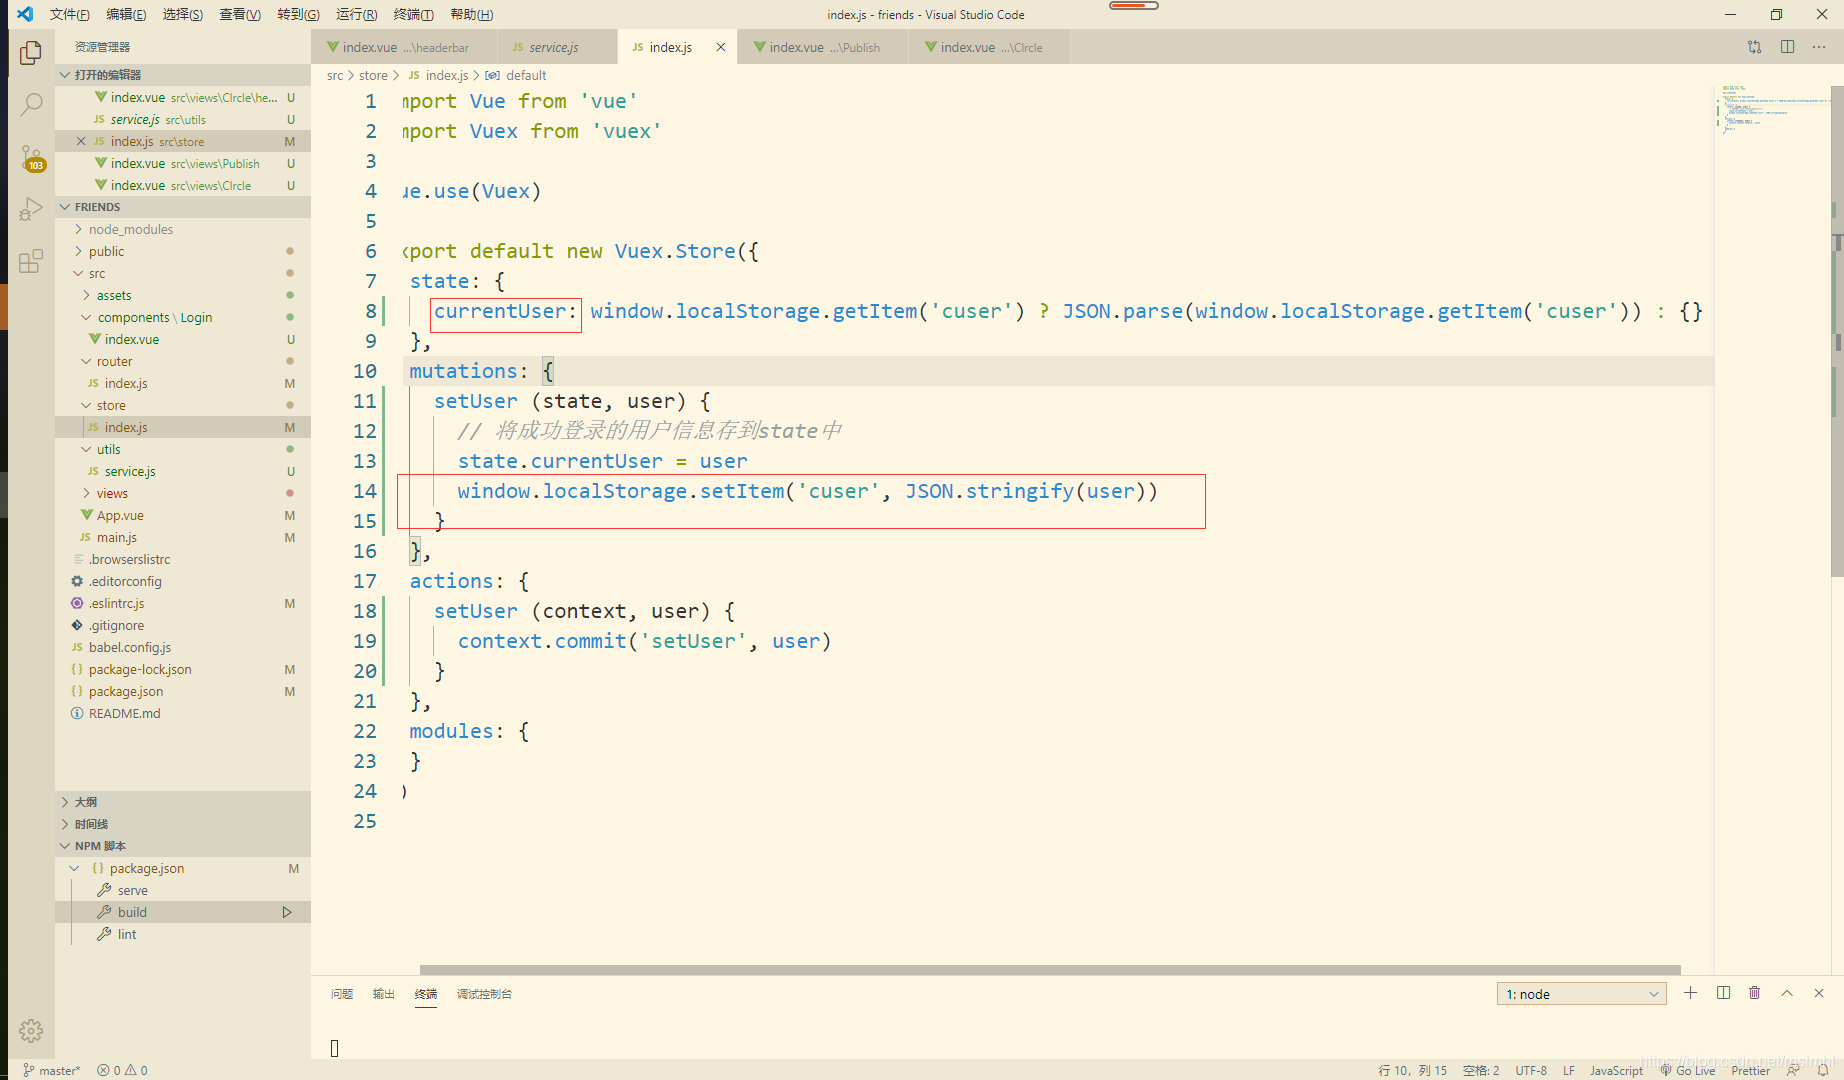
初次登录的时候,前端调后调的登录接口,发送用户名和密码,后端收到请求,验证用户名和密码,验证成功,就给前端返回一个token,和一个用户信息的值,前端拿到token,将token储存到Vuex中,然后从Vuex中把token的值存入浏览器Cookies中。把用户信息存到Vuex然后再存储到LocalStroage中
Cookies
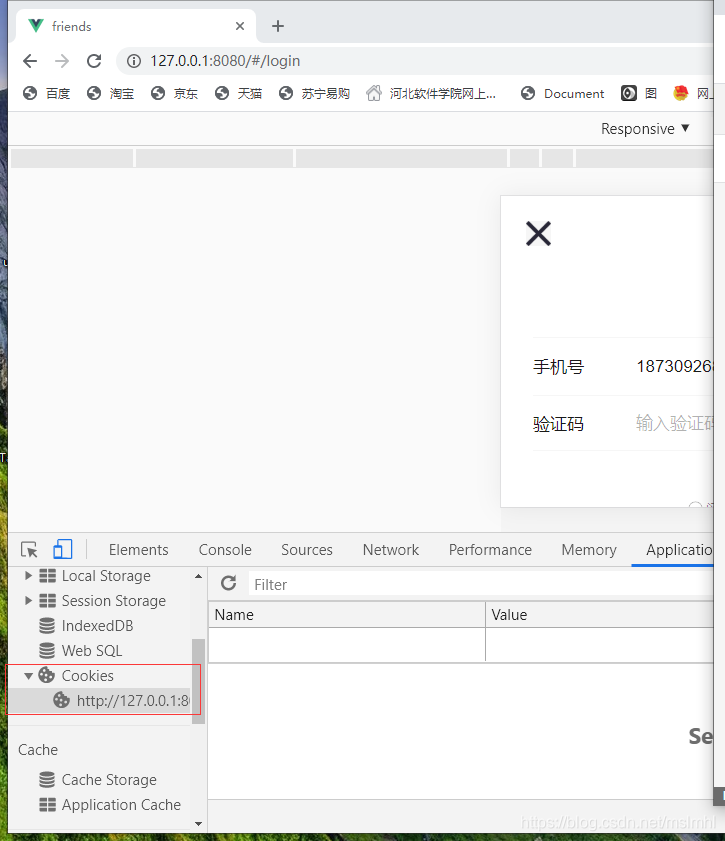
LocalStroage
然后跳转到下一个页面,根据后端接口的要求,只要不登录就不能访问的页面需要在前端每次跳转页面师判断Cookies中是否有token,没有就跳转到登录页,有就跳转到相应的页面,我们应该再每次发送post/get请求的时候应该加入token,常用方法再项目utils/service.js中添加全局拦截器,将token的值放入请求头中
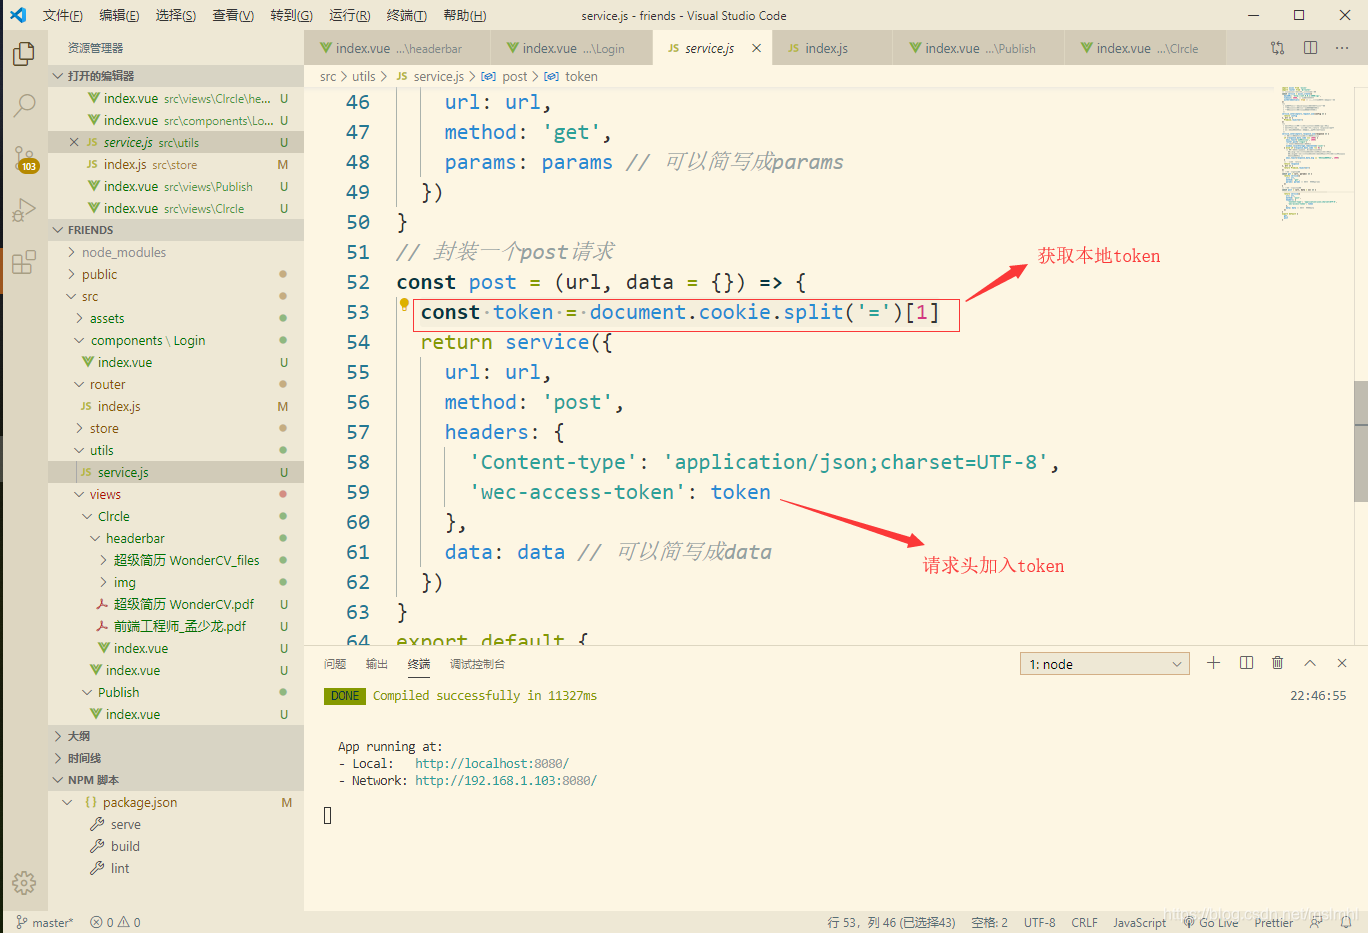
后端判断请求头中有无token,有token,就拿到token并验证token是否过期,在这里过期会返回无效的token然后有个跳回登录页面重新登录并且清楚本地用户的信息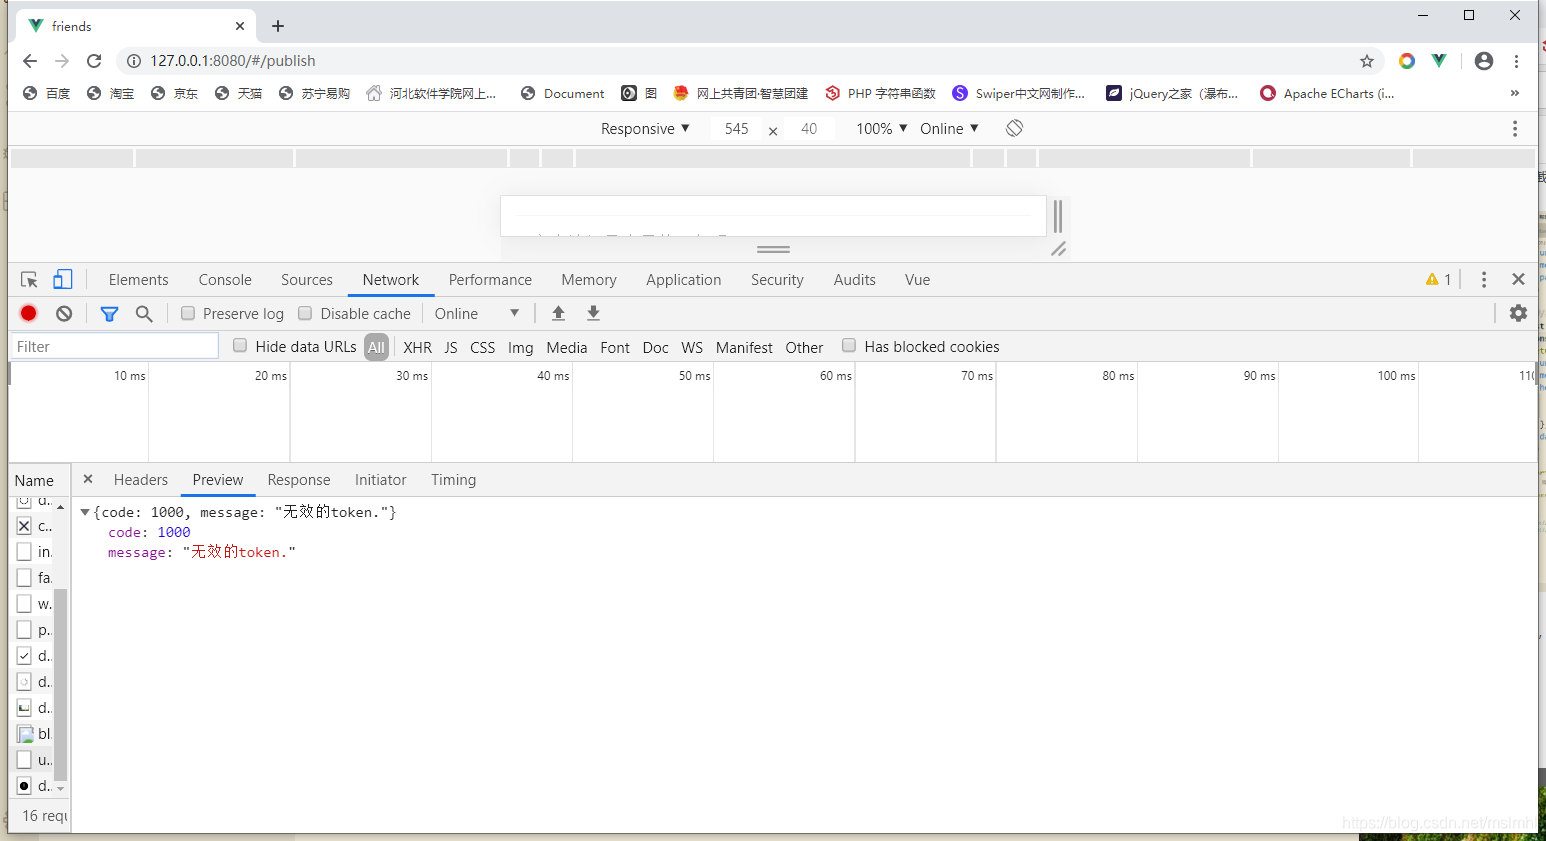
再全局拦截器中加代码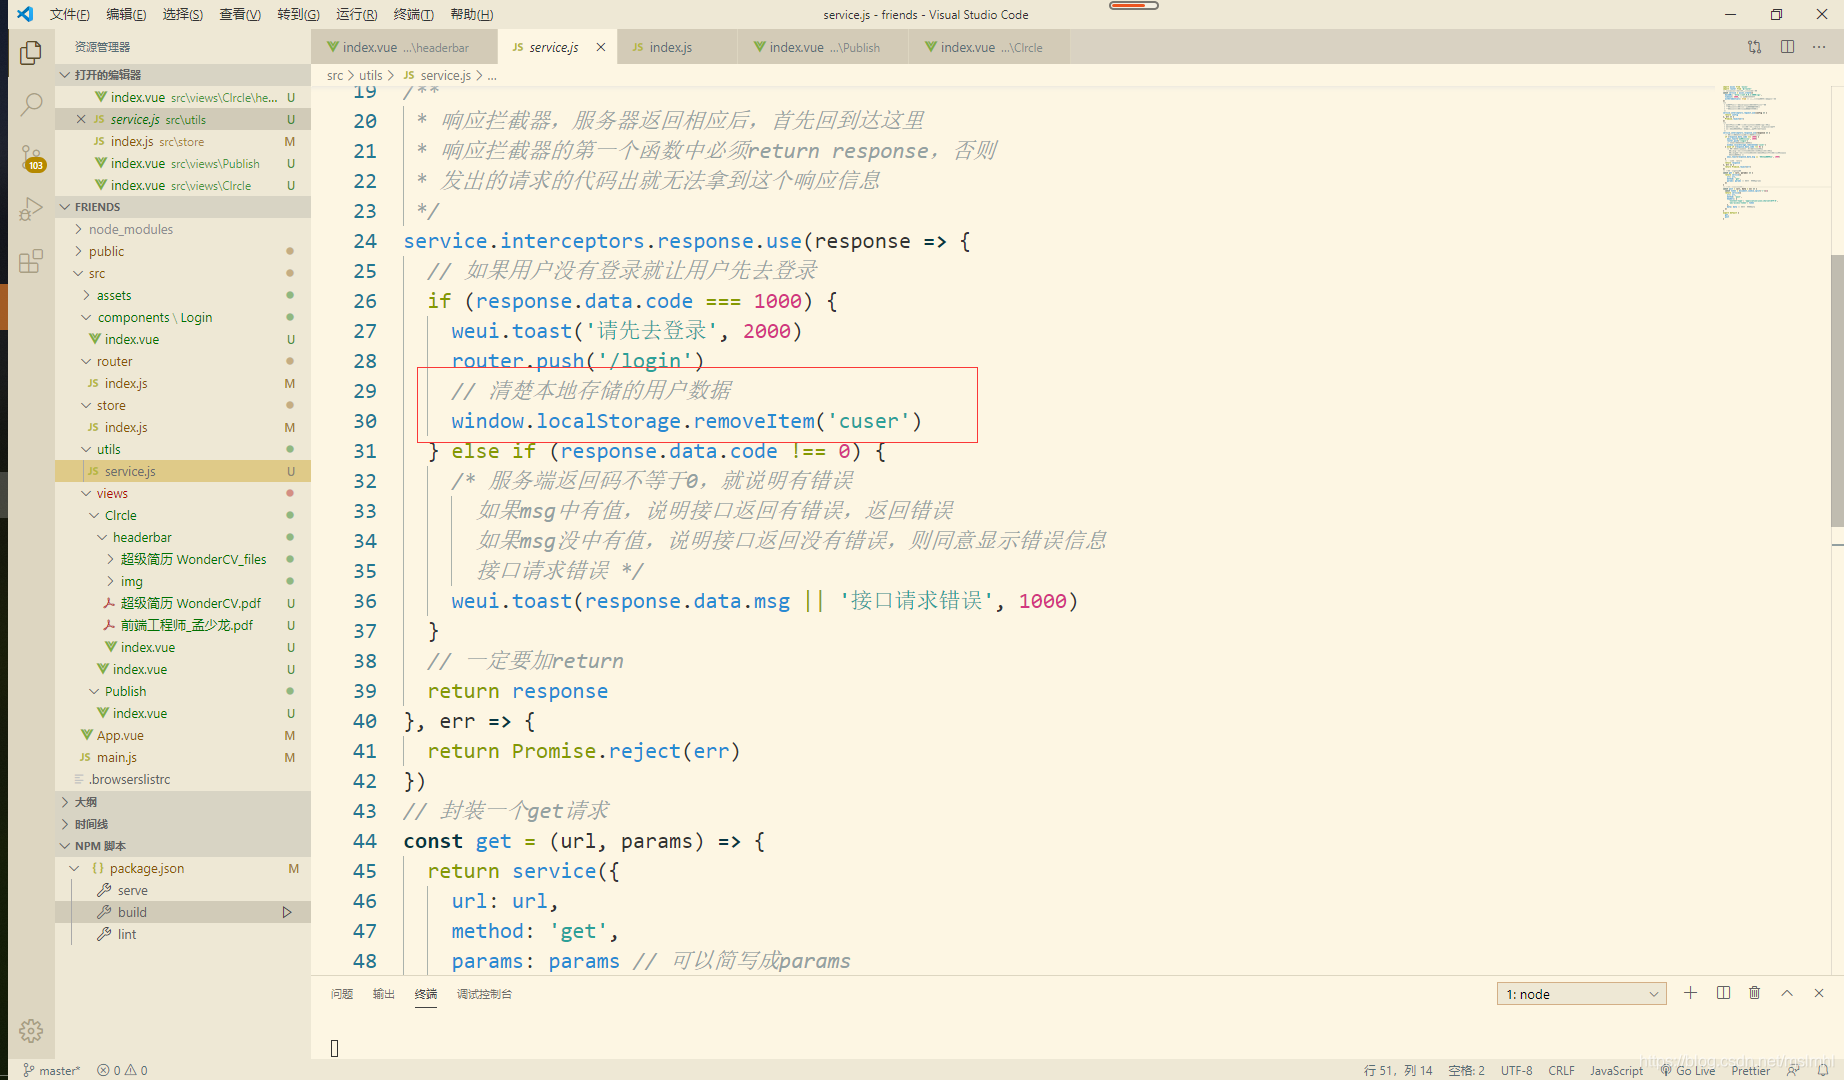
转自:csdn 作者:mslmhl
移动互联网的迅速崛起,让移动网页,移动客户端越来越重要,客户端的页面设计也是一门很大的学问。科技迅速发展的今手机屏幕的尺寸越来越放大化,但却始终 很有限,因此,在APP的界面设计中,精简是一贯的准则。这里所说的精简并不是内容上尽可能的少量,而是要注重重点的表达。在视觉上也要遵循用户的视觉逻 辑,用户看着顺眼了,才会真正的喜欢。
接下来为大家分享精美的app UI设计案例:


--手机appUI设计--
更多精彩文章:
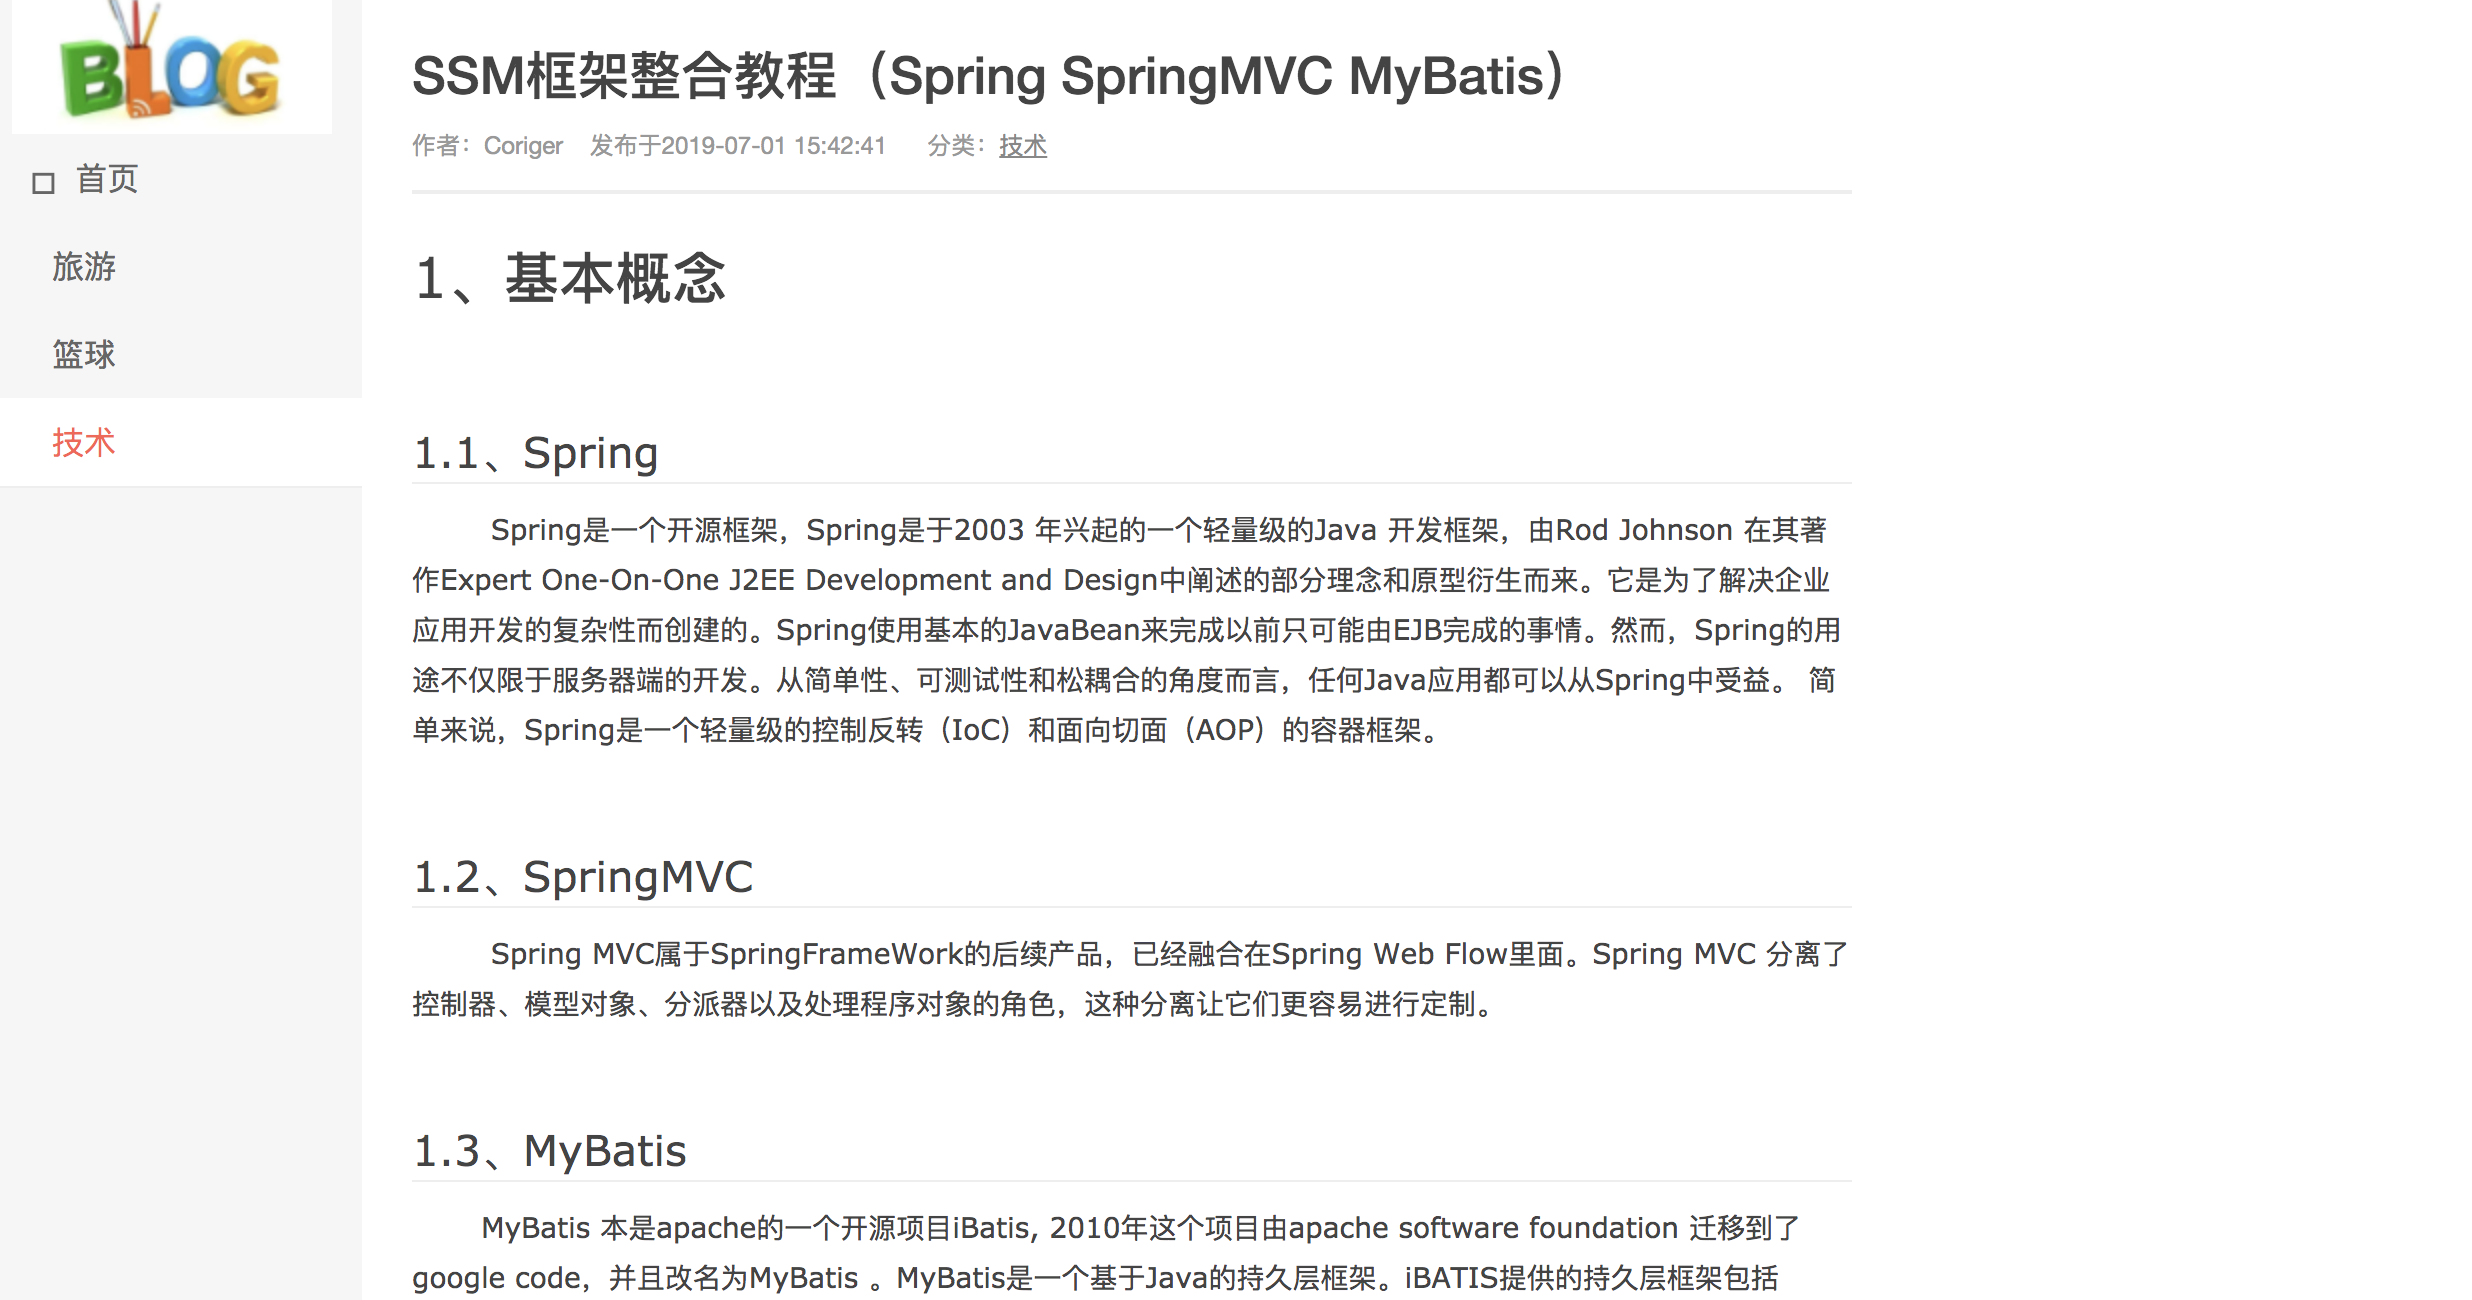
本系列文章主要通过从零开始搭建自己的个人博客,来加深对SSM框架的学习与使用,了解一个系统从提出到设计-到开发-到测试-部署运行的过程,并记录在搭建过程中的学习心得、遇见的错误及解决方式。
个人博客的主要功能有:
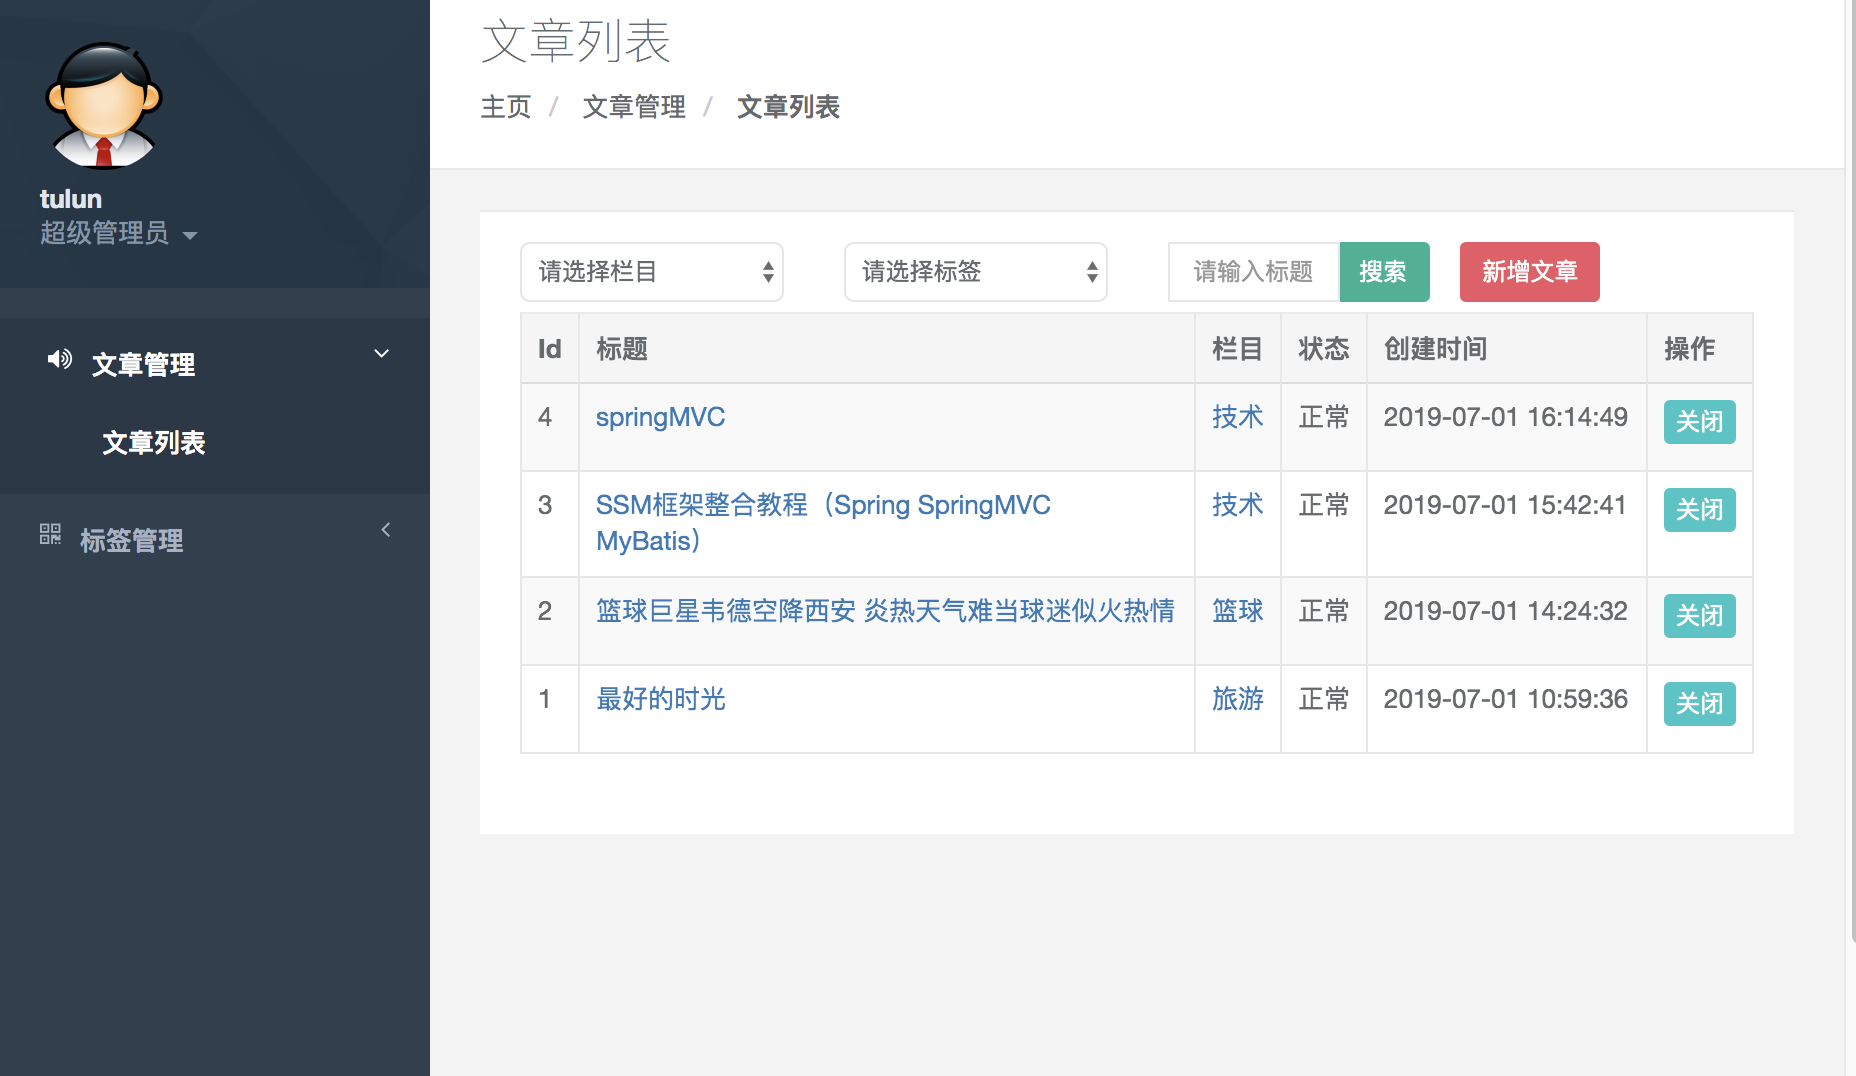
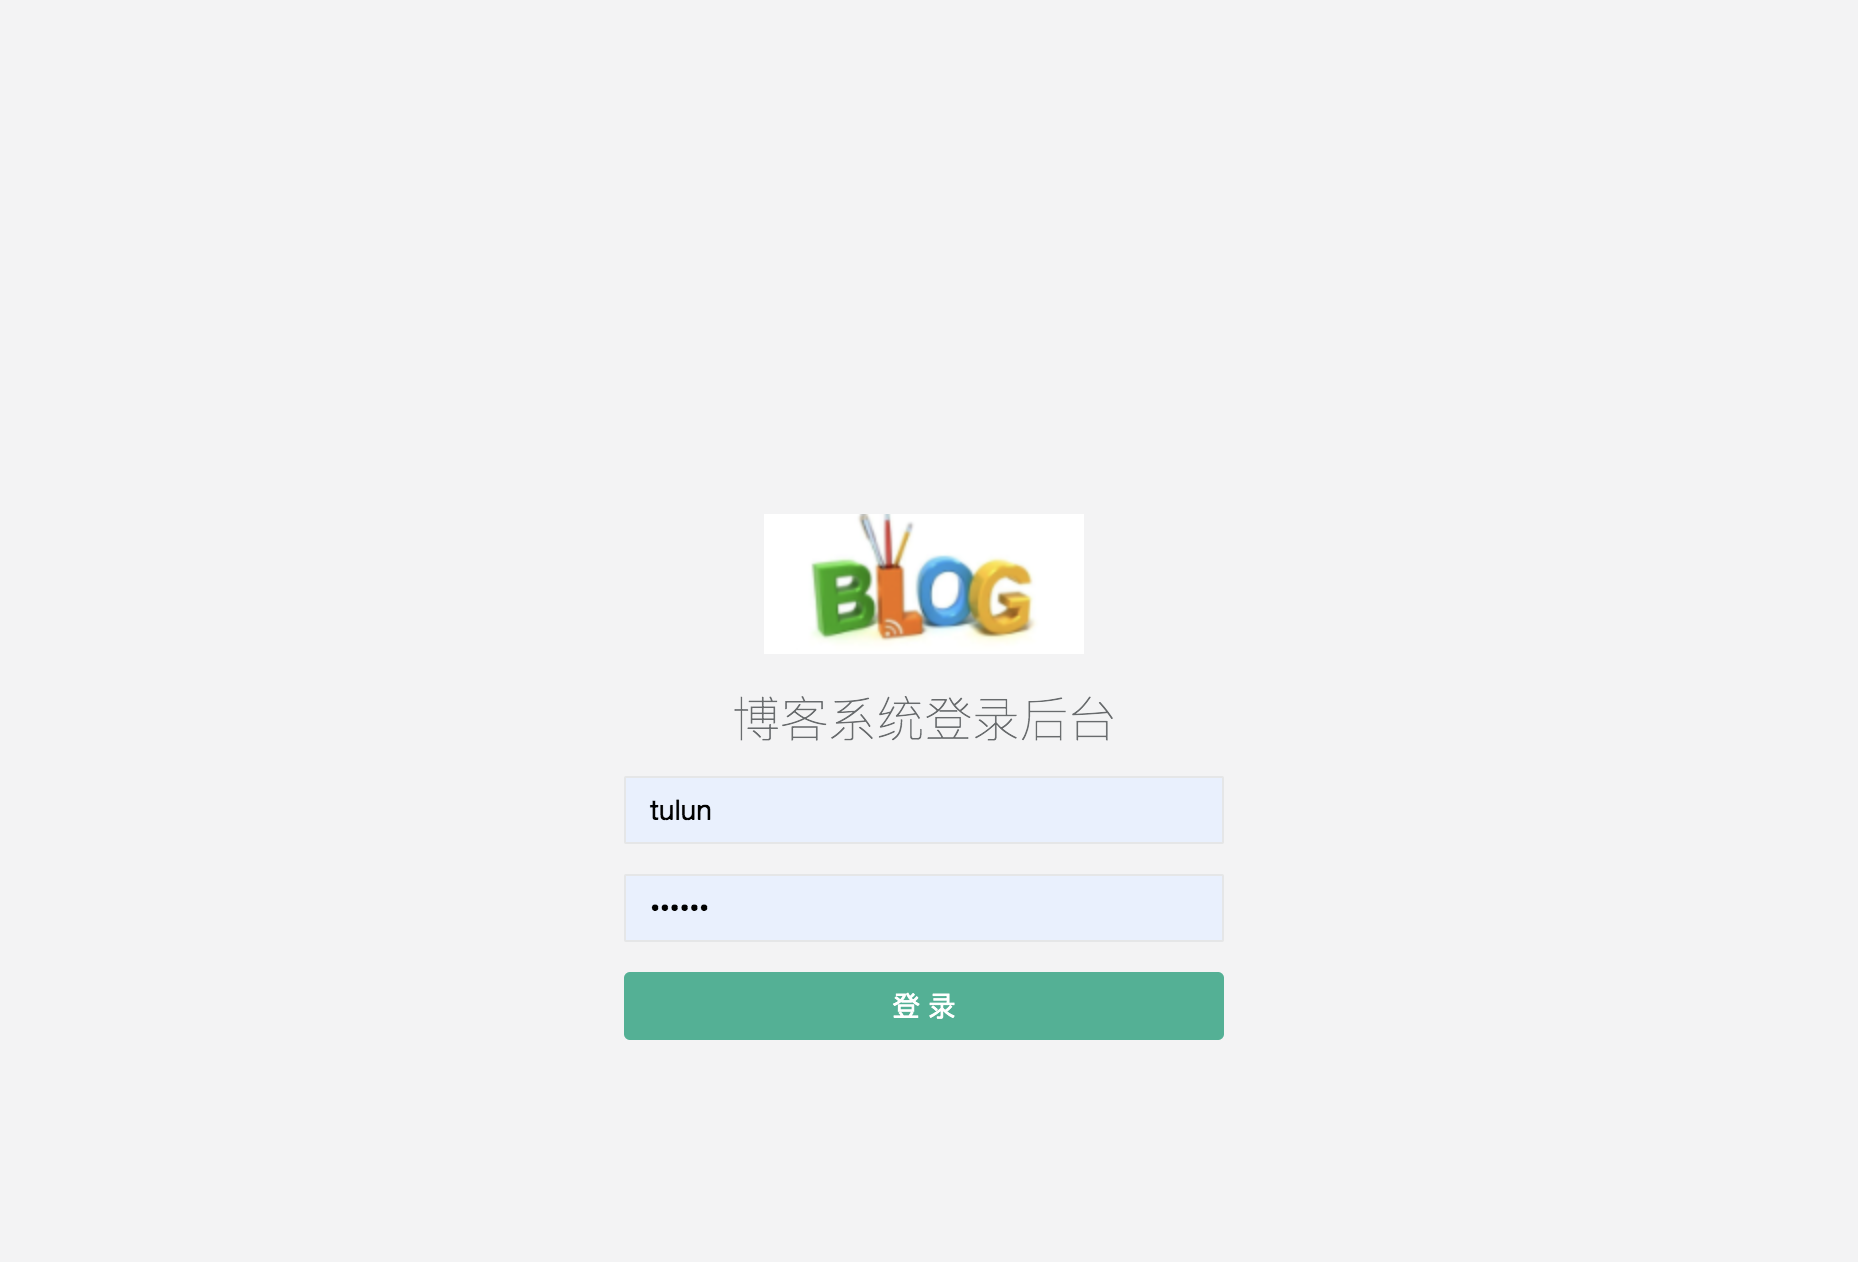
界面展示:
前台博客列表界面
博客详情页面
后台管理页面
登录页面
核心框架:Spring:5.2.8.RELEASE
web框架:SpringMVC:5.2.8.RELEASE
持久层框架:Mybatis 3.2.4
数据库连接池:阿里druid:0.2.6
数据库:MySQL5.XX
JSON数据处理:谷歌gson 2.3
jsp
Ajax
前端框架:bootstrap
富文本编辑器:百度UEditor
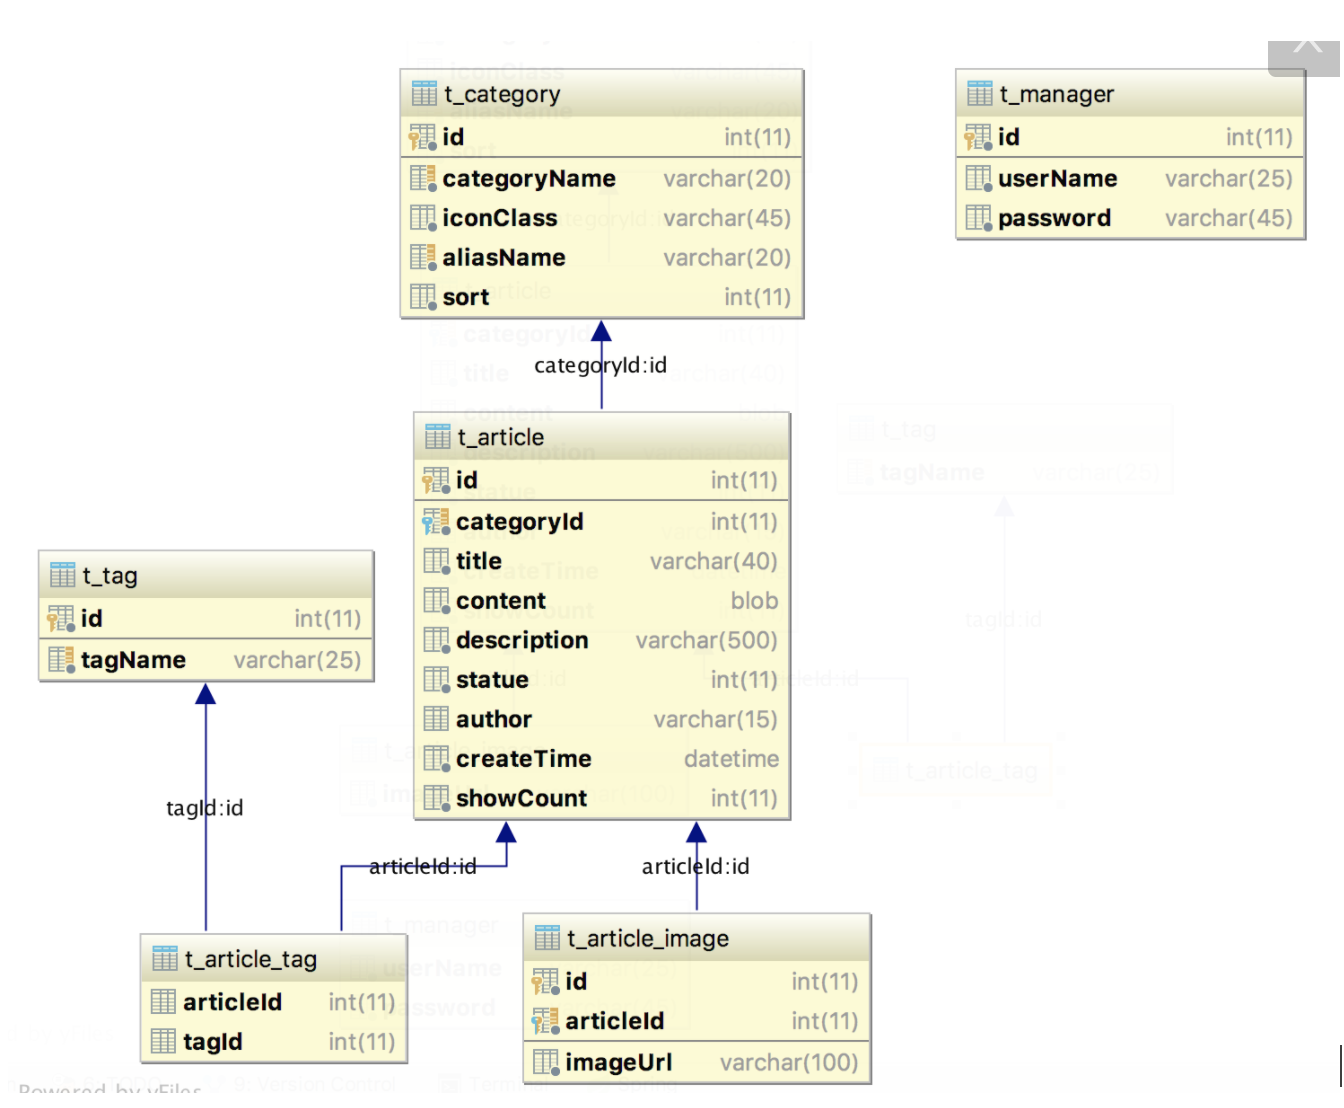
创建SQL语句:
-
DROP TABLE IF EXISTS `t_article`;
-
CREATE TABLE `t_article` (
-
`id` int(11) NOT NULL AUTO_INCREMENT,
-
`categoryId` int(11) NOT NULL COMMENT '分类Id',
-
`title` varchar(40) NOT NULL COMMENT '标题',
-
`content` blob NOT NULL COMMENT '内容',
-
`description` varchar(500) NOT NULL COMMENT '文章简介 用于列表显示',
-
`statue` int(11) NOT NULL DEFAULT '0' COMMENT '状态 0:正常 1:不可用',
-
`author` varchar(15) DEFAULT 'tulun' COMMENT '作者',
-
`createTime` datetime NOT NULL COMMENT '发表时间',
-
`showCount` int(11) NOT NULL DEFAULT '0' COMMENT '浏览量',
-
PRIMARY KEY (`id`)
-
) ENGINE=InnoDB DEFAULT CHARSET=utf8 COMMENT='文章表';
-
-
-
-- ----------------------------
-
-- Table structure for t_article_image
-
-- ----------------------------
-
DROP TABLE IF EXISTS `t_article_image`;
-
CREATE TABLE `t_article_image` (
-
`id` int(11) NOT NULL AUTO_INCREMENT,
-
`imageUrl` varchar(100) NOT NULL COMMENT '图片地址',
-
`articleId` int(11) NOT NULL COMMENT '文章Id',
-
PRIMARY KEY (`id`,`articleId`)
-
) ENGINE=InnoDB DEFAULT CHARSET=utf8 COMMENT='文章图 主要用于列表浏览';
-
-
-- ----------------------------
-
-- Table structure for t_tag
-
-- ----------------------------
-
DROP TABLE IF EXISTS `t_tag`;
-
CREATE TABLE `t_tag` (
-
`id` int(11) NOT NULL AUTO_INCREMENT,
-
`tagName` varchar(25) NOT NULL COMMENT '标签名称 唯一',
-
PRIMARY KEY (`id`),
-
UNIQUE KEY `tagName_UNIQUE` (`tagName`)
-
) ENGINE=InnoDB AUTO_INCREMENT=23 DEFAULT CHARSET=utf8 COMMENT='标签表';
-
-
-
-- ----------------------------
-
-- Table structure for t_article_tag
-
-- ----------------------------
-
DROP TABLE IF EXISTS `t_article_tag`;
-
CREATE TABLE `t_article_tag` (
-
`articleId` int(11) NOT NULL COMMENT '文章Id',
-
`tagId` int(11) NOT NULL COMMENT '标签Id',
-
PRIMARY KEY (`articleId`,`tagId`)
-
) ENGINE=InnoDB DEFAULT CHARSET=utf8 COMMENT='文章标签中间表';
-
-
-- ----------------------------
-
-- Table structure for t_category
-
-- ----------------------------
-
DROP TABLE IF EXISTS `t_category`;
-
CREATE TABLE `t_category` (
-
`id` int(11) NOT NULL AUTO_INCREMENT,
-
`categoryName` varchar(20) NOT NULL COMMENT '分类名称 唯一',
-
`iconClass` varchar(45) NOT NULL COMMENT '图标样式',
-
`aliasName` varchar(20) NOT NULL COMMENT '别名 唯一 比如新闻 就用News 代替 栏目Id不显示在url中',
-
`sort` int(11) NOT NULL DEFAULT '0' COMMENT '排序 (0-10)',
-
PRIMARY KEY (`id`),
-
UNIQUE KEY `aliasName_UNIQUE` (`aliasName`),
-
UNIQUE KEY `categoryName_UNIQUE` (`categoryName`)
-
) ENGINE=InnoDB DEFAULT CHARSET=utf8 COMMENT='分类表 只支持一级分类 如果需要分多个层次 用标签来协助实现';
-
-
-
-- ----------------------------
-
-- Table structure for t_manager
-
-- ----------------------------
-
DROP TABLE IF EXISTS `t_manager`;
-
CREATE TABLE `t_manager` (
-
`id` int(11) NOT NULL AUTO_INCREMENT,
-
`userName` varchar(25) NOT NULL COMMENT '用户名',
-
`password` varchar(45) NOT NULL,
-
PRIMARY KEY (`id`)
-
) ENGINE=InnoDB DEFAULT CHARSET=utf8;
搭建如下框架结构:
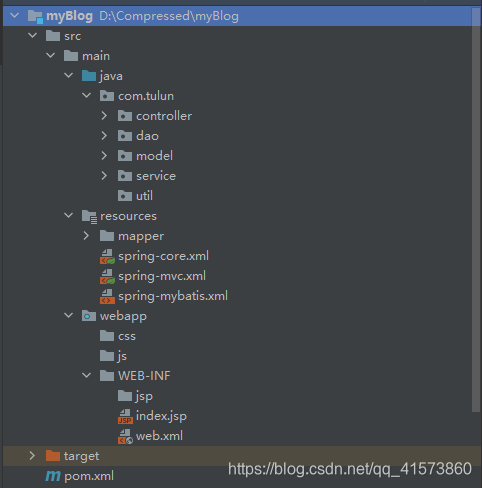
目录说明:
-
目录说明:
-
|-src
-
|--mian
-
|---java JAVA源代码根目录
-
|----com
-
|-----tulun
-
|------model 存放pogo类:基本基本的getter和setter方法
-
|------controller 展示层类包路径:前端用户请求映射到该包路径下类的实现
-
|------service 业务逻辑层包路径:业务逻辑实现,调用dao层服务
-
|------dao 数据库操作层包路径:提供对数据库的操作类与方法
-
|------util 工具类包路径
-
|---resource 配置文件根目录
-
|----myatis mybatis接口对应配置文件目录
-
|----spring-XXX.xml SSM中mybatis、spring核心、springMVC的全局配置文件
-
|--webapp 前端页面内容根目录
-
|---WEB-INF
-
|----web.xml 前端页面必要配置文件
-
|-pom.xml maven的配置文件
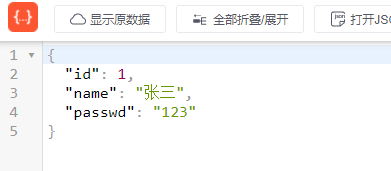
主要完成各个层之间的连接映射,完成从t_manager表中读取数据并进行回显
根据数据库表t_manager,创建User类
-
package com.tulun.model;
-
-
/**
-
* Description :
-
* Created by Resumebb
-
* Date :2021/4/17
-
*/
-
public class User {
-
private Integer id;
-
private String name;
-
private String passwd;
-
-
public Integer getId() {
-
return id;
-
}
-
-
public void setId(Integer id) {
-
this.id = id;
-
}
-
-
public String getName() {
-
return name;
-
}
-
-
public void setName(String name) {
-
this.name = name;
-
}
-
-
public String getPasswd() {
-
return passwd;
-
}
-
-
public void setPasswd(String passwd) {
-
this.passwd = passwd;
-
}
-
}
这里用到了阿里巴巴的druid连接池
-
<beans xmlns="http://www.springframework.org/schema/beans"
-
xmlns:xsi="http://www.w3.org/2001/XMLSchema-instance"
-
xmlns:context="http://www.springframework.org/schema/context"
-
xsi:schemaLocation="http://www.springframework.org/schema/beans
-
http://www.springframework.org/schema/beans/spring-beans-3.0.xsd
-
http://www.springframework.org/schema/context
-
http://www.springframework.org/schema/context/spring-context-3.0.xsd">
-
-
<!--开启注解-->
-
<context:component-scan base-package="com.tulun"/>
-
-
<!--配置数据源:借助连接池druid-->
-
<bean id ="dataSource" class="com.alibaba.druid.pool.DruidDataSource">
-
<!--注入属性-->
-
<property name="url" value="jdbc:mysql://localhost:3306/test"/>
-
<property name="username" value="root"/>
-
<property name="password" value="123456"/>
-
</bean>
-
-
<bean id="sqlSessionFactory" class="org.mybatis.spring.SqlSessionFactoryBean">
-
<property name="dataSource" ref="dataSource"/>
-
<!--注入mapper映射文件-->
-
<property name="configLocation" value="classpath:spring-mybatis.xml"></property>
-
<property name="mapperLocations" value="classpath:mapper/*.xml"/>
-
-
</bean>
-
-
<bean class="org.mybatis.spring.mapper.MapperScannerConfigurer">
-
<property name="basePackage" value="com.tulun.dao"/>
-
<property name="sqlSessionFactoryBeanName" value="sqlSessionFactory"/>
-
</bean>
-
-
</beans>
-
<?xml version="1.0" encoding="UTF-8" ?>
-
<!DOCTYPE configuration
-
PUBLIC "-//mybatis.org//DTD Config 3.0//EN"
-
"http://mybatis.org/dtd/mybatis-3-config.dtd">
-
<!--根标签-->
-
<configuration>
-
</configuration>
-
<?xml version="1.0" encoding="UTF-8"?>
-
<beans xmlns="http://www.springframework.org/schema/beans"
-
xmlns:xsi="http://www.w3.org/2001/XMLSchema-instance"
-
xmlns:context="http://www.springframework.org/schema/context"
-
xmlns:mvc="http://www.springframework.org/schema/mvc"
-
xsi:schemaLocation="http://www.springframework.org/schema/beans http://www.springframework.org/schema/beans/spring-beans.xsd
-
http://www.springframework.org/schema/context http://www.springframework.org/schema/context/spring-context-4.1.xsd
-
http://www.springframework.org/schema/mvc http://www.springframework.org/schema/mvc/spring-mvc-4.1.xsd">
-
<!--扫描controller写注解-->
-
<context:component-scan base-package="com.tulun.controller"/>
-
-
<!--配置映射器-->
-
<mvc:annotation-driven/>
-
-
<!--配置视图解析器-->
-
<!--视图解析器-->
-
<bean class="org.springframework.web.servlet.view.InternalResourceViewResolver">
-
<!--jsp页面前缀-->
-
<property name="prefix" value="/WEB-INF/jsp/"/>
-
<!--jsp后缀-->
-
<property name="suffix" value=".jsp"/>
-
<property name="viewClass" value="org.springframework.web.servlet.view.freemarker.FreeMarkerView"/>
-
</bean>
-
-
</beans>
web配置文件
-
<?xml version="1.0" encoding="UTF-8"?>
-
<web-app version="2.5" xmlns="http://java.sun.com/xml/ns/javaee"
-
xmlns:xsi="http://www.w3.org/2001/XMLSchema-instance"
-
xsi:schemaLocation="http://java.sun.com/xml/ns/javaee
-
http://java.sun.com/xml/ns/javaee/web-app_2_5.xsd">
-
-
<context-param>
-
<param-name>contextConfigLocation</param-name>
-
<param-value>classpath:spring-core.xml</param-value>
-
</context-param>
-
<listener>
-
<listener-class>org.springframework.web.context.ContextLoaderListener</listener-class>
-
</listener>
-
-
<!--前端控制器-->
-
<servlet>
-
<servlet-name>myBolg</servlet-name>
-
<servlet-class>org.springframework.web.servlet.DispatcherServlet</servlet-class>
-
<!--将springMVC的配置文件进行配置-->
-
<init-param>
-
<param-name>contextConfigLocation</param-name>
-
<param-value>classpath:spring-mvc.xml</param-value>
-
</init-param>
-
</servlet>
-
-
<servlet-mapping>
-
<servlet-name>myBolg</servlet-name>
-
<url-pattern>/</url-pattern>
-
</servlet-mapping>
-
-
</web-app>
-
<dependencies>
-
<dependency>
-
<groupId>junit</groupId>
-
<artifactId>junit</artifactId>
-
<version>4.11</version>
-
<scope>test</scope>
-
</dependency>
-
-
<!-- spring依赖-->
-
<dependency>
-
<groupId>org.springframework</groupId>
-
<artifactId>spring-core</artifactId>
-
<version>5.2.8.RELEASE</version>
-
</dependency>
-
-
<dependency>
-
<groupId>org.springframework</groupId>
-
<artifactId>spring-context</artifactId>
-
<version>5.2.8.RELEASE</version>
-
</dependency>
-
-
<dependency>
-
<groupId>org.springframework</groupId>
-
<artifactId>spring-beans</artifactId>
-
<version>5.2.8.RELEASE</version>
-
</dependency>
-
-
<dependency>
-
<groupId>org.springframework</groupId>
-
<artifactId>spring-expression</artifactId>
-
<version>5.2.8.RELEASE</version>
-
</dependency>
-
-
<!--web依赖/spring mvc依赖-->
-
<dependency>
-
<groupId>org.springframework</groupId>
-
<artifactId>spring-webmvc</artifactId>
-
<version>5.2.8.RELEASE</version>
-
</dependency>
-
<dependency>
-
<groupId>org.springframework</groupId>
-
<artifactId>spring-web</artifactId>
-
<version>5.2.8.RELEASE</version>
-
</dependency>
-
<dependency>
-
<groupId>javax.servlet</groupId>
-
<artifactId>javax.servlet-api</artifactId>
-
<version>3.1.0</version>
-
</dependency>
-
-
<!--tomcat servlet api -->
-
<dependency>
-
<groupId>jstl</groupId>
-
<artifactId>jstl</artifactId>
-
<version>1.2</version>
-
</dependency>
-
<dependency>
-
<groupId>taglibs</groupId>
-
<artifactId>standard</artifactId>
-
<version>1.1.2</version>
-
</dependency>
-
-
<!--mybatis依赖-->
-
<dependency>
-
<groupId>org.mybatis</groupId>
-
<artifactId>mybatis</artifactId>
-
<version>3.4.1</version>
-
</dependency>
-
<dependency>
-
<groupId>mysql</groupId>
-
<artifactId>mysql-connector-java</artifactId>
-
<version>5.1.39</version>
-
</dependency>
-
-
<!-- 整合-->
-
<dependency>
-
<groupId>org.mybatis</groupId>
-
<artifactId>mybatis-spring</artifactId>
-
<version>1.3.0</version>
-
</dependency>
-
-
<!-- 连接池-->
-
<dependency>
-
<groupId>com.mchange</groupId>
-
<artifactId>c3p0</artifactId>
-
<version>0.9.5.2</version>
-
</dependency>
-
-
<dependency>
-
<groupId>org.springframework</groupId>
-
<artifactId>spring-tx</artifactId>
-
<version>5.2.8.RELEASE</version>
-
</dependency>
-
<dependency>
-
<groupId>org.springframework</groupId>
-
<artifactId>spring-jdbc</artifactId>
-
<version>5.2.8.RELEASE</version>
-
</dependency>
-
-
<dependency>
-
<groupId>javax.servlet.jsp.jstl</groupId>
-
<artifactId>jstl</artifactId>
-
<version>1.2</version>
-
</dependency>
-
-
<dependency>
-
<groupId>javax.servlet</groupId>
-
<artifactId>servlet-api</artifactId>
-
<version>2.5</version>
-
</dependency>
-
-
<dependency>
-
<groupId>com.google.code.gson</groupId>
-
<artifactId>gson</artifactId>
-
<version>2.3</version>
-
</dependency>
-
-
<dependency>
-
<groupId>com.alibaba</groupId>
-
<artifactId>druid</artifactId>
-
<version>0.2.6</version>
-
</dependency>
-
-
<dependency>
-
<groupId>commons-logging</groupId>
-
<artifactId>commons-logging</artifactId>
-
<version>1.1.1</version>
-
</dependency>
-
-
<dependency>
-
<groupId>commons-configuration</groupId>
-
<artifactId>commons-configuration</artifactId>
-
<version>1.9</version>
-
</dependency>
-
-
</dependencies>
-
import com.tulun.model.User;
-
-
/**
-
* Description :
-
* Created by Resumebb
-
* Date :2021/4/22
-
*/
-
public interface UserMapper {
-
public User getUserById(Integer id);
-
}
-
package com.tulun.service;
-
-
import com.tulun.model.User;
-
import com.tulun.dao.UserMapper;
-
import org.springframework.beans.factory.annotation.Autowired;
-
import org.springframework.stereotype.Service;
-
-
/**
-
* Description :
-
* Created by Resumebb
-
* Date :2021/4/19
-
*/
-
@Service
-
public class UserService {
-
@Autowired
-
private UserMapper userMapper;
-
-
public User getUserById(Integer id){
-
if(id < 0)
-
return new User();
-
return userMapper.getUserById(id);
-
}
-
}
查询t_manager中的id为1的数据进行显示
-
package com.tulun.controller;
-
-
import com.tulun.model.User;
-
import com.tulun.service.UserService;
-
import org.springframework.beans.factory.annotation.Autowired;
-
import org.springframework.stereotype.Controller;
-
import org.springframework.web.bind.annotation.RequestMapping;
-
import org.springframework.web.bind.annotation.ResponseBody;
-
-
/**
-
* Description :
-
* Created by Resumebb
-
* Date :2021/4/22
-
*/
-
@Controller
-
public class UserController {
-
@Autowired
-
private UserService userService;
-
-
@RequestMapping("/testUser")
-
@ResponseBody
-
public User testUser(){
-
User user = userService.getUserById(1);
-
return user;
-
}
-
}
-
<?xml version="1.0" encoding="UTF-8" ?>
-
<!DOCTYPE mapper
-
PUBLIC "-//mybatis.org//DTD Mapper 3.0//EN"
-
"http://mybatis.org/dtd/mybatis-3-mapper.dtd">
-
<mapper namespace="com.tulun.dao.UserMapper">
-
<resultMap id="UserMap" type="com.tulun.model.User">
-
<result property="id" column="id"></result>
-
<result property="name" column="userName"></result>
-
<result property="passwd" column="password"></result>
-
</resultMap>
-
-
<select id="getUserById" parameterType="int" resultMap="UserMap">
-
select * from t_manager where id=#{id}
-
</select>
-
</mapper>
原因是因为端口被占用了,更改服务器的端口号就可以了。
出现这个错误就要检查SQL查询语句,数据源的配置是否正确,经检查我报这个错是因为SQL查询语句manager写成了manger,用户名密码不对也会报这个错。
类似这种错,一是检查@Service有没有加上,二是检查映射文件有没有顶行写,第一行不能有空行。

转自:csdn。作者:resumebb
蓝蓝设计( www.lanlanwork.com )是一家专注而深入的界面设计公司,为期望卓越的国内外企业提供卓越的UI界面设计、BS界面设计 、 cs界面设计 、 ipad界面设计 、 包装设计 、 图标定制 、 用户体验 、交互设计、 网站建设 、平面设计服务
蓝蓝设计的小编 http://www.lanlanwork.com