

如果您想订阅本博客内容,每天自动发到您的邮箱中, 请点这里
1、用px2rem配合lib-flexible,让网页适配。
lib-flexible
作用:让网页根据设备dpr和宽度,利用viewport和html根元素的font-size配合rem来适配不同尺寸的移动端设备
安装:
npm install lib-flexible
1
引入:入口文件main.js中:
import "lib-flexible/flexible.js"
1
2、手写一个js小工具,省略rem的计算,加快开发速度。
在src目录下增加一个utils目录,在里面新建一个js文件,写入以下内容:
// 基准大小
const baseSize = 32
// 设置 rem 函数
function setRem () {
// 当前页面宽度相对于 750 宽的缩放比例,可根据自己需要修改。
const scale = document.documentElement.clientWidth / 750
// 设置页面根节点字体大小
document.documentElement.style.fontSize = (baseSize * Math.min(scale, 2)) + 'px'
}
// 初始化
setRem()
// 改变窗口大小时重新设置 rem
window.onresize = function () {
setRem()
}
在main.js中引入改js文件:
import "./utils/rem"
1
然后就可以直接用px写页面啦,而不用去计算rem的值,是不是很舒服呢。
3、使用VW。了解下vw 与 vh单位,以viewport为基准,1vw 与 1vh分别为window.innerWidth 与 window.innerHeight的百分之一
安装:
npm i postcss-px-to-viewport -save -dev
1
在package.json中配置如下:
"postcss": {
"plugins": {
"autoprefixer": {},
"postcss-pxtorem": {
"rootValue": 32,
"propList": ["*"]
}
},
"plugins": {
"autoprefixer": {},
"postcss-px-to-viewport": {
"viewportWidth": 750,
"minPixelValue": 1
}
}
},
4、利用bootstrap实现响应式图片
在 Bootstrap 版本 3 中,通过为图片添加 .img-responsive 类可以让图片支持响应式布局。其实质是为图片设置了 max-width: 100%;、 height: auto; 和 display: block; 属性,从而让图片在其父元素中更好的缩放。
对于图片的大小限制一定要在图片的父级元素进行限制。
5、利用bootstrap的栅格系统,下面列一下栅格系统的参数:
超小屏手机 (<768px) 小屏幕平板(>=768px) 中等屏桌面(>=992px) 大屏桌面(>=1200px)
类前缀 .col-xs .col-sm .col-md .col-lg
列数 12 12 12 12
.container最大宽度 None(自动) 750px 970px 1170px
举个移动设备和桌面的例子:
<!-- Stack the columns on mobile by making one full-width and the other half-width -->
<div class="row">
<div class="col-xs-12 col-md-8">.col-xs-12 .col-md-8</div>
<div class="col-xs-6 col-md-4">.col-xs-6 .col-md-4</div>
</div>
<!-- Columns start at 50% wide on mobile and bump up to 33.3% wide on desktop -->
<div class="row">
<div class="col-xs-6 col-md-4">.col-xs-6 .col-md-4</div>
<div class="col-xs-6 col-md-4">.col-xs-6 .col-md-4</div>
<div class="col-xs-6 col-md-4">.col-xs-6 .col-md-4</div>
</div>
<!-- Columns are always 50% wide, on mobile and desktop -->
<div class="row">
<div class="col-xs-6">.col-xs-6</div>
<div class="col-xs-6">.col-xs-6</div>
</div>
还有更多对响应式的支持,就不一一列举了。
如果您想订阅本博客内容,每天自动发到您的邮箱中, 请点这里
Bootstrap:
1. 概念: 一个前端开发的框架,Bootstrap,来自 Twitter,是目前很受欢迎的前端框架。Bootstrap 是基于 HTML、CSS、JavaScript 的,它简洁灵活,使得 Web 开发更加快捷。
* 框架:一个半成品软件,开发人员可以在框架基础上,在进行开发,简化编码。
* 好处:
1. 定义了很多的css样式和js插件。我们开发人员直接可以使用这些样式和插件得到丰富的页面效果。
2. 响应式布局。
* 同一套页面可以兼容不同分辨率的设备。
2. 快速入门
1. 下载Bootstrap
2. 在项目中将这三个文件夹复制
3. 创建html页面,引入必要的资源文件
3.演示案例
<!DOCTYPE html>
<html lang="zh-CN">
<head>
<meta charset="utf-8">
<meta http-equiv="X-UA-Compatible" content="IE=edge">
<meta name="viewport" content="width=device-width, initial-scale=1">
<!-- 上述3个meta标签*必须*放在最前面,任何其他内容都*必须*跟随其后! -->
<title>Bootstrap HelloWorld</title>
<!-- Bootstrap -->
<link href="css/bootstrap.min.css" rel="stylesheet">
<!-- jQuery (Bootstrap 的所有 JavaScript 插件都依赖 jQuery,所以必须放在前边) -->
<script src="js/jquery-3.3.1.min.js"></script>
<!-- 加载 Bootstrap 的所有 JavaScript 插件。你也可以根据需要只加载单个插件。 -->
<script src="js/bootstrap.min.js"></script>
</head>
<body>
<h1>你好,世界!</h1>
</body>
</html>
响应式布局
同一套页面可以兼容不同分辨率的设备。
* 实现:依赖于栅格系统:将一行平均分成12个格子,可以指定元素占几个格子
* 步骤:
1. 定义容器。相当于之前的table、
* 容器分类:
1. container:两边留白
2. container-fluid:每一种设备都是100%宽度
2. 定义行。相当于之前的tr 样式:row
3. 定义元素。指定该元素在不同的设备上,所占的格子数目。样式:col-设备代号-格子数目
* 设备代号:
1. xs:超小屏幕 手机 (<768px):col-xs-12
2. sm:小屏幕 平板 (≥768px)
3. md:中等屏幕 桌面显示器 (≥992px)
4. lg:大屏幕 大桌面显示器 (≥1200px)
* 注意:
1. 一行中如果格子数目超过12,则超出部分自动换行。
2. 栅格类属性可以向上兼容。栅格类适用于与屏幕宽度大于或等于分界点大小的设备。
3. 如果真实设备宽度小于了设置栅格类属性的设备代码的最小值,会一个元素沾满一整行。
CSS样式和JS插件
1. 全局CSS样式:
* 按钮:class="btn btn-default"
* 图片:
* class="img-responsive":图片在任意尺寸都占100%
* 图片形状
* <img src="..." alt="..." class="img-rounded">:方形
* <img src="..." alt="..." class="img-circle"> : 圆形
* <img src="..." alt="..." class="img-thumbnail"> :相框
* 表格
* table
* table-bordered
* table-hover
* 表单
* 给表单项添加:class="form-control"
2. 组件:
* 导航条
* 分页条
3. 插件:
* 轮播图
演示案例
<!DOCTYPE html>
<html lang="zh-CN">
<head>
<meta charset="utf-8">
<meta http-equiv="X-UA-Compatible" content="IE=edge">
<meta name="viewport" content="width=device-width, initial-scale=1">
<!-- 上述3个meta标签*必须*放在最前面,任何其他内容都*必须*跟随其后! -->
<title>Bootstrap HelloWorld</title>
<!-- Bootstrap -->
<link href="css/bootstrap.min.css" rel="stylesheet">
<!-- jQuery (Bootstrap 的所有 JavaScript 插件都依赖 jQuery,所以必须放在前边) -->
<script src="js/jquery-3.3.1.min.js"></script>
<!-- 加载 Bootstrap 的所有 JavaScript 插件。你也可以根据需要只加载单个插件。 -->
<script src="js/bootstrap.min.js"></script>
<style>
.paddtop{
padding-top: 10px;
}
.search-btn{
float: left;
border:1px solid #ffc900;
width: 90px;
height: 35px;
background-color:#ffc900 ;
text-align: center;
line-height: 35px;
margin-top: 15px;
}
.search-input{
float: left;
border:2px solid #ffc900;
width: 400px;
height: 35px;
padding-left: 5px;
margin-top: 15px;
}
.jx{
border-bottom: 2px solid #ffc900;
padding: 5px;
}
.company{
height: 40px;
background-color: #ffc900;
text-align: center;
line-height:40px ;
font-size: 8px;
}
</style>
</head>
<body>
<!-- 1.页眉部分-->
<header class="container-fluid">
<div class="row">
<img src="img/top_banner.jpg" class="img-responsive">
</div>
<div class="row paddtop">
<div class="col-md-3">
<img src="img/logo.jpg" class="img-responsive">
</div>
<div class="col-md-5">
<input class="search-input" placeholder="请输入线路名称">
<a class="search-btn" href="#">搜索</a>
</div>
<div class="col-md-4">
<img src="img/hotel_tel.png" class="img-responsive">
</div>
</div>
<!--导航栏-->
<div class="row">
<nav class="navbar navbar-default">
<div class="container-fluid">
<!-- Brand and toggle get grouped for better mobile display -->
<div class="navbar-header">
<!-- 定义汉堡按钮 -->
<button type="button" class="navbar-toggle collapsed" data-toggle="collapse" data-target="#bs-example-navbar-collapse-1" aria-expanded="false">
<span class="sr-only">Toggle navigation</span>
<span class="icon-bar"></span>
<span class="icon-bar"></span>
<span class="icon-bar"></span>
</button>
<a class="navbar-brand" href="#">首页</a>
</div>
<!-- Collect the nav links, forms, and other content for toggling -->
<div class="collapse navbar-collapse" id="bs-example-navbar-collapse-1">
<ul class="nav navbar-nav">
<li class="active"><a href="#">Link <span class="sr-only">(current)</span></a></li>
<li><a href="#">Link</a></li>
<li><a href="#">Link</a></li>
<li><a href="#">Link</a></li>
<li><a href="#">Link</a></li>
<li><a href="#">Link</a></li>
</ul>
</div><!-- /.navbar-collapse -->
</div><!-- /.container-fluid -->
</nav>
</div>
<!--轮播图-->
<div class="row">
<div id="carousel-example-generic" class="carousel slide" data-ride="carousel">
<!-- Indicators -->
<ol class="carousel-indicators">
<li data-target="#carousel-example-generic" data-slide-to="0" class="active"></li>
<li data-target="#carousel-example-generic" data-slide-to="1"></li>
<li data-target="#carousel-example-generic" data-slide-to="2"></li>
</ol>
<!-- Wrapper for slides -->
<div class="carousel-inner" role="listbox">
<div class="item active">
<img src="img/banner_1.jpg" alt="...">
</div>
<div class="item">
<img src="img/banner_2.jpg" alt="...">
</div>
<div class="item">
<img src="img/banner_3.jpg" alt="...">
</div>
</div>
<!-- Controls -->
<a class="left carousel-control" href="#carousel-example-generic" role="button" data-slide="prev">
<span class="glyphicon glyphicon-chevron-left" aria-hidden="true"></span>
<span class="sr-only">Previous</span>
</a>
<a class="right carousel-control" href="#carousel-example-generic" role="button" data-slide="next">
<span class="glyphicon glyphicon-chevron-right" aria-hidden="true"></span>
<span class="sr-only">Next</span>
</a>
</div>
</div>
</header>
<!-- 2.主体部分-->
<div class="container">
<div class="row jx">
<img src="img/icon_5.jpg">
<span>黑马精选</span>
</div>
<div class="row paddtop">
<div class="col-md-3">
<div class="thumbnail">
<img src="img/jiangxuan_3.jpg" alt="">
<p>上海直飞三亚5天4晚自由行(春节预售+亲子/蜜月/休闲游首选+豪华酒店任选+接送机)</p>
<font color="red">¥ 699</font>
</div>
</div>
<div class="col-md-3">
<div class="thumbnail">
<img src="img/jiangxuan_3.jpg" alt="">
<p>上海直飞三亚5天4晚自由行(春节预售+亲子/蜜月/休闲游首选+豪华酒店任选+接送机)</p>
<font color="red">¥ 699</font>
</div>
</div>
<div class="col-md-3">
<div class="thumbnail">
<img src="img/jiangxuan_3.jpg" alt="">
<p>上海直飞三亚5天4晚自由行(春节预售+亲子/蜜月/休闲游首选+豪华酒店任选+接送机)</p>
<font color="red">¥ 699</font>
</div>
</div>
<div class="col-md-3">
<div class="thumbnail">
<img src="img/jiangxuan_3.jpg" alt="">
<p>上海直飞三亚5天4晚自由行(春节预售+亲子/蜜月/休闲游首选+豪华酒店任选+接送机)</p>
<font color="red">¥ 699</font>
</div>
</div>
</div>
<div class="row jx">
<img src="img/icon_6.jpg">
<span>国内游</span>
</div>
<div class="row paddtop">
<div class="col-md-4">
<img src="img/guonei_1.jpg">
</div>
<div class="col-md-8">
<div class="row">
<div class="col-md-4">
<div class="thumbnail">
<img src="img/jiangxuan_3.jpg" alt="">
<p>上海直飞三亚5天4晚自由行(春节预售+亲子/蜜月/休闲游首选+豪华酒店任选+接送机)</p>
<font color="red">¥ 699</font>
</div>
</div>
<div class="col-md-4">
<div class="thumbnail">
<img src="img/jiangxuan_3.jpg" alt="">
<p>上海直飞三亚5天4晚自由行(春节预售+亲子/蜜月/休闲游首选+豪华酒店任选+接送机)</p>
<font color="red">¥ 699</font>
</div>
</div>
<div class="col-md-4">
<div class="thumbnail">
<img src="img/jiangxuan_3.jpg" alt="">
<p>上海直飞三亚5天4晚自由行(春节预售+亲子/蜜月/休闲游首选+豪华酒店任选+接送机)</p>
<font color="red">¥ 699</font>
</div>
</div>
</div>
</div>
</div>
</div>
<!-- 3.页脚部分-->
<footer class="container-fluid">
<div class="row">
<img src="img/footer_service.png" class="img-responsive">
</div>
<div class="row company">
CSDN博客杨校老师 版权所有Copyright 2017-2019, All Rights Reserved 鲁ICP备19007759号-1
</div>
</footer>
</body>
</html>
蓝蓝设计( www.lanlanwork.com )是一家专注而深入的界面设计公司,为期望卓越的国内外企业提供卓越的UI界面设计、BS界面设计 、 cs界面设计 、 ipad界面设计 、 包装设计 、 图标定制 、 用户体验 、交互设计、 网站建设 、平面设计服务。
如果您想订阅本博客内容,每天自动发到您的邮箱中, 请点这里
有这样一种常见的需求:有一个搜索框,需要根据用户的输入进行实时的查询。也就是说用户每输入一个字符就要发送一次请求。
想到的做法是监听输入框的keyup时间然后在回调里发送异步请求。
这样做的不足也很明显:
其实我们并不需要用户每次输入时都发送请求,这样会给服务器造成不必要的压力。
因为发送的是异步请求,有可能查询的结果和最后输入的内容并不匹配。
如何解决以上两种问题呢? 有两种解决方案
首先我们规定当用户停止输入1秒(具体时间根据自己需求而定)后再根据输入框的值发送请求。
其次我们利用定时器来解决以上问题。
第一种方案:直接看代码吧
vat timer
$('.input').on('keyup', function(e) {
clearTimeout(timer)
timer = setTimeout(function() {
// do something
}, 1000)
})
首先定义一个定时器timer
监听输入框的keyup事件,在回调函数里先清除timer,这一步总能保证在用户停止输入1秒后执行最后一个timer。如果用户输入的间隔小于1秒就不会执行timer
这么写似乎不太抽象,而且定义了一个全局变量timer,不友好!稍加改动一下:
function debounce(func,delay){
var timer
return function(){
clearTimeout(timer)
var event = arguments[0] // 获取原生event参数
timer = setTimeout(function(){
func(event)
},delay)
}
}
function handle(event){
// do something
}
$('.input').on('keyup', debounce(handle, 1000))
这样是不是复用性更高,我们只需要在handle函数中写我们的处理逻辑就可以了。而且没有了全局变量,避免了全局污染的可能!!
*第二种方案: *
var lastTime
$('.input').on('keyup', function(e) {
lastTime = e.timeStamp
setTimeout(function() {
console.log('timeout')
if (lastTime == e.timeStamp) {
// do something
}
}, 1000)
})
首先定义一个时间戳来保存最后一次输入的时间
然后1秒后在定时器里判断保存的时间戳和触发事件的时间戳e.timeStamp是否相同,只要1秒内又输入了内容,e.timeStamp就回变化。
但是这种写法有个弊端,用户键入几次就会执行几次setTimeout,也就是说当用户连续键入多个字符后,会有多个任务被推入待执行队列,然后每隔1秒执行,只是在执行的时候判断要不要发送异步请求,这种方式不会发送多余的异步请求,但是会执行多余的任务,这无疑浪费了性能。
蓝蓝设计( www.lanlanwork.com )是一家专注而深入的界面设计公司,为期望卓越的国内外企业提供卓越的UI界面设计、BS界面设计 、 cs界面设计 、 ipad界面设计 、 包装设计 、 图标定制 、 用户体验 、交互设计、 网站建设 、平面设计服务。
如果您想订阅本博客内容,每天自动发到您的邮箱中, 请点这里
DOM树
在访问页面时,需要与页面中的元素进行交互式的操作。在操作中,元素的访问是最频繁、最常用的,主要包括对元素属性、内容、值CSS的操作。
一、操作元素的属性
attr() prop() 获取或设置元素的属性值
两者区别:简单来说,对于HTML元素本身就带有的固有属性,在处理时,使用prop方法。对于HTML元素我们自己自定义的DOM属性,在处理时,使用attr方法。
针对属性对象不同
prop( )是针对Dom元素属性,attr( )针对HTML元素属性,和attribute与property区别一样。
用于设置的属性值类型不同
attr()函数操作的是文档节点的属性,因此设置的属性值只能是字符串类型,如果不是字符串类型,也会调用其toString()方法,将其转为字符串类型。
prop()函数操作的是JS对象的属性,因此设置的属性值可以为包括数组和对象在内的任意类型。
应用版本不同
attr()是jQuery 1.0版本就有的函数,prop()是jQuery 1.6版本新增的函数。毫无疑问,在1.6之前,你只能使用attr()函数;1.6及以后版本,你可以根据实际需要选择对应的函数。
其他不同
对于表单元素的checked、selected、disabled等属性,Attr()方法拿不到值,请使用prop()函数来设置或获取checked、selected、disabled等属性。对于其它能够用prop()实现的操作,也尽量使用prop()函数。如下图代码:
<!DOCTYPE html>
<html>
<head lang="en">
<meta charset="UTF-8">
<title></title>
<script src="js/jquery-1.9.1.min.js"></script>
</head>
<body>
<input type="button" id="btn1" value="按钮">
<input type="button" id="btn2" value="按钮">
<script>
//操作元素的属性
//attr() prop()获取或设置元素的属性值
$("#btn1").attr("value","按钮1");//将#btn1的value值改为按钮1
$("#btn1").prop("value","按钮2");//将#btn1的value值改为按钮2
console.log( $("input[type='button']").prop("value"));//获取#btn1的value值,输出为按钮2
console.log($("#btn2").attr("value"));//获取#btn1的value值,输出为按钮
//设置多个属性值
$("input[type='button']").prop({
width:"200px",
value:"hello"
});//同时设置宽度为100px,value值为hello
//根据输出结果,width值设置失败,value值设置成功
console.log($("input[type='button']").prop("width"));//0
console.log($("input[type='button']").attr("width"));//0
$("input[type='button']").attr({
width:"200px",
value:"HELLO"
})//同时设置宽度为200px,value值为HELLO
//根据输出结果可以看到,width和value均设置成功
console.log($("input[type='button']").prop("width"));//0
console.log($("input[type='button']").attr("width"));//200px
// var btn=$("input[type='button']");
// btn.attr("data-src","pink");
// console.log(btn.attr("data-src"));//pink
// console.log(btn.prop("data-src"));//undefined
var btn=$("input[type='button']");
btn.prop("data-src","pink");
console.log(btn.attr("data-src"));//undefined
console.log(btn.prop("data-src"));//pink
</script>
二、删除元素的属性
removeAttr( name ) ,其中name为元素属性的名称
removeProp( name ) ,其中name为元素属性的名称
三、元素内容的操作
在JQuery中,操作元素内容的方法包括html( )和text( )。前者与JavaScript中的innerHTML属性类似,即获取或设置元素的HTML内容;后者类似于JavaScript中的innerText属性,即获取或设置元素的文本内容。区别如下:
语法格式 参数说明 功能描述
html() 无参数 用于获取元素的HTML内容
html(val) val参数为元素的HTML内容 用于设置元素的HTML内容
text() 无参数 用于获取元素 的文本内容
text(val) val参数为元素的文本内容 用于设置元素的文本内容
<script>
//js中的写法 innerHTML innerText
var sd=document.getElementById("block");
sd.innerText="小猫吃鱼";
console.log(sd.innerHTML);//小猫吃鱼
console.log(sd.innerText);//小猫吃鱼
// //jquery html() text() 和js一致 获取或设置元素的html值或文本值
console.log($("#block").html());//小猫吃鱼
console.log($("#block").text());//小猫吃鱼
$("#block").text("小猫抓老鼠");//修改innerText内容
console.log($("#block").html());//小猫抓老鼠
console.log($("#block").text());//小猫抓老鼠
$("#block").html("小猫吃肉肉");//修改innerHTML内容
console.log($("#block").html());//小猫吃肉肉
console.log($("#block").text());//小猫吃肉肉
</script>
四、操作表单元素的值
val() 获取或设置表单元素的value值
<!DOCTYPE html>
<html>
<head lang="en">
<meta charset="UTF-8">
<title></title>
<script src="js/jquery-1.9.1.min.js"></script>
</head>
<body>
<input type="text" id="txt" value="请输入...">
<script>
console.log( $("#txt").val());// 获取#txt的value值 输出为:请输入...
$("#txt").val("12345");//修改#txt的value值为12345
console.log( $("#txt").val());//12345
</script>
</body>
</html>
五、元素样式的操作
1.直接设置元素样式值
在JQuery中,通过css()方法为某个指定的元素设置样式值,语法格式如下:
css(name,value) ,其中name为样式名称,value为样式的值
css()可以设置样式也可以获取样式
2.增加CSS类别
通过addClass()方法增加元素类别的名称,语法格式如下:
addClass(class) ,其中参数class为类名称,可以同时增加多个,用空格隔开即可,如addClass(class0 class1 class2 ...)
3.删除CSS类别
与addClass()方法相对应,removeClass()方法用于删除类别,语法格式与addClass()相同,如果不设定参数,则删除元素中的所有类名称
4.类别切换
通过toggleClass()方法切换不同的元素类别,语法格式如下:
toggleClass(class) ,其中参数class为类别名称,其功能是当元素中含有名称为class的CSS类别时,删除该类别,若没有,则增加该类别
<!DOCTYPE html>
<html>
<head lang="en">
<meta charset="UTF-8">
<title></title>
<script src="js/jquery-1.9.1.min.js"></script>
</head>
<body>
<button id="btn" class="btndata">按钮</button>
<script>
$("#btn").addClass("btn1");//追加一个类名称
$("#btn").addClass("btn2 btn3");//追加多个类名称
$("#btn").removeClass("btn2 btn1");//移除类名称
$("#btn").removeClass();//移除所有类名称
$("#btn").toggleClass("btn1");//类的切换 toggleClass() 如果有类名称则替换 如果没有就添加
</script>
</body>
</html>
六、jquery操作子父节点
children() 找父元素里面的子节点
<!DOCTYPE html>
<html>
<head lang="en">
<meta charset="UTF-8">
<title></title>
<script src="js/jquery-1.9.1.min.js"></script>
</head>
<body>
<ul>
<li class="lilist">1</li>
<li class="lidata">2</li>
<span>6</span>
<li class="lilist">3</li>
<span>5</span>
<li class="lilist">4</li>
<span>7</span>
</ul>
<script>
console.log($("ul").children());//输出ul 下的所有子节点
console.log($("ul").children()[0]);//输出ul下索引为0的子节点
console.log($("ul>li").first());//输出ul里面第一个li
console.log($("ul>li").last());//输出ul里面最后一个li
console.log($("ul>li").eq(2));//eq() 根据索引找元素
console.log($("ul>li").first().siblings(".lilist"));//找同胞元素 输出和first()相同类名称的元素
console.log($("ul>li").eq(1).prev());//找当前元素的前一个元素
console.log($("ul>li").eq(2).prevAll("span"));//当前元素前面的所有指定元素
console.log($("ul>li").eq(2).prevAll());//当前元素前面的所有元素
console.log($("ul>li").eq(1).next());//找当前元素的下一个元素
console.log($("ul>li").eq(1).nextAll("li"));//当前元素后面的所有指定元素
console.log($("ul>li").eq(1).nextAll());//当前元素后面的所有元素
console.log($("ul>li").eq(0).is(".qq"));//is() 判断当前对象是谁 输出true or false 当前元素与类名称相符 输出true
</script>
</body>
</html>
七、JQuery中的尺寸问题
下面以高度为例进行说明
<!DOCTYPE html>
<html>
<head lang="en">
<meta charset="UTF-8">
<title></title>
<script src="js/jquery-1.9.1.min.js"></script>
<style>
.ss{
width: 200px;
height: 200px;
margin: 10px 10px;
padding: 20px 20px;
}
</style>
</head>
<body>
<div class="ss"></div>
<script>
console.log($(".ss").height());//200 可视区域 不包括内外边距
console.log($(".ss").innerHeight());//240 包括内边距的距离
console.log($(".ss").outerHeight());//240 包括内边距的距离
</script>
</body>
</html>
蓝蓝设计( www.lanlanwork.com )是一家专注而深入的界面设计公司,为期望卓越的国内外企业提供卓越的UI界面设计、BS界面设计 、 cs界面设计 、 ipad界面设计 、 包装设计 、 图标定制 、 用户体验 、交互设计、 网站建设 、平面设计服务。
如果您想订阅本博客内容,每天自动发到您的邮箱中, 请点这里
1、大家都知道vue是一种单页应用,单页应用就是仅在页面初始化的时候加载相应的html/css/js一单页面加载完成,不会因为用户的操作而进行页面的重新加载或者跳转,用javascript动态的变化html的内容
优点: 良好的交互体验,用户不需要刷新页面,页面显示流畅, 良好的前后端工作分离模式,减轻服务器压力,
缺点: 不利于SEO,初次加载耗时比较多
2、hash模式
vue-router默认的是hash模式—使用URL的hash来模拟一个完整的URL,于是当URL改变的时候,页面不会重新加载,也就是单页应用了,当#后面的hash发生变化,不会导致浏览器向服务器发出请求,浏览器不发出请求就不会刷新页面,并且会触发hasChange这个事件,通过监听hash值的变化来实现更新页面部分内容的操作
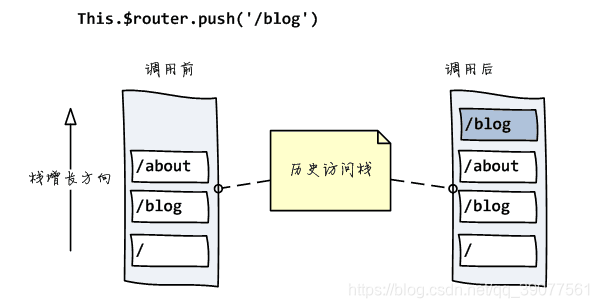
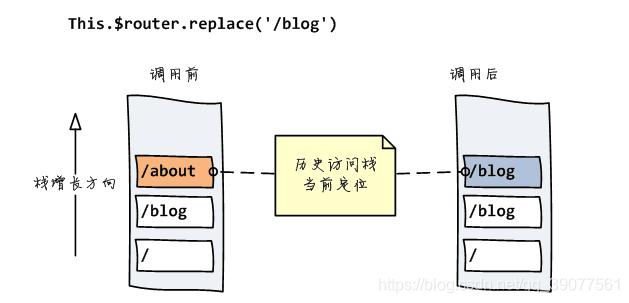
对于hash模式会创建hashHistory对象,在访问不同的路由的时候,会发生两件事:
HashHistory.push()将新的路由添加到浏览器访问的历史的栈顶,和HasHistory.replace()替换到当前栈顶的路由
3、history模式
主要使用HTML5的pushState()和replaceState()这两个api来实现的,pushState()可以改变url地址且不会发送请求,replaceState()可以读取历史记录栈,还可以对浏览器记录进行修改
window.history.pushState(stateObject, title, URL)
window.history.replaceState(stateObject, title, URL)
包括back,forward , go 三个方法
history.go(-2);//后退两次
history.go(2);//前进两次
history.back(); //后退
hsitory.forward(); //前进
区别:
前面的hashchange,你只能改变#后面的url片段。而pushState设置的新URL可以是与当前URL同源的任意URL。
history模式则会将URL修改得就和正常请求后端的URL一样,如后端没有配置对应/user/id的路由处理,则会返回404错误
参考于: https://www.cnblogs.com/ceceliahappycoding/p/10552620.html
蓝蓝设计( www.lanlanwork.com )是一家专注而深入的界面设计公司,为期望卓越的国内外企业提供卓越的UI界面设计、BS界面设计 、 cs界面设计 、 ipad界面设计 、 包装设计 、 图标定制 、 用户体验 、交互设计、 网站建设 、平面设计服务。如果您想订阅本博客内容,每天自动发到
前言
在此之前,已经实现了vue+ElementUI的跨域查询并渲染查询结果的功能,现在想要在每一行中添加修改和删除的按钮。于是乎就需要获取当前行的数据,于是就有了下面两种方式的获取。
1 获取当前行的数据
1.1 我的笨办法
这里是我记录自己的学习过程,这个方法也能实现,但是麻烦,如果您只是为了寻找最终方案,请直接查看1.2章节。
首先我查看了官方文档,打算使用对话框来渲染修改页面和删除警告页面。这个实现起来很简单,就是对按钮绑定一个click事件,然后控制对话框的显示和隐藏:
<el-table @row-click="handleEdit" :data="dengmiQueryForm.list" stripe border width="100%" height="350">
<el-table-column prop="mimian" label="谜面" width="300" fixed="left">
</el-table-column>
<el-table-column prop="dengmiSeq" label="序号">
</el-table-column>
<el-table-column prop="mimu" label="谜目">
</el-table-column>
<el-table-column prop="mige" label="谜格">
</el-table-column>
<el-table-column prop="midi" label="谜底">
</el-table-column>
<el-table-column prop="zuozhe" label="作者">
</el-table-column>
<el-table-column prop="mizhu" label="注">
</el-table-column>
<el-table-column prop="shangxi" label="赏析">
</el-table-column>
<el-table-column prop="leixing" label="类型">
</el-table-column>
<el-table-column label="操作" fixed="right" width="200px">
<el-col :span="10">
<el-tooltip effect="dark" content="编辑当前行" placement="top">
<el-button size="mini" @click="dengmiQueryForm.dialogVisible = true">编辑</el-button>
</el-tooltip>
</el-col>
</el-table-column>
</el-table>
<div style="margin-top: 5px;"></div><!--这个只是为了在页面上显示间隔-->
<el-dialog title="编辑灯谜" :visible.sync="dengmiQueryForm.dialogVisible">
<el-form :model="modifyForm">
<el-form-item label="谜面" :label-width="modifyForm.formLabelWidth">
<el-input v-model="modifyForm.mimian" auto-complete="off"></el-input>
</el-form-item>
<el-form-item label="谜目" :label-width="modifyForm.formLabelWidth">
<el-input v-model="modifyForm.mimu" auto-complete="off"></el-input>
</el-form-item>
</el-form>
<div slot="footer" class="dialog-footer">
<el-button @click="dengmiQueryForm.dialogVisible = false">取 消</el-button>
<el-button type="primary" @click="dengmiQueryForm.dialogVisible = false">确 定</el-button>
</div>
</el-dialog>
<script>
export default {
name: "dengmiQuery",
comments: {
DengmiModify
},
data() {
return {
modifyForm:{
formLabelWidth:'120px',
mimian:'',
mimu:''
},
dengmiQueryForm: {
dialogDeleteVisible:false,
dialogVisible: false,
list: []
}
};
},
methods: {
submitForm(formName) {
console.log(formName.mimu);
this.$http.get('http://localhost:909/dengmi/showDengmi2').then(function (success) {
console.log("This request is succeed! Here is the response:");
this.dengmiQueryForm.list = success.body.result;
this.dengmiQueryForm.requestResult = true;
}, function (error) {
console.log("This request is failed! Here is the response:");
console.log(error);
this.dengmiQueryForm.requestResult = false;
})
},
handleEdit(row) {
this.dengmiQueryForm.deleteShow = row.mimian + "(" + row.mimu + ")" + row.midi + "/" + row.zuozhe;
this.modifyForm.mimian=row.mimian;
this.modifyForm.mimu=row.mimu;
}
}
}
</script>
如上代码,是在el-table标签上绑定了行单击事件*@row-click=“handleEdit”*,该方法的参数row即为当前行的数据。
在handleEdit方法中,通过对data中的参数赋值,然后新增窗口中通过使用data中的参数来获取当前行的数据,从而实现将当前行的数据传递到新的对话框中。
这个方法虽然也能实现需求,但是比较麻烦:当有别的操作的时候,比如我再添加一个删除操作,就需要在点击删除按钮的时候,获取当前行的数据,然后进行删除操作;而因为新增和删除使用的是不同的对话框,其取值也是要通过handleEdit方法来获取,因此,当按钮较多,或者当前行的字段值较多的时候,就需要在handleEdit中对许多许多的变量进行赋值,而且是对所有按钮的所有参数。这个工作量想想还是挺恐怖的。
1.2 使用slot-scope获取数据
slot-scope是属于VUE的东东,叫做插槽;至于插槽是个什么东东,来戳这里。
在操作列,对操作按钮先用带有slot-scope属性的dom进行包装,即可获取当前行的数据,具体的代码,除了操作列不同外,还需要删除el-table标签中绑定的*@row-click*方法,剩下的都一样:
<el-table-column label="操作尝试2">
<template slot-scope="scope">
<el-button type="text" @click="checkDetail(scope.row)">查看详情</el-button>
</template>
</el-table-column>
<script>
export default {
name: "dengmiQuery",
data() {
return {
modifyForm:{
formLabelWidth:'120px',
mimian:'',
mimu:''
},
dengmiQueryForm: {
dialogVisible: false,
list: [],
}
};
},
methods: {
checkDetail(val){
console.log(val)
}
}
}
</script>
通过<template slot-scope=“scope”>来定义当前行的数据对象,然后通过scope.row来获取当前行的数据。
全部代码
<template>
<div>
<el-form :model="dengmiQueryForm" ref="dengmiQueryForm" label-width="100px" class="demo-ruleForm" size="mini">
<el-row>
<el-col span="8">
<el-form-item label="谜面">
<el-input v-model="dengmiQueryForm.mimian"></el-input>
</el-form-item>
</el-col>
<el-col span="8">
<el-form-item label="谜目">
<el-input v-model="dengmiQueryForm.mimu"></el-input>
</el-form-item>
</el-col>
<el-col span="8">
<el-form-item label="谜格">
<el-input v-model="dengmiQueryForm.mige"></el-input>
</el-form-item>
</el-col>
</el-row>
<el-row>
<el-col span="8">
<el-form-item label="谜底">
<el-input v-model="dengmiQueryForm.midi"></el-input>
</el-form-item>
</el-col>
<el-col span="8">
<el-form-item label="作者">
<el-input v-model="dengmiQueryForm.zuozhe"></el-input>
</el-form-item>
</el-col>
<el-col span="8">
<el-form-item label="谜底字数">
<el-input v-model="dengmiQueryForm.midiLength"></el-input>
</el-form-item>
</el-col>
</el-row>
<el-row>
<el-col>
<el-button type="primary" @click="submitForm" icon="el-icon-search">查询</el-button>
<el-button type="warning" @click="resetForm" icon="el-icon-search" plain>重置</el-button>
</el-col>
</el-row>
</el-form>
<el-header></el-header>
<div v-if="dengmiQueryForm.requestResult">
<el-table :data="dengmiQueryForm.list.slice((dengmiQueryForm.currentPage-1)*dengmiQueryForm.pagesize,dengmiQueryForm.currentPage*dengmiQueryForm.pagesize)"
stripe border width="100%" height="350">
<el-table-column type="index" fixed="left"></el-table-column>
<el-table-column prop="mimian" label="谜面" width="300" fixed="left">
</el-table-column>
<el-table-column prop="dengmiSeq" label="序号">
</el-table-column>
<el-table-column prop="mimu" label="谜目">
</el-table-column>
<el-table-column prop="mige" label="谜格">
</el-table-column>
<el-table-column prop="midi" label="谜底">
</el-table-column>
<el-table-column prop="zuozhe" label="作者">
</el-table-column>
<el-table-column prop="mizhu" label="注">
</el-table-column>
<el-table-column prop="shangxi" label="赏析">
</el-table-column>
<el-table-column prop="leixing" label="类型">
</el-table-column>
<el-table-column label="操作" fixed="right" width="200px">
<el-row>
<el-col :span="10">
<el-tooltip effect="dark" content="编辑当前行" placement="top">
<el-button size="mini" @click="dengmiQueryForm.dialogVisible = true">编辑</el-button>
</el-tooltip>
</el-col>
<el-col :span="10">
<el-tooltip effect="light" content="删除当前行" placement="top">
<el-button size="mini" @click="dengmiQueryForm.dialogDeleteVisible = true" type="danger" plain>删除</el-button>
</el-tooltip>
</el-col>
</el-row>
</el-table-column>
<el-table-column label="操作尝试2">
<template slot-scope="scope">
<el-button type="text" @click="checkDetail(scope.row)">查看详情</el-button>
</template>
</el-table-column>
</el-table>
<div style="margin-top: 5px;"></div>
<el-pagination
prev-text="上一页"
next-text="下一页"
background
@size-change="handleSizeChange"
@current-change="handleCurrentChange"
:current-page="dengmiQueryForm.currentPageA"
:page-sizes="[5,10,50,100]"
:page-size="5"
layout="total, sizes, prev, pager, next, jumper"
:total="dengmiQueryForm.list.length">
</el-pagination>
</div>
<div v-else>
请求失败!
</div>
<el-dialog title="编辑灯谜" :visible.sync="dengmiQueryForm.dialogVisible">
<el-form :model="modifyForm">
<el-form-item label="谜面" :label-width="modifyForm.formLabelWidth">
<el-input v-model="modifyForm.mimian" auto-complete="off"></el-input>
</el-form-item>
<el-form-item label="谜目" :label-width="modifyForm.formLabelWidth">
<el-input v-model="modifyForm.mimu" auto-complete="off"></el-input>
</el-form-item>
</el-form>
<div slot="footer" class="dialog-footer">
<el-button @click="dengmiQueryForm.dialogVisible = false">取 消</el-button>
<el-button type="primary" @click="dengmiQueryForm.dialogVisible = false">确 定</el-button>
</div>
</el-dialog>
<el-dialog title="删除灯谜" :visible.sync="dengmiQueryForm.dialogDeleteVisible">
<h1><span style="color: red"><strong>确定删除该行数据?删除后不可恢复!</strong></span></h1>
<el-form>
<el-form-item label="当前行数据">
<el-col :span="18">
<el-input v-model="dengmiQueryForm.deleteShow" readonly></el-input>
</el-col>
</el-form-item>
</el-form>
<div slot="footer" class="dialog-footer">
<el-button @click="dengmiQueryForm.dialogDeleteVisible = false">取 消</el-button>
<el-button type="primary" @click="dengmiQueryForm.dialogDeleteVisible = false">确 定</el-button>
</div>
</el-dialog>
</div>
</template>
<script>
export default {
name: "dengmiQuery",
data() {
return {
modifyForm:{
formLabelWidth:'120px',
mimian:'',
mimu:''
},
dengmiQueryForm: {
deleteShow:'',
dialogDeleteVisible:false,
dialogVisible: false,
currentRow: null,
visibleA: false,
currentPage: 1, //初始页
pagesize: 5, // 每页的数据
currentPageA: 1,
mimian: '',
mimu: '',
mige: '',
midi: '',
zuozhe: '',
midiLength: '',
list: [],
requestResult: true,
thisRowData:{}
}
};
},
methods: {
submitForm(formName) {
console.log(formName.mimu);
this.$http.get('http://localhost:909/dengmi/showDengmi2').then(function (success) {
console.log("This request is succeed! Here is the response:");
this.dengmiQueryForm.list = success.body.result;
this.dengmiQueryForm.requestResult = true;
}, function (error) {
console.log("This request is failed! Here is the response:");
console.log(error);
this.dengmiQueryForm.requestResult = false;
})
},
resetForm(formName) {
this.$refs[formName].resetFields();
},
handleSizeChange(size) {
this.dengmiQueryForm.pagesize = size;
console.log(this.dengmiQueryForm.pagesize) //每页下拉显示数据
},
handleCurrentChange(currentPage) {
this.dengmiQueryForm.currentPage = currentPage;
console.log(this.dengmiQueryForm.currentPage) //点击第几页
},
handleEdit(row) {
this.dengmiQueryForm.deleteShow = row.mimian + "(" + row.mimu + ")" + row.midi + "/" + row.zuozhe;
// this.dengmiQueryForm.currentRow = row;
console.log(this.dengmiQueryForm.deleteShow);
this.modifyForm.mimian=row.mimian;
this.modifyForm.mimu=row.mimu;
// console.log("event=" + event);
// console.log(colunm)
},
handleClose(done) {
this.$confirm('确认关闭?')
.then(_ => {
done();
})
.catch(_ => {});
},
checkDetail(val){
console.log(val)
}
}
}
</script>
<style scoped>
</style>
蓝蓝设计( www.lanlanwork.com )是一家专注而深入的界面设计公司,为期望卓越的国内外企业提供卓越的UI界面设计、BS界面设计 、 cs界面设计 、 ipad界面设计 、 包装设计 、 图标定制 、 用户体验 、交互设计、 网站建设 、平面设计服务。
如果您想订阅本博客内容,每天自动发到您的邮箱中, 请点这里
现在我有如下需求,子组件 <user /> 中此时有一条用户的信息(userInfo);我要在父组件通过插槽展示这个用户的姓名(userInfo.name);
注意:这里的父组件并没有这个用户的信息,子组件中有,如果直接在父组件{{userInfo.name}} 获取这条信息是获取不到的;因为,只有 <user /> 组件可以访问到 userInfo,而我们提供的内容是在父组件渲染的;
模板在哪写,就是用哪里的变量,跟插槽用在哪无关
模板是在父组件中写好,被编译过后,传到子组件的插槽中的
为了让父组件的插槽内容可以读取到子组件的数据,我们可以将userInfo 作为一个 <slot> 元素的特性绑定上去;
// 子组件
const card = {
data() {
return {
userInfo: {name: '宫鑫'}
}
},
template: `
<div class='card'>
<!-- 在插槽上绑定子组件的数据 -->
<slot :userInfo="userInfo"/>
</div>
`
};
绑定在 元素上的特性被称为插槽 prop。现在在父级作用域中,我们可以给v-slot带一个值来定义我们提供的插槽 prop 的名字:
// 父组件
template: `
<div>
<card>
<template v-slot:default="userInfo">
用户姓名: {{userInfo}}
</template>
</card>
</div>
`
// 输出:
// 用户姓名: { "userInfo": { "name": "宫鑫" } }
蓝蓝设计( www.lanlanwork.com )是一家专注而深入的界面设计公司,为期望卓越的国内外企业提供卓越的UI界面设计、BS界面设计 、 cs界面设计 、 ipad界面设计 、 包装设计 、 图标定制 、 用户体验 、交互设计、 网站建设 、平面设计服务。
如果您想订阅本博客内容,每天自动发到您的邮箱中, 请点这里
今天遇到的就是z-index不起作用的问题。一个后台小哥不知道抽什么疯,写元素覆盖偏不让用absolute,搞的我之后废了9牛二虎之力写了一下,问题描述是这样的,
一对兄弟节点,insert和parent,parent有两个子节点subtop和subbottom,展现的结果是想让subtop在insert上面,subbottom在insert下面,
代码如下:
<!DOCTYPE html>
<html lang="en">
<head>
<meta charset="UTF-8">
<title>Document</title>
<style type="text/css">
.insert{
position: relative;
z-index:100;
background: green;
width:300px;
height:300px;
top:100px;
}
.parent{
/*position:relative;
z-index: 1000;*/
width:200px;
height:200px;
/*left:0;
top:-50px;*/
border:1px solid #eee;
}
.subbottom{
position:relative;
z-index: 50;
width:200px;
height:200px;
background: red;
top:-100px;
left:0;
}
.subtop{
position: relative;
z-index:1100;
width:100px;
height:100px;
left:0;
top:0;
background: blue;
}
</style>
</head>
<body>
<div class="insert"></div>
<div class="parent">
<div class="subtop"></div>
<div class="subbottom"></div>
</div>
</body>
</html>
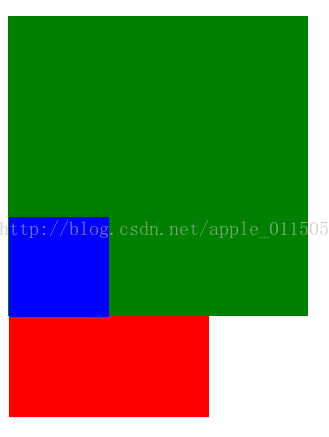
其实原理也很简单,就是利用了z-index的覆盖问题,在写的过程中我发现无论怎么改变,insert的z-index总是无效的,于是百度了一下z-index无效的情况,一共有三种:
1、父标签 position属性为relative;
2、问题标签无position属性(不包括static);
3、问题标签含有浮动(float)属性。
这样也很好理解为什么parent设置了position和z-index之后insert的z-index就会失效的问题了,他的解决办法有是三个:
1、position:relative改为position:absolute;
2、浮动元素添加position属性(如relative,absolute等);
3、去除浮动。
所以,去掉parent的position和z-index,达到了我想要的效果,如下图所示:
蓝蓝设计( www.lanlanwork.com )是一家专注而深入的界面设计公司,为期望卓越的国内外企业提供卓越的UI界面设计、BS界面设计 、 cs界面设计 、 ipad界面设计 、 包装设计 、 图标定制 、 用户体验 、交互设计、网站建设 、平面设计服务。如果您想订阅本博客内容,每天自动发到您的邮箱中, 请点这里
这个问题是解决基于 vue 和 electron 的开发中使用 vuex 的 dispatch 无效的问题,即解决了 Please, don't use direct commit's, use dispatch instead of this. 问题。
先允许我梳理一下目录结构,以便阅读的时候不会一头雾水,你到底说的这个文件是哪个……
其中 /src/main 是存放主配置文件的,/src/render 下面有 store、router、components 等。
components 下面就是很多 .vue 文件,router 下面就是一些路由配置的 js 文件和一些拦截器的 js。
关键是 store,store 下面有一个 index.js 的主配置文件 index.js,和一个 modules 文件夹。
index.js 里面写的是(记住这句话,后面会用到):
import Vue from 'vue'
import Vuex from 'vuex'
import { createPersistedState, createSharedMutations } from 'vuex-electron'
import modules from './modules'
Vue.use(Vuex)
export default new Vuex.Store({
modules,
plugins: [
createPersistedState(),
createSharedMutations()
],
strict: process.env.NODE_ENV !== 'production'
})
而 modules/ 下面存放各个实体,例如上图中的 Auth.js 和 Counter.js,并通过 index.js 全部引入。
/**
* The file enables `@/store/index.js` to import all vuex modules
* in a one-shot manner. There should not be any reason to edit this file.
*/
const files = require.context('.', false, /\.js$/)
const modules = {}
files.keys().forEach(key => {
if (key === './index.js') return
modules[key.replace(/(\.\/|\.js)/g, '')] = files(key).default
})
export default modules
然后来看一个 vuex 的官方样例:
const state = {
main: 0
}
const mutations = {
DECREMENT_MAIN_COUNTER (state) {
state.main--
},
INCREMENT_MAIN_COUNTER (state) {
state.main++
}
}
const actions = {
someAsyncTask ({ commit }) {
// do something async
commit('INCREMENT_MAIN_COUNTER')
}
}
export default {
state,
mutations,
actions
}
之后很显然的,我想要在 Vue 的组件调用 INCREMENT_MAIN_COUNTER 对计数器加 1。
this.$store.commit('INCREMENT_MAIN_COUNTER');
// this.$store.commit('INCREMENT_MAIN_COUNTER', payload);
1
2
如果是一般的 vue,就 OK 了,但是,我遇到了报错,说,Please, don't use direct commit's, use dispatch instead of this.
那好吧,没事,不就是不然用 Commit,非要用 Dispatch 嘛,那我就写一个 Action,里面直接调用 Mutation,就像这个样子:
const actions = {
JUST_INCREASE ({ commit }) {
commit('INCREMENT_MAIN_COUNTER')
}
}
1
2
3
4
5
然而奇怪的事情是,this.$store.dispatch('JUST_INCREASE') 并不能运行,没反应,计数器还是 0,不能赋值,就像是这个函数没有被执行一样。没有报错,没有任何异常,查也查不出什么问题。
网上的资料似乎也挺少。
折腾了很久,后来发现是 vuex-electron 里面一个插件的锅。
解决方法有两个。
方法一:
在 store/index.js 里面,就是上文特别强调了的那个文件,去掉 createSharedMutations 插件。
import Vue from 'vue'
import Vuex from 'vuex'
import { createPersistedState, createSharedMutations } from 'vuex-electron'
import modules from './modules'
Vue.use(Vuex)
export default new Vuex.Store({
modules,
plugins: [
createPersistedState(),
createSharedMutations() // 注释掉这一行
],
strict: process.env.NODE_ENV !== 'production'
})
这是因为 vuex-electron 引入了一个用于多进程间共享 Vuex Store 的状态的插件。如果没有多进程交互的需求,完全可以不引入这个插件。
注释掉以后重启项目,用 this.$store.commit('XXX') 就可以使用了。
然而,如果需要多进程来处理怎么办?
方法二:
https://github.com/vue-electron/vuex-electron#installation
看第 3 条:
In case if you enabled createSharedMutations() plugin you need to create an instance of store in the main process. To do it just add this line into your main process (for example src/main.js):
import './path/to/your/store'
1
这种时候就不能用第一种方法来解决问题了。
好在文档也说了,加上一行导入。
找到 /src/main/index.js,在前面加上一句:
import '../renderer/store'
1
之后一切正常,可以使用 Dispatch 来进行操作了。
最后还有一个比较奇怪的问题:
在直接调用 state 的时候,这样写 this.$store.state.loginStatus 是不行的,会 undefined,必须写成 this.$store.state.Auth.loginStatus,就像是 this.$store.state.Counter.main 一样,似乎可以解释为,不同的模块不指定名字的话就找不到。
但是,在写 Dispatch 的时候又不需要指定名字了,直接 dispatch('changeLoginStatus') 就行了,不然难道不应该是也按照 dispatch('Auth/changeLoginStatus') 这样子来写嘛……
蓝蓝设计( www.lanlanwork.com )是一家专注而深入的界面设计公司,为期望卓越的国内外企业提供卓越的UI界面设计、BS界面设计 、 cs界面设计 、 ipad界面设计 、 包装设计 、 图标定制 、 用户体验 、交互设计、网站建设 、平面设计服务。
如果您想订阅本博客内容,每天自动发到您的邮箱中, 请点这里
需求是拦截前端的网络请求和相应。
废话不多说,直接上干货。
我用的是vue-cli3所以这个config文件是我自己创建的。
先介绍env.js
//根据不同的环境更改不同的baseUrl
let baseUrl = '';
//开发环境下
if (process.env.NODE_ENV == 'development') {
baseUrl = '';
} else if (process.env.NODE_ENV == 'production') {
baseUrl = '生产地址';
}
export {
baseUrl,//导出baseUrl
}
在这里我首先设置了开发环境和生产环境的地址,并向外抛出。
在看一下axios.js
import {
baseUrl, //引入baseUrl
} from "../config/env";
import axios from 'axios';
import qs from 'qs';
//引入vuex的js文件
import vuex from '../src/store/index';
// 创建 axios 实例
let service = axios.create({
baseUrl: baseUrl,//请求前缀
timeout: 20000, // 请求超时时间
crossDomain: true,//设置cross跨域
withCredentials: true//设置cross跨域 并设置访问权限 允许跨域携带cookie信息
})
// 设置 post 默认 Content-Type
service.defaults.headers.post['Content-Type'] = 'application/x-www-form-urlencoded;charset=UTF-8';
// 添加请求拦截器
service.interceptors.request.use(
(config) => {
// console.log()
//下面的代码是如何在拦截器中调用vuex管理状态。
//我这里主要是做了一个蒙层的遮盖
// vuex.$store.commit('OPEN_LOADING');
//判断请求方式是否为POST,进行转换格式
config.method === 'post'
? config.data = qs.stringify({...config.data})
: config.params = {...config.params};
// 请求发送前进行处理
return config
},
(error) => {
// 请求错误处理
return Promise.reject(error)
}
)
// 添加响应拦截器
service.interceptors.response.use(
(response) => {
let { data } = response;
return data
},
(error) => {
let info = {},
{ status, statusText, data } = error.response
if (!error.response) {
info = {
code: 5000,
msg: 'Network Error'
}
} else {
// 此处整理错误信息格式
info = {
code: status,
data: data,
msg: statusText
}
}
}
)
/**
* 向外抛出service
*/
export default service
最后将这个axios.js文件引入main.js中,并将引入的axios挂载到Vue实例上就ok了。
完美!如有不对的地方还请各位大佬指点,万分感谢。
踩过的坑:
怎么在axios拦截器中使用vuex,首先我们要引入vuex的js文件,然后就可以用了,就这么简单。
蓝蓝设计( www.lanlanwork.com )是一家专注而深入的界面设计公司,为期望卓越的国内外企业提供卓越的UI界面设计、BS界面设计 、 cs界面设计 、 ipad界面设计 、 包装设计 、 图标定制 、 用户体验 、交互设计、 网站建设 、平面设计服务。
蓝蓝设计的小编 http://www.lanlanwork.com