


例子一:
<table>
<tr>
<th>用户名</th>
<th>状态</th>
<tr>
<tr>
<td>张三</td>
<td data-uid="10000">正常</td>
<tr>
<tr>
<td>李四</td>
<td data-uid="10001">冻结</td>
<tr>
<tr>
<td>王二麻子</td>
<td data-uid=10002>冻结</td>
<tr>
</table>
<script type="text/javascript">
$(document).ready(function(){
var uid = 1001;
$("td[data-uid = "+ uid +"]").html('正常');
}
</script>
<script type="text/javascript">
$(function(){
alert(123);
var v=4;
var test=$("input[type='radio'][value='"+v+"']");//直接拼接字符串就可以了
console.info(test);
var testValue=test.attr({"checked":true});
console.info(testValue);
});
</script>
<body>
This is my JSP page. <br>
<table>
<tr>
<td>性别:</td>
<td>
<input name="sex" type="radio" value="0"/>男 0
<input name="sex" type="radio" value="1"/>女 1
<input name="sex" type="radio" value="2"/>女 2
<input name="sex" type="radio" value="3"/>女 3
<input name="sex" type="radio" value="4"/>女 4
</td>
</tr>
</table>
</body>
例子三、jQuery中选择器参数使用变量应该注意的问题
这是原来的代码
var li_index = $(this).index();
var $content_index = li_index + 2;
var $content_progress = $(“div.content:eq(” + $content_index + “)”);
var $newavalue = $(this).find(“a”).attr(“name”);
var $resource = $(this).find(“a”).html().replace(“首页”,$newavalue);
var $afterresource = $resource.replace($newavalue,””);
var $afterresource = $newavalue + $afterresource.replace(“首页”,$newavalue);
实现的是关键词替换,不过到第三行时候不执行了,调试啊,替换啊,都不行。 从早上到刚才一直在各种群里面发问,终于 …… 俺们大本营 的Lomu大神一阵见血:
你的写法不对
要连接符
$(“div.content:nth-child($content_index)”);
$(“div.content:nth-child(” + $content_index + “)”);
关键是外面有引号
有引号被当字符串处理了
说真的现在感觉,有些基础的东西出错,光靠自己调试根本找不出问题所在。比如刚才那个 + 号,我看书就没见过。出现这种错误百度也不知道什么关键词。真不知道 选择器 里面用变量 还要用到+号,那个《锋利的jQuery 》也没有明确的说 选择器 里面用变量 还要用到+号,包括我们的w3cschool。
蓝蓝设计建立了UI设计分享群,每天会分享国内外的一些优秀设计,如果有兴趣的话,可以进入一起成长学习,请扫码蓝小助,报下信息,蓝小助会请您入群。欢迎您加入噢~~希望得到建议咨询、商务合作,也请与我们联系。

文章来源:脚本之家 作者:junjie
蓝蓝设计( www.lanlanwork.com )是一家专注而深入的界面设计公司,为期望卓越的国内外企业提供卓越的UI界面设计、BS界面设计 、 cs界面设计 、 ipad界面设计 、 包装设计 、 图标定制 、 用户体验 、交互设计、 网站建设 、平面设计服务
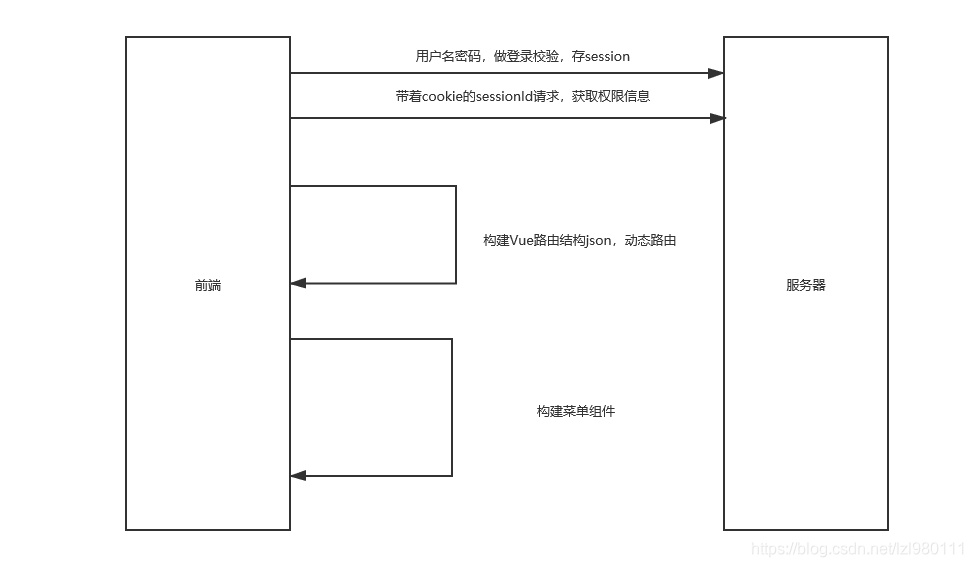
一个博主做的shiro笔记:https://www.guitu18.com/post/2019/07/26/43.html
<dependencies> <dependency> <groupId>org.springframework.boot</groupId> <artifactId>spring-boot-starter-web</artifactId> </dependency> <dependency> <groupId>mysql</groupId> <artifactId>mysql-connector-java</artifactId> <scope>runtime</scope> </dependency> <dependency> <groupId>org.projectlombok</groupId> <artifactId>lombok</artifactId> <optional>true</optional> </dependency> <dependency> <groupId>org.springframework.boot</groupId> <artifactId>spring-boot-starter-test</artifactId> <scope>test</scope> </dependency> <!-- shiro --> <dependency> <groupId>org.apache.shiro</groupId> <artifactId>shiro-spring</artifactId> <version>1.7.0</version> </dependency> <!--mybatis-plus 持久层--> <dependency> <groupId>com.baomidou</groupId> <artifactId>mybatis-plus-boot-starter</artifactId> <version>3.4.1</version> </dependency> <!-- 整合swagger --> <dependency> <groupId>io.springfox</groupId> <artifactId>springfox-swagger2</artifactId> <version>2.8.0</version> </dependency> <dependency> <groupId>io.springfox</groupId> <artifactId>springfox-swagger-ui</artifactId> <version>2.8.0</version> </dependency> <!-- kaptcha 验证码 --> <dependency> <groupId>com.github.penggle</groupId> <artifactId>kaptcha</artifactId> <version>2.3.2</version> </dependency> </dependencies>
package com.unclebb.zlgl.config; import com.unclebb.zlgl.utils.CustomRealm; import org.apache.shiro.authc.credential.HashedCredentialsMatcher; import org.apache.shiro.mgt.DefaultSecurityManager; import org.apache.shiro.spring.web.ShiroFilterFactoryBean; import org.apache.shiro.util.ThreadContext; import org.apache.shiro.web.mgt.DefaultWebSecurityManager; import org.springframework.aop.framework.autoproxy.DefaultAdvisorAutoProxyCreator; import org.springframework.boot.autoconfigure.condition.ConditionalOnMissingBean; import org.springframework.context.annotation.Bean; import org.springframework.context.annotation.Configuration; import java.util.HashMap; import java.util.Map; /**
 * @program: zlgl
 * @description: Shiro配置类:将SecurityManager以及Realm都注入到Spring容器中
 * @author: LiuZhiliang
 * @create: 2021-05-10 08:56
 **/ @Configuration public class ShiroConfig { /**
    * @Description: 代理生成器,需要借助SpringAOP来扫描@RequiresRoles和@RequiresPermissions等注解。生成代理类实现功能增强,从而实现权限控制。需要配合AuthorizationAttributeSourceAdvisor一起使用,否则权限注解无效。
    * @Param:
    * @return:
    * @Author: Liuzhiliang
    * @Date:
    */ @Bean public DefaultAdvisorAutoProxyCreator lifecycleBeanProcessor(){ DefaultAdvisorAutoProxyCreator defaultAdvisorAutoProxyCreator = new DefaultAdvisorAutoProxyCreator(); defaultAdvisorAutoProxyCreator.setProxyTargetClass(true); return defaultAdvisorAutoProxyCreator; } /**
    * @Description:  上面配置的DefaultAdvisorAutoProxyCreator相当于一个切面,下面这个类就相当于切点了,两个一起才能实现注解权限控制。
    * @Param:
    * @return:
    * @Author: Liuzhiliang
    * @Date:
    */ @Bean public AuthorizationAttributeSourceAdvisor authorizationAttributeSourceAdvisor(DefaultWebSecurityManager securityManager){ AuthorizationAttributeSourceAdvisor advisor = new AuthorizationAttributeSourceAdvisor(); advisor.setSecurityManager(securityManager); return advisor; } /**
     * @Description: Filter工厂,设置对应的过滤条件和跳转条件
     * @Param:
     * @return:
     * @Author: Liuzhiliang
     * @Date:
     */ //权限管理,配置主要是Realm的管理认证 @Bean public DefaultWebSecurityManager securityManager(){ DefaultWebSecurityManager securityManager = new DefaultWebSecurityManager(); securityManager.setRealm(myShiroRealm()); ThreadContext.bind(securityManager); return securityManager; } //将自己的验证方式加入容器 @Bean public CustomRealm myShiroRealm() { HashedCredentialsMatcher matcher = new HashedCredentialsMatcher(); //加密 matcher.setHashAlgorithmName("md5"); matcher.setHashIterations(1); CustomRealm customRealm = new CustomRealm(); customRealm.setCredentialsMatcher(matcher); return customRealm; } @Bean public ShiroFilterFactoryBean shiroFilter(DefaultSecurityManager securityManager){ ShiroFilterFactoryBean shiroFilterFactoryBean = new ShiroFilterFactoryBean(); shiroFilterFactoryBean.setSecurityManager(securityManager); //        Map<String,String> maps = new HashMap<>(); //        maps.put("/logout","logout"); //        maps.put("/**","authc"); //        shiroFilterFactoryBean.setLoginUrl("/login"); //        shiroFilterFactoryBean.setUnauthorizedUrl("/403.html"); //        shiroFilterFactoryBean.setSuccessUrl("/index"); //        shiroFilterFactoryBean.setFilterChainDefinitionMap(maps); return shiroFilterFactoryBean; } }
package com.unclebb.zlgl.config; import com.google.common.base.Predicates; import org.springframework.context.annotation.Bean; import org.springframework.context.annotation.Configuration; import springfox.documentation.builders.ApiInfoBuilder; import springfox.documentation.builders.PathSelectors; import springfox.documentation.service.ApiInfo; import springfox.documentation.service.Contact; import springfox.documentation.spi.DocumentationType; import springfox.documentation.spring.web.plugins.Docket; import springfox.documentation.swagger2.annotations.EnableSwagger2; /**
 * @Author unclebb
 * @Description Swagger配置类
 * @Date 2021/5/9
 **/ @Configuration @EnableSwagger2 public class Swagger2Config { @Bean public Docket webApiConfig(){ return new Docket(DocumentationType.SWAGGER_2) .groupName("webApi") .apiInfo(webApiInfo()) .select() //过滤掉admin路径下的所有页面 .paths(Predicates.and(PathSelectors.regex("/user/.*"))) //过滤掉所有error或error.*页面 //.paths(Predicates.not(PathSelectors.regex("/error.*"))) .build(); } private ApiInfo webApiInfo(){ return new ApiInfoBuilder() .title("网站-API文档") .description("本文档描述了网站微服务接口定义") .version("1.0") .contact(new Contact("qy", "http://atguigu.com", "55317332@qq.com")) .build(); } }
package com.unclebb.zlgl.config; import com.google.code.kaptcha.impl.DefaultKaptcha; import com.google.code.kaptcha.util.Config; import org.springframework.context.annotation.Bean; import org.springframework.stereotype.Component; import java.util.Properties; /**
 * @program: zlgl
 * @description: Kaptcha配置类
 * @author: LiuZhiliang
 * @create: 2021-05-12 09:03
 **/ @Component public class KaptchaConfig { @Bean public DefaultKaptcha getKaptcha(){ DefaultKaptcha dk = new DefaultKaptcha(); Properties properties = new Properties(); // 图片边框 properties.setProperty("kaptcha.border", "yes"); // 边框颜色 properties.setProperty("kaptcha.border.color", "105,179,90"); // 字体颜色 properties.setProperty("kaptcha.textproducer.font.color", "red"); // 图片宽 properties.setProperty("kaptcha.image.width", "110"); // 图片高 properties.setProperty("kaptcha.image.height", "40"); // 字体大小 properties.setProperty("kaptcha.textproducer.font.size", "30"); // session key properties.setProperty("kaptcha.session.key", "code"); // 验证码长度 properties.setProperty("kaptcha.textproducer.char.length", "4"); // 字体 properties.setProperty("kaptcha.textproducer.font.names", "宋体,楷体,微软雅黑"); Config config = new Config(properties); dk.setConfig(config); return dk; } }
package com.unclebb.zlgl.pojo; import com.baomidou.mybatisplus.annotation.IdType; import com.baomidou.mybatisplus.annotation.TableField; import com.baomidou.mybatisplus.annotation.TableId; import com.baomidou.mybatisplus.annotation.TableName; import lombok.Data; import java.util.Set; /**
 * @Author unclebb
 * @Description 用户实体类
 * @Date 2021/5/9
 **/ @Data @TableName(value = "user") public class User { @TableId(value = "id",type = IdType.AUTO)//指定自增策略 private int id; @TableField(value = "username") private String username; @TableField(value = "password") private String password; @TableField(exist = false) private Set<Role> rolesSet; private String salt; }
package com.unclebb.zlgl.pojo; import com.baomidou.mybatisplus.annotation.IdType; import com.baomidou.mybatisplus.annotation.TableField; import com.baomidou.mybatisplus.annotation.TableId; import lombok.Data; import java.util.Set; /**
 * @Author unclebb
 * @Description 角色实体类
 * @Date 2021/5/9
 **/ @Data public class Role { @TableId(value = "id",type = IdType.AUTO)//指定自增策略 private int id; @TableField(value = "user_name") private String userName; @TableField(value = "role_name") private String roleName; @TableField(exist = false) private Set<Permission> permissionSet; }
package com.unclebb.zlgl.pojo; import com.baomidou.mybatisplus.annotation.IdType; import com.baomidou.mybatisplus.annotation.TableField; import com.baomidou.mybatisplus.annotation.TableId; import lombok.Data; /**
 * @Author unclebb
 * @Description 权限实体类
 * @Date 2021/5/9
 **/ @Data public class Permission { @TableId(value = "id",type = IdType.AUTO)//指定自增策略 private int id; @TableField(value = "role_name") private String roleName; @TableField(value = "permission_name") private String permissionName; }
基本格式:
package com.unclebb.zlgl.mapper; import com.baomidou.mybatisplus.core.mapper.BaseMapper; import com.unclebb.zlgl.pojo.User; import org.apache.ibatis.annotations.Mapper; /**
 * @Author unclebb
 * @Description 用户映射
 * @Date 2021/5/9
 **/ @Mapper public interface UserMapper extends BaseMapper<User> { }
package com.unclebb.zlgl.service; import com.baomidou.mybatisplus.extension.service.IService; import com.unclebb.zlgl.pojo.User; import org.springframework.stereotype.Service; /**
 * @Author unclebb
 * @Description 用户登录接口
 * @Date 2021/5/9
 **/ @Service public interface LoginService extends IService<User> { public User getByUsername(String username); }
package com.unclebb.zlgl.service; import com.baomidou.mybatisplus.extension.service.IService; import com.unclebb.zlgl.pojo.Role; import org.springframework.stereotype.Service; import java.util.List; @Service public interface RoleService extends IService<Role> { public List<Role> getRole(String userName); }
package com.unclebb.zlgl.service; import com.baomidou.mybatisplus.extension.service.IService; import com.unclebb.zlgl.pojo.Permission; import org.springframework.stereotype.Service; import java.util.List; @Service public interface PermissionService extends IService<Permission> { public List<Permission> getPermissions(String roleName); }
package com.unclebb.zlgl.service.impl; import com.baomidou.mybatisplus.core.conditions.query.QueryWrapper; import com.baomidou.mybatisplus.extension.service.impl.ServiceImpl; import com.unclebb.zlgl.mapper.UserMapper; import com.unclebb.zlgl.pojo.Role; import com.unclebb.zlgl.pojo.User; import com.unclebb.zlgl.service.LoginService; import com.unclebb.zlgl.service.PermissionService; import com.unclebb.zlgl.service.RoleService; import org.springframework.beans.factory.annotation.Autowired; import org.springframework.stereotype.Service; import java.util.HashSet; import java.util.List; import java.util.Set; /**
 * @Author unclebb
 * @Description 登录实现类
 * @Date 2021/5/9
 **/ @Service public class LoginServiceImpl extends ServiceImpl<UserMapper, User> implements LoginService { @Autowired RoleService roleService; @Override public User getByUsername(String username) { QueryWrapper<User> wrapper = new QueryWrapper<>(); wrapper.eq("username",username); User user = this.getOne(wrapper); List<Role> roleList = roleService.getRole(user.getUsername()); user.setRolesSet(new HashSet<Role>(roleList)); return user; } }
package com.unclebb.zlgl.service.impl; import com.baomidou.mybatisplus.core.conditions.query.QueryWrapper; import com.baomidou.mybatisplus.extension.service.impl.ServiceImpl; import com.unclebb.zlgl.mapper.RoleMapper; import com.unclebb.zlgl.pojo.Permission; import com.unclebb.zlgl.pojo.Role; import com.unclebb.zlgl.service.PermissionService; import com.unclebb.zlgl.service.RoleService; import org.springframework.beans.factory.annotation.Autowired; import org.springframework.stereotype.Service; import java.util.HashSet; import java.util.List; import java.util.Set; /**
 * @program: zlgl
 * @description: Role实现类
 * @author: LiuZhiliang
 * @create: 2021-05-10 16:16
 **/ @Service public class RoleServiceImpl extends ServiceImpl<RoleMapper, Role> implements RoleService { @Autowired PermissionService permissionService; @Override public List<Role> getRole(String userName) { QueryWrapper wrapper = new QueryWrapper(); wrapper.eq("user_name",userName); List<Role> roleList = this.list(wrapper); for (Role role:roleList){ List<Permission> permissions = permissionService.getPermissions(role.getRoleName()); role.setPermissionSet(new HashSet<Permission>(permissions)); } return roleList; } }
package com.unclebb.zlgl.service.impl; import com.baomidou.mybatisplus.core.conditions.query.QueryWrapper; import com.baomidou.mybatisplus.extension.service.impl.ServiceImpl; import com.unclebb.zlgl.mapper.PermissionMapper; import com.unclebb.zlgl.pojo.Permission; import com.unclebb.zlgl.pojo.User; import com.unclebb.zlgl.service.PermissionService; import org.springframework.stereotype.Service; import java.util.List; import java.util.Set; /**
 * @program: zlgl
 * @description: Permission实现类
 * @author: LiuZhiliang
 * @create: 2021-05-10 16:18
 **/ @Service public class PermissionServiceImpl extends ServiceImpl<PermissionMapper, Permission> implements PermissionService { @Override public List<Permission> getPermissions(String roleName) { QueryWrapper<Permission> wrapper = new QueryWrapper<>(); wrapper.eq("role_name",roleName); return this.list(wrapper); } }
package com.unclebb.zlgl.controller; import com.unclebb.zlgl.pojo.Role; import com.unclebb.zlgl.pojo.User; import com.unclebb.zlgl.service.RoleService; import com.unclebb.zlgl.utils.Result; import io.swagger.annotations.ApiOperation; import org.apache.shiro.SecurityUtils; import org.apache.shiro.authc.AuthenticationException; import org.apache.shiro.authc.UsernamePasswordToken; import org.apache.shiro.authz.AuthorizationException; import org.apache.shiro.session.Session; import org.apache.shiro.subject.Subject; import org.springframework.beans.factory.annotation.Autowired; import org.springframework.util.StringUtils; import org.springframework.web.bind.annotation.*; import javax.servlet.http.HttpSession; import java.util.Enumeration; import java.util.HashMap; import java.util.List; import java.util.Map; /**
 * @Author unclebb
 * @Description 登录控制器
 * @Date 2021/5/9
 **/ @RestController public class LoginController { @Autowired RoleService roleService; /**
    * @Description: 登录接口
    * @Param:
    * @return:
    * @Author: Liuzhiliang
    * @Date:
    */ @ApiOperation(value = "登录接口") @RequestMapping("/user/login") public Result login(@RequestBody User user){ System.out.println("进入/user/login API接口"); if (StringUtils.isEmpty(user.getUsername())||StringUtils.isEmpty(user.getPassword())){ return Result.fail("请输入用户名密码"); } Subject subject = SecurityUtils.getSubject(); Session session = subject.getSession(); Object sessionId = session.getId(); Map ret = new HashMap<String,Object>(); ret.put("token",sessionId); UsernamePasswordToken token = new UsernamePasswordToken(user.getUsername(),user.getPassword()); try { //登录成功 subject.login(token); return Result.ok(ret); } catch (AuthenticationException e) { e.printStackTrace(); //登录失败 return Result.fail("用户名密码错误"); } } /**
    * @Description: 基本测试接口
    * @Param:
    * @return:
    * @Author: Liuzhiliang
    * @Date:
    */ @RequestMapping("/user/noauthority") public Result noauthority(){ return Result.fail("没有权限"); } /**
    * @Description: 测试session接口
    * @Param:
    * @return:
    * @Author: Liuzhiliang
    * @Date:
    */ @RequestMapping("/user/demoSession") @ResponseBody public String demoSession(HttpSession session){ System.out.println("测试session"); Enumeration<String> names = session.getAttributeNames(); while (names.hasMoreElements()){ String name = names.nextElement(); Object value = session.getAttribute(name); System.out.println(name + " -------  "+ value); } return "session 取值"; } /**
    * @Description: 测试session接口
    * @Param:
    * @return:
    * @Author: Liuzhiliang
    * @Date:
    */ @RequestMapping("/user/demoSession2") @ResponseBody public String demoSession2(){ Subject subject = SecurityUtils.getSubject(); Session session = subject.getSession(); System.out.println(session.getHost()); System.out.println(session.getId()); System.out.println(session.getLastAccessTime().getTime()); System.out.println(session.getTimeout()); System.out.println(session.getAttribute("test")); return "session 取值"; } /**
    * @Description: 测试session接口
    * @Param:
    * @return:
    * @Author: Liuzhiliang
    * @Date:
    */ @RequestMapping("/user/checkPermission") @ResponseBody public Result checkPermission(User user){ if (StringUtils.isEmpty(user.getUsername())||StringUtils.isEmpty(user.getPassword())){ return Result.fail("请输入用户名密码"); } Subject subject = SecurityUtils.getSubject(); Session session = subject.getSession(); session.setAttribute("test","test"); UsernamePasswordToken token = new UsernamePasswordToken(user.getUsername(),user.getPassword()); token.setRememberMe(true); try { //登录成功 subject.login(token); } catch (AuthenticationException e) { e.printStackTrace(); //登录失败 return Result.fail("用户名密码错误"); } try { subject.checkRole("admin"); return Result.ok("权限检查成功"); } catch (AuthorizationException e) { e.printStackTrace(); return Result.fail("检查权限失败"); } } /**
    * @Description: 根据token获取用户授权信息接口
    * @Param:
    * @return:
    * @Author: Liuzhiliang
    * @Date:
    */ @RequestMapping("/user/checkRole") public Result checkRole(@RequestParam String token){ Subject subject = SecurityUtils.getSubject(); Session session = subject.getSession(); List<Role> roleList = null; if (token.equals(session.getId().toString())){ String username = session.getAttribute("org.apache.shiro.subject.support.DefaultSubjectContext_PRINCIPALS_SESSION_KEY").toString(); System.out.println(username); roleList = roleService.getRole(username); } return Result.ok(roleList); } /**
    * @Description: 测试kaptcha ,获取验证码
    * @Param:
    * @return:
    * @Author: Liuzhiliang
    * @Date:
    */ @RequestMapping("/user/testKaptcha") @ResponseBody public String TestKaptcha(HttpServletRequest request, HttpServletResponse response) throws IOException { byte[] captcha = null; ByteArrayOutputStream out = new ByteArrayOutputStream(); try { // 将生成的验证码保存在session中 String createText = defaultKaptcha.createText(); request.getSession().setAttribute("rightCode", createText); BufferedImage bi = defaultKaptcha.createImage(createText); ImageIO.write(bi, "jpg", out); } catch (Exception e) { response.sendError(HttpServletResponse.SC_NOT_FOUND); } captcha = out.toByteArray(); response.setHeader("Cache-Control", "no-store"); response.setHeader("Pragma", "no-cache"); response.setDateHeader("Expires", 0); response.setContentType("image/jpeg"); ServletOutputStream sout = response.getOutputStream(); sout.write(captcha); sout.flush(); sout.close(); return "测试Kaptcha"; } /**
     * 校对验证码
     *
     * @param request
     * @param response
     * @return
     */ @RequestMapping(value = "/user/verifyKaptcha") public Result imgvrifyControllerDefaultKaptcha(HttpServletRequest request, HttpServletResponse response) { ModelAndView model = new ModelAndView(); String rightCode = (String) request.getSession().getAttribute("rightCode"); String tryCode = request.getParameter("tryCode"); System.out.println("rightCode:" + rightCode + " ———— tryCode:" + tryCode); if (!rightCode.equals(tryCode)) { model.addObject("info", "验证码错误,请再输一次!"); model.setViewName("login"); return Result.fail("验证码错误"); } else { model.addObject("info", "登陆成功"); model.setViewName("index"); return Result.ok("验证成功"); } } /**
    * @Description: 测试 校验权限 permission
    * @Param:
    * @return:
    * @Author: Liuzhiliang
    * @Date:
    */ @RequestMapping("/user/testShiroPermission") @RequiresPermissions("user:add") public Result TestShiroPermissions(){ System.out.println("访问 TestShiroPermissions API"); Subject subject = SecurityUtils.getSubject(); String username = (String) subject.getPrincipal(); System.out.println(username); return Result.ok(username); } /**
    * @Description: 登出功能API
    * @Param:
    * @return:
    * @Author: Liuzhiliang
    * @Date:
    */ @RequestMapping("/user/logout") public Result logout(){ Subject subject = SecurityUtils.getSubject(); String username = (String) subject.getPrincipal(); subject.logout(); return Result.ok(username); } /**
    * @Description:  测试校验 角色 role
    * @Param:
    * @return:
    * @Author: Liuzhiliang
    * @Date:
    */ @RequestMapping("/user/TestRole") @RequiresRoles("admin") public Result TestRole(){ System.out.println("测试TestRole"); return Result.ok("测试Role"); } }
package com.unclebb.zlgl.utils; import io.swagger.annotations.ApiModel; import io.swagger.annotations.ApiModelProperty; import lombok.Data; /**
 * @Author unclebb
 * @Description 统一返回API格式
 * @Date 2021/5/9
 **/ @Data @ApiModel(value = "全局统一返回结果") public class Result<T> { @ApiModelProperty(value = "返回码") private Integer code; @ApiModelProperty(value = "返回消息") private String message; @ApiModelProperty(value = "返回数据") private T data; public Result(){} public static <T> Result<T> build(T data) { Result<T> result = new Result<T>(); if (data != null) result.setData(data); return result; } public static <T> Result<T> build(T body, ResultCodeEnum resultCodeEnum) { Result<T> result = build(body); result.setCode(resultCodeEnum.getCode()); result.setMessage(resultCodeEnum.getMessage()); return result; } public static<T> Result<T> ok(){ return Result.ok(null); } /**
     * 操作成功
     * @param data
     * @param <T>
     * @return
     */ public static<T> Result<T> ok(T data){ Result<T> result = build(data); return build(data, ResultCodeEnum.SUCCESS); } public static<T> Result<T> fail(){ return Result.fail(null); } /**
     * 操作失败
     * @param data
     * @param <T>
     * @return
     */ public static<T> Result<T> fail(T data){ Result<T> result = build(data); return build(data, ResultCodeEnum.FAIL); } public Result<T> message(String msg){ this.setMessage(msg); return this; } public Result<T> code(Integer code){ this.setCode(code); return this; } }
package com.unclebb.zlgl.utils; import lombok.Getter; /**
 * @Author unclebb
 * @Description API状态信息
 * @Date 2021/5/9
 **/ @Getter public enum ResultCodeEnum { SUCCESS(200,"成功"), FAIL(201, "失败"), SERVICE_ERROR(202, "服务异常"), DATA_ERROR(204, "数据异常"), SIGN_ERROR(300, "签名错误"), PAY_PASSWORD_ERROR(401, "支付密码错误"), REPEAT_ERROR(402, "重复提交"), INVEST_AMMOUNT_MORE_ERROR(501, "出借金额已经多余标的金额"), RETURN_AMMOUNT_MORE_ERROR(502, "还款金额不正确"), PROJECT_AMMOUNT_ERROR(503, "标的金额不一致") ; private Integer code; private String message; private ResultCodeEnum(Integer code, String message) { this.code = code; this.message = message; } }
package com.unclebb.zlgl.utils; import com.unclebb.zlgl.pojo.Permission; import com.unclebb.zlgl.pojo.Role; import com.unclebb.zlgl.pojo.User; import com.unclebb.zlgl.service.LoginService; import org.apache.shiro.authc.AuthenticationException; import org.apache.shiro.authc.AuthenticationInfo; import org.apache.shiro.authc.AuthenticationToken; import org.apache.shiro.authc.SimpleAuthenticationInfo; import org.apache.shiro.authz.AuthorizationInfo; import org.apache.shiro.authz.SimpleAuthorizationInfo; import org.apache.shiro.realm.AuthorizingRealm; import org.apache.shiro.subject.PrincipalCollection; import org.apache.shiro.util.ByteSource; import org.springframework.beans.factory.annotation.Autowired; /**
 * @program: zlgl
 * @description: 自定义Realm
 * @author: LiuZhiliang
 * @create: 2021-05-10 09:09
 **/ public class CustomRealm extends AuthorizingRealm { @Autowired LoginService loginService; /**
    * @Description: 授权配置
    * @Param:
    * @return:
    * @Author: Liuzhiliang
    * @Date:
    */ @Override protected AuthorizationInfo doGetAuthorizationInfo(PrincipalCollection principals) { String username = (String) principals.getPrimaryPrincipal(); User user = loginService.getByUsername(username); if (user == null){ return null; }else { SimpleAuthorizationInfo  simpleAuthorizationInfo = new SimpleAuthorizationInfo(); for (Role role : user.getRolesSet()){ simpleAuthorizationInfo.addRole(role.getRoleName()); for (Permission permission : role.getPermissionSet()){ simpleAuthorizationInfo.addStringPermission(permission.getPermissionName()); } } return simpleAuthorizationInfo; } } /**
    * @Description: 认证配置
    * @Param:
    * @return:
    * @Author: Liuzhiliang
    * @Date:
    */ @Override protected AuthenticationInfo doGetAuthenticationInfo(AuthenticationToken token) throws AuthenticationException { String username = token.getPrincipal().toString(); User user = loginService.getByUsername(username); if (user == null){ return null; }else { //匹配密码 SimpleAuthenticationInfo simpleAuthenticationInfo = new SimpleAuthenticationInfo(username,user.getPassword(),getName()); simpleAuthenticationInfo.setCredentialsSalt(ByteSource.Util.bytes(user.getSalt())); return simpleAuthenticationInfo; } } }
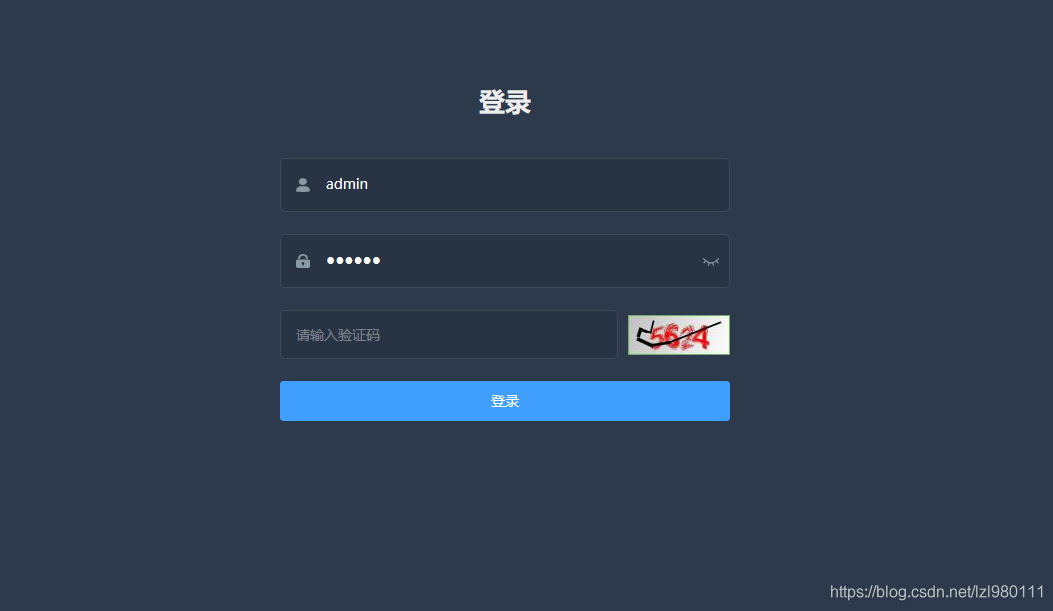
前端我这里直接用了 开源的管理系统框架
附地址:
运行截图如下
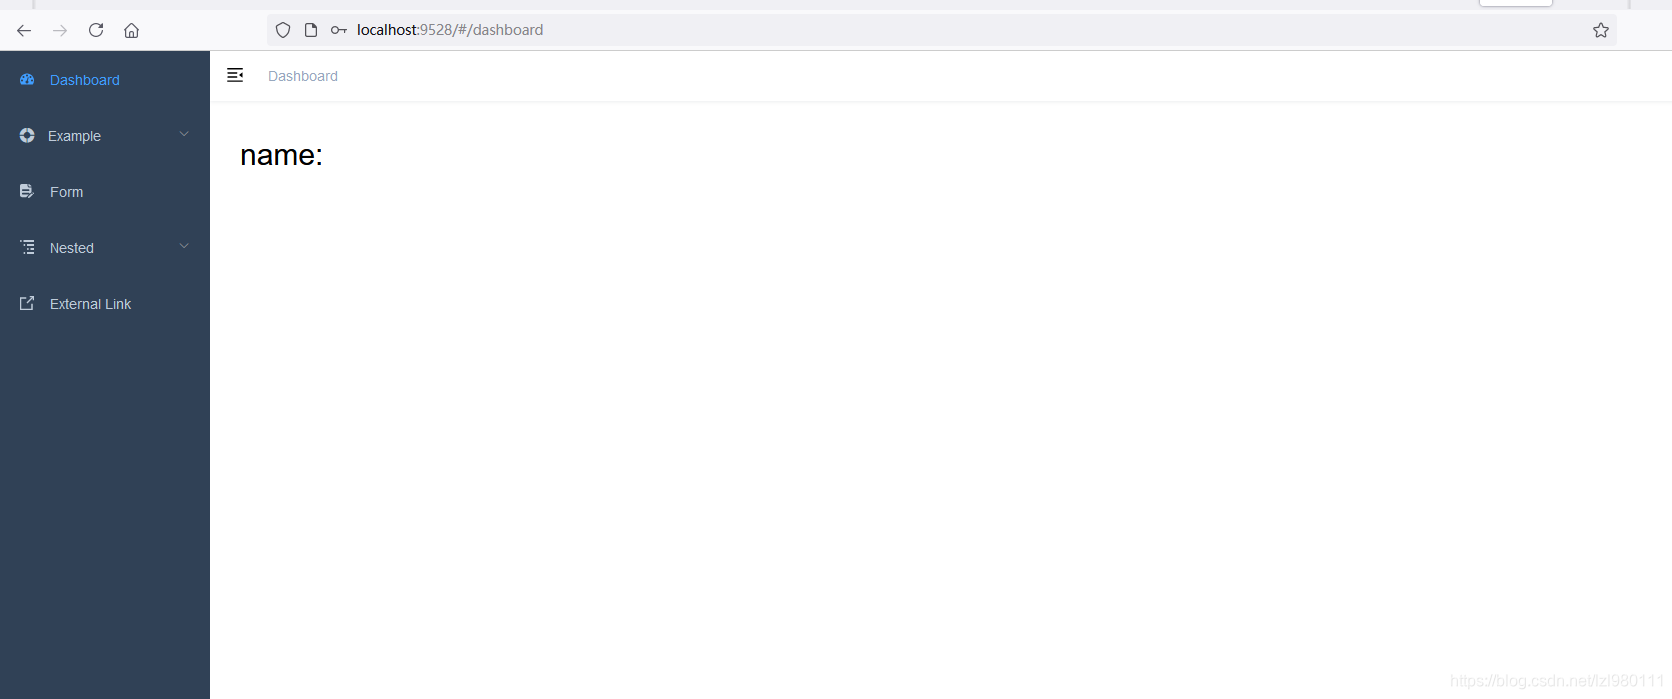
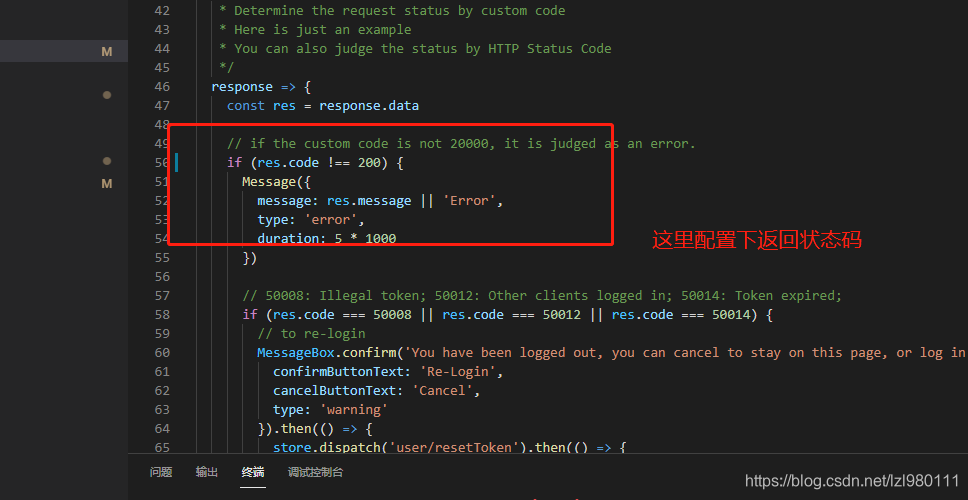
完事儿只需要改一下它的 返回状态码校验,配置下跨域就可以了
验证码部分包含两个API接口
/user/testKaptcha 获取验证码信息
/user/verifyKaptcha 校验
其中获取验证码图片信息相当于请求静态图片资源,直接将验证码图片的src指向 该接口即可,前端源码如下:
<el-image :src="kaptcha" @click="refreshCode()" alt="加载失败" style="margin-left:10px;height:40px;margin-top:5px"> <div slot="placeholder" class="image-slot"> <i class="el-icon-loading"></i> </div> </el-image>
其中路径定义为:
kaptcha:"http://localhost:8082/user/testKaptcha?t="+ new Date().getTime(),
后面加的时间参数是为了刷新url用的
前端的刷新函数就是将kaptcha重新赋值
refreshCode(){ console.log("测试切换验证码") this.kaptcha = "http://localhost:8082/user/testKaptcha?t="+ new Date().getTime() console.log(this.kaptcha) },
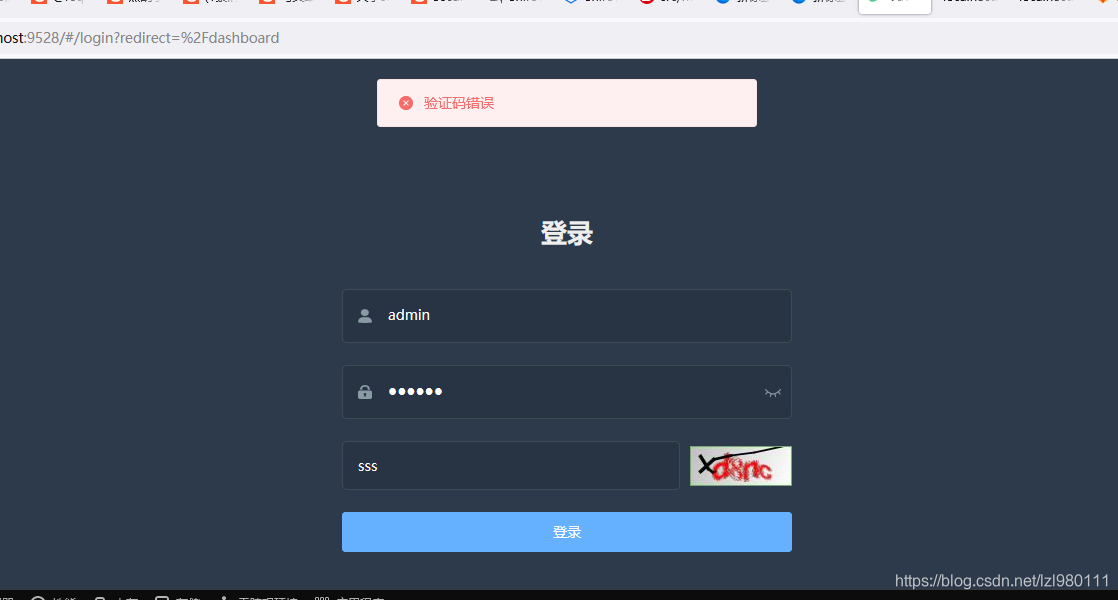
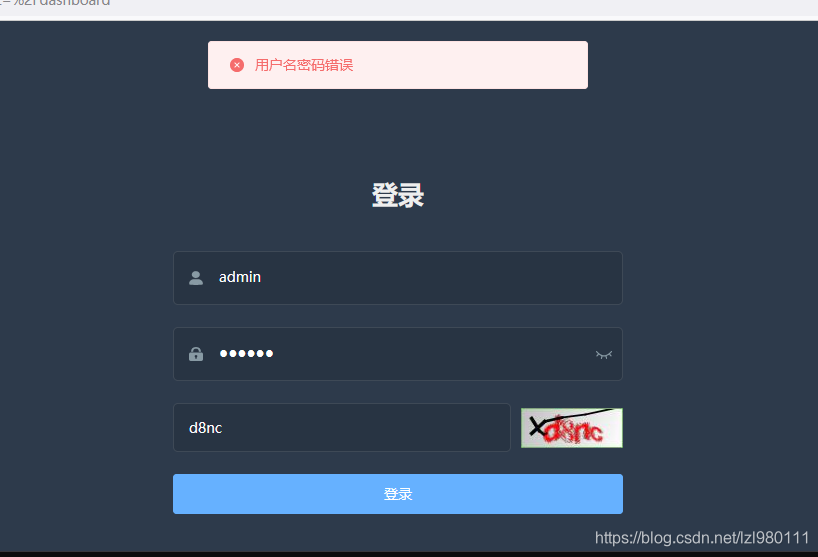
登录首先会验证 验证码的正确性,登陆成功进入主界面
验证码错误如下:
用户名密码错误如下:
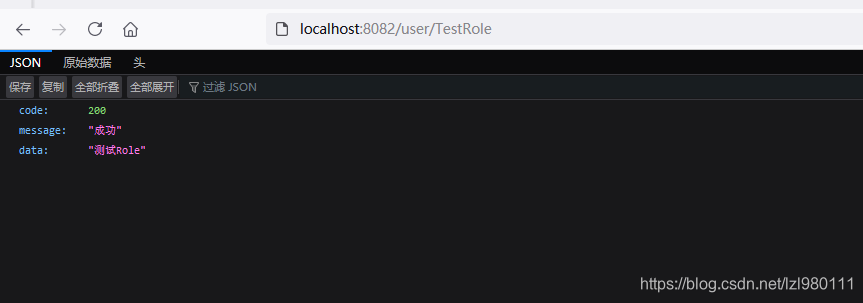
登陆成功后请求校验角色 校验成功
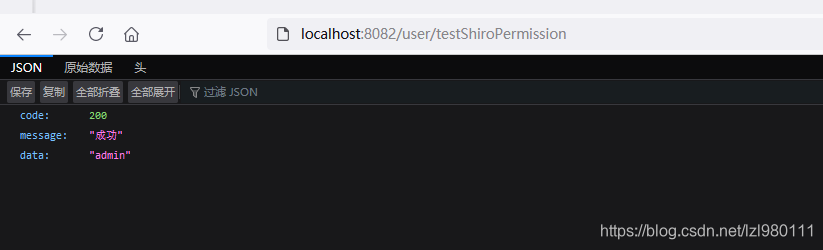
 请求校验权限 校验成功
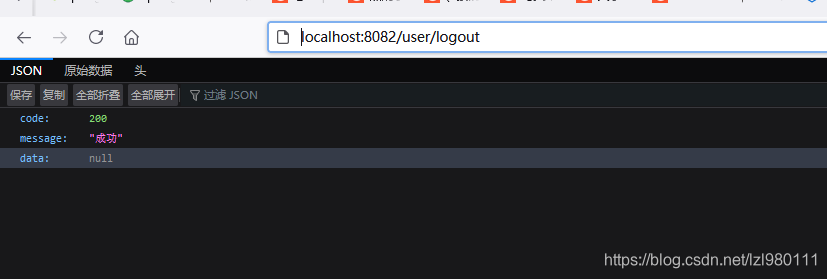
退出,执行两次,data为null
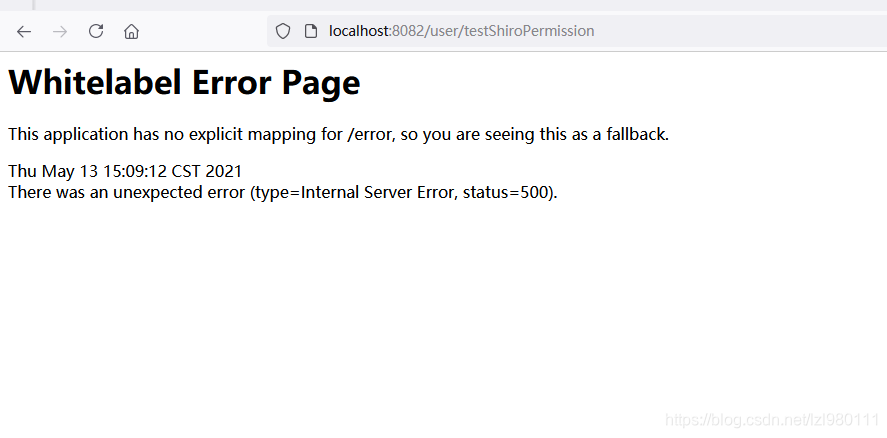
再次校验权限,报出异常
蓝蓝设计建立了UI设计分享群,每天会分享国内外的一些优秀设计,如果有兴趣的话,可以进入一起成长学习,请扫码蓝小助,报下信息,蓝小助会请您入群。欢迎您加入噢~~希望得到建议咨询、商务合作,也请与我们联系。
文章来源:csdn 作者:黑胡子大叔的小屋
蓝蓝设计( www.lanlanwork.com )是一家专注而深入的界面设计公司,为期望卓越的国内外企业提供卓越的UI界面设计、BS界面设计 、 cs界面设计 、 ipad界面设计 、 包装设计 、 图标定制 、 用户体验 、交互设计、 网站建设 、平面设计服务
我们打开visual studio code , 选择文件------------->将文件夹添加到工作区,导入我们的项目
导入后,我们安装以下element
官网:https://element.eleme.cn/#/zh-CN/component/installation
安装命令:npm add element-ui或者也可以用yarn
安装完成后,我们在main.js中引入Element
import Vue from 'vue'
import App from './App'
import router from './router'
import ElementUI from 'element-ui'
import 'element-ui/lib/theme-chalk/index.css'
Vue.config.productionTip = false
/* eslint-disable no-new */
Vue.use(ElementUI)
new Vue({
el: '#app',
router,
components: { App },
template: '<App/>'
})
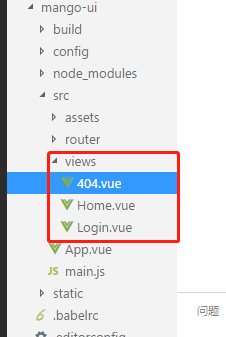
我们把components改名为views,并在目录下添加3个页面:Login.vue、Home.vue、404.vue。
页面内容类似:
<template>
<div class="page">
<h2>Login Page</h2>
</div>
</template>
<script>
export default {
name: 'Login'
}
</script>
配置路由
打开router/index.js,添加3个路由分别对应主页、登录、404页面
import Vue from 'vue'
import Router from 'vue-router'
import Login from '@/views/Login'
import Home from '@/views/Home'
import NotFound from '@/views/404'
Vue.use(Router)
export default new Router({
routes: [
{
path: '/',
name: 'Home',
component: Home
}, {
path: '/login',
name: 'Login',
component: Login
}, {
path: '/404',
name: 'notFound',
component: NotFound
}
]
})
配置完后启动项目,在浏览器访问测试

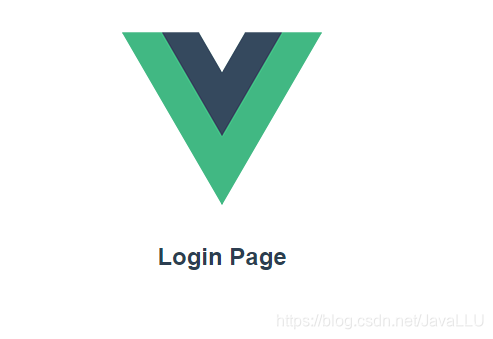

说明我们的配置已经生效了
安装依赖:
npm uninstall sass-loader //卸载当前版本)
npm install sass-loader@7.3.1 --save-dev //卸了重新安装了一个低版本
npm install node-sass@4.14.1 --save-dev //安装node-sass
安装的时候注意对应版本,版本不对应,启动会报错
安装后修改404页面
<template>
<div class="site-wrapper site-page--not-found">
<div class="site-content__wrapper">
<div class="site-content">
<h2 class="not-found-title">404</h2>
<p class="not-found-desc">抱歉!您访问的页面<em>失联</em>啦 ...</p>
<el-button @click="$router.go(-1)">返回上一页</el-button>
<el-button type="primary" class="not-found-btn-gohome" @click="$router.push('/')">进入首页</el-button>
</div>
</div>
</div>
</template>
<script>
export default {
name: '404'
}
</script>
<style lang="scss">
.site-wrapper.site-page--not-found {
position: absolute;
top: 60px;
right: 0;
bottom: 0;
left: 0;
overflow: hidden;
.site-content__wrapper {
padding: 0;
margin: 0;
background-color: #fff;
}
.site-content {
position: fixed;
top: 15%;
left: 50%;
z-index: 2;
padding: 30px;
text-align: center;
transform: translate(-50%, 0);
}
.not-found-title {
margin: 20px 0 15px;
font-size: 8em;
font-weight: 500;
color: rgb(55, 71, 79);
}
.not-found-desc {
margin: 0 0 30px;
font-size: 26px;
text-transform: uppercase;
color: rgb(118, 131, 143);
> em {
font-style: normal;
color: #ee8145;
}
}
.not-found-btn-gohome {
margin-left: 30px;
}
}
</style>
再浏览器访问http://localhost:8080/#/404
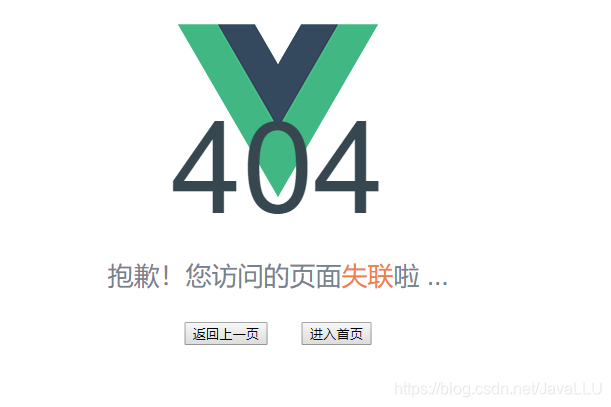
可以看到样式改变了
命令:npm install axios
安装完成后修改Home页面,进行一个简单的测试
<template>
<div class="page">
<h2>Home Page</h2>
<el-button type="primary" @click="testAxios()">测试Axios调用</el-button>
</div>
</template>
<script>
import axios from 'axios'
import mock from '@/mock/mock.js'
export default {
name: 'Home',
methods: {
testAxios() {
axios.get('http://localhost:8080').then(res => { alert(res.data) })
}
}
}
</script>
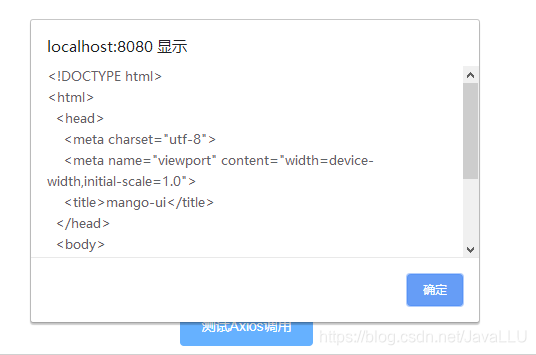
可以看到我们的请求已经成功了
为了模拟后台接口提供页面需要的数据,引入mock.js
安装依赖:npm install mockjs -dev
安装完成,在src新建一个mock目录,创建mock.js,在里面模拟两个接口,分别拦截用户和菜单的请求并返回相应数据。
import Mock from 'mockjs'
Mock.mock('http://localhost:8080/user', {
'name': '@name', // 随机生成姓名
'name': '@email', // 随机生成邮箱
'age|1-12': 7, // 年龄1-12之间
})
Mock.mock('http://localhost:8080/menu', {
'id': '@increment', // id自增
'name': 'menu', // 名称为menu
'order|1-10': 6, // 排序1-10之间
})
修改Home.vue,在页面添加两个按钮,分别触发用户和菜单请求。成功后弹出返回结果
注意:要在页面引入mock import mock from '@/mock/mock.js'
Home.vue
<template>
<div class="page">
<h2>Home Page</h2>
<el-button type="primary" @click="testAxios()">测试Axios调用</el-button>
<el-button type="primary" @click="getUser()">获取用户信息</el-button>
<el-button type="primary" @click="getMenu()">获取菜单信息</el-button>
</div>
</template>
<script>
import axios from 'axios'
import mock from '@/mock/mock.js'
export default {
name: 'Home',
methods: {
testAxios() {
axios.get('http://localhost:8080').then(res => { alert(res.data) })
},
getUser() {
axios.get('http://localhost:8080/user').then(res => { alert(JSON.stringify(res.data)) })
},
getMenu() {
axios.get('http://localhost:8080/menu').then(res => { alert(JSON.stringify(res.data)) })
}
}
}
</script>
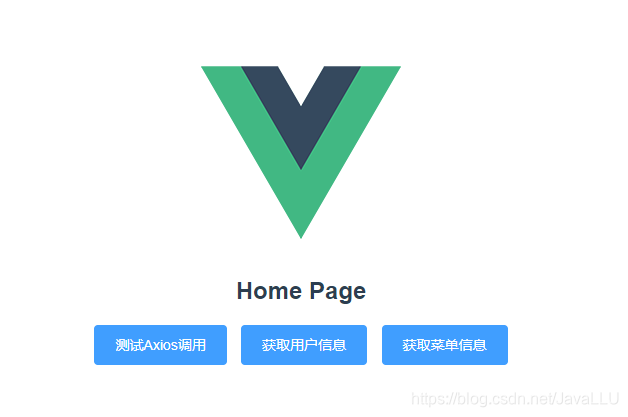
点击获取用户信息
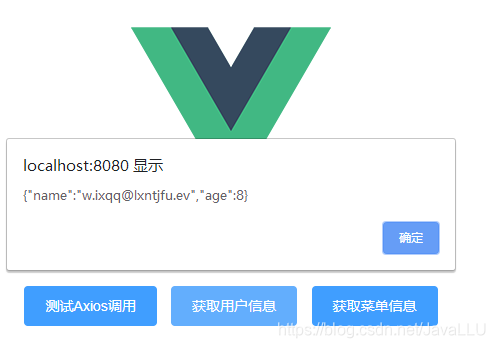
点击获取菜单信息
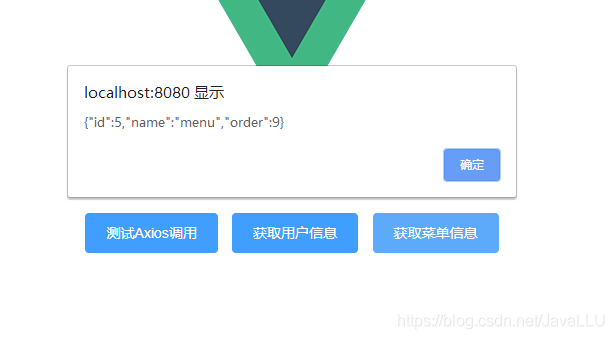
可以看到我们已经得到响应数据,这样mock就集成进来了
看完记得点赞哦
蓝蓝设计建立了UI设计分享群,每天会分享国内外的一些优秀设计,如果有兴趣的话,可以进入一起成长学习,请扫码蓝小助,报下信息,蓝小助会请您入群。欢迎您加入噢~~希望得到建议咨询、商务合作,也请与我们联系。
文章来源:csdn 作者:Java璐到底
蓝蓝设计( www.lanlanwork.com )是一家专注而深入的界面设计公司,为期望卓越的国内外企业提供卓越的UI界面设计、BS界面设计 、 cs界面设计 、 ipad界面设计 、 包装设计 、 图标定制 、 用户体验 、交互设计、 网站建设 、平面设计服务
1.登录到mysql进入命令行:[root@localhost mysql]# ./bin/mysql -h127.0.0.1 -uroot -proot
2.查看user表:
mysql> use mysql
Reading table information for completion of table and column names
You can turn off this feature to get a quicker startup with -A
Database changed
mysql> select host,user,password from user;
+-----------------------+------+-------------------------------------------+
| host | user | password |
+-----------------------+------+-------------------------------------------+
| localhost | root | *81F5E21E35407D884A6CD4A731AEBFB6AF209E1B |
| localhost.localdomain | root | |
| 127.0.0.1 | root | |
| ::1 | root | |
| localhost | | |
| localhost.localdomain | | |
+-----------------------+------+-------------------------------------------+
6 rows in set (0.00 sec)
表中host、user字段标识了可以访问数据库的主机和用户。例如上面的数据就表示只能本地主机通过root用户访问。原来如此,难怪远程连接死活连不上。
经过网上查找方法,为了让数据库支持远程主机访问,有两种方法可以开启远程访问功能。
第一种(改表法):
修改host字段的值,将localhost修改成需要远程连接数据库的ip地址。或者直接修改成%。修改成%表示,所有主机都可以通过root用户访问数据库。为了方便,我直接修改成%。命令:mysql> update user set host = '%' where user = 'root';
运行上面语句会又一个报错:
ERROR 1062 (23000): Duplicate entry '%-root' for key 'PRIMARY'
不用管,直接flush privileges;
远程连接测试。
第二种(授权法):
例如,你想root使用root从任何主机连接到mysql服务器的话。
GRANT ALL PRIVILEGES ON *.* TO 'root'@'%' IDENTIFIED BY 'root' WITH GRANT OPTION;
如果你想允许用户myuser从ip为192.168.1.64的主机连接到mysql服务器,并使用root作为密码
GRANT ALL PRIVILEGES ON *.* TO 'root'@'192.168.1.64' IDENTIFIED BY
'root' WITH GRANT OPTION;
输入命令:FLUSH PRIVILEGES;
蓝蓝设计( www.lanlanwork.com )是一家专注而深入的界面设计公司,为期望卓越的国内外企业提供卓越的UI界面设计、BS界面设计 、 cs界面设计 、 ipad界面设计 、 包装设计 、 图标定制 、 用户体验 、交互设计、 网站建设 、平面设计服务
文章来源:csdn。
分享此文一切功德,皆悉回向给文章原作者及众读者.
免责声明:蓝蓝设计尊重原作者,文章的版权归原作者。如涉及版权问题,请及时与我们取得联系,我们立即更正或删除。
我们打开visual studio code , 选择文件------------->将文件夹添加到工作区,导入我们的项目
导入后,我们安装以下element
官网:https://element.eleme.cn/#/zh-CN/component/installation
安装命令:npm add element-ui或者也可以用yarn
安装完成后,我们在main.js中引入Element
import Vue from 'vue'
import App from './App'
import router from './router'
import ElementUI from 'element-ui'
import 'element-ui/lib/theme-chalk/index.css'
Vue.config.productionTip = false
/* eslint-disable no-new */
Vue.use(ElementUI)
new Vue({
el: '#app',
router,
components: { App },
template: '<App/>'
})
我们把components改名为views,并在目录下添加3个页面:Login.vue、Home.vue、404.vue。
页面内容类似:
<template>
<div class="page">
<h2>Login Page</h2>
</div>
</template>
<script>
export default {
name: 'Login'
}
</script>
配置路由
打开router/index.js,添加3个路由分别对应主页、登录、404页面
import Vue from 'vue'
import Router from 'vue-router'
import Login from '@/views/Login'
import Home from '@/views/Home'
import NotFound from '@/views/404'
Vue.use(Router)
export default new Router({
routes: [
{
path: '/',
name: 'Home',
component: Home
}, {
path: '/login',
name: 'Login',
component: Login
}, {
path: '/404',
name: 'notFound',
component: NotFound
}
]
})
配置完后启动项目,在浏览器访问测试
说明我们的配置已经生效了
安装依赖:
npm uninstall sass-loader //卸载当前版本)
npm install sass-loader@7.3.1 --save-dev //卸了重新安装了一个低版本
npm install node-sass@4.14.1 --save-dev //安装node-sass
安装的时候注意对应版本,版本不对应,启动会报错
安装后修改404页面
<template>
<div class="site-wrapper site-page--not-found">
<div class="site-content__wrapper">
<div class="site-content">
<h2 class="not-found-title">404</h2>
<p class="not-found-desc">抱歉!您访问的页面<em>失联</em>啦 ...</p>
<el-button @click="$router.go(-1)">返回上一页</el-button>
<el-button type="primary" class="not-found-btn-gohome" @click="$router.push('/')">进入首页</el-button>
</div>
</div>
</div>
</template>
<script>
export default {
name: '404'
}
</script>
<style lang="scss">
.site-wrapper.site-page--not-found {
position: absolute;
top: 60px;
right: 0;
bottom: 0;
left: 0;
overflow: hidden;
.site-content__wrapper {
padding: 0;
margin: 0;
background-color: #fff;
}
.site-content {
position: fixed;
top: 15%;
left: 50%;
z-index: 2;
padding: 30px;
text-align: center;
transform: translate(-50%, 0);
}
.not-found-title {
margin: 20px 0 15px;
font-size: 8em;
font-weight: 500;
color: rgb(55, 71, 79);
}
.not-found-desc {
margin: 0 0 30px;
font-size: 26px;
text-transform: uppercase;
color: rgb(118, 131, 143);
> em {
font-style: normal;
color: #ee8145;
}
}
.not-found-btn-gohome {
margin-left: 30px;
}
}
</style>
再浏览器访问http://localhost:8080/#/404
可以看到样式改变了
命令:npm install axios
安装完成后修改Home页面,进行一个简单的测试
<template>
<div class="page">
<h2>Home Page</h2>
<el-button type="primary" @click="testAxios()">测试Axios调用</el-button>
</div>
</template>
<script>
import axios from 'axios'
import mock from '@/mock/mock.js'
export default {
name: 'Home',
methods: {
testAxios() {
axios.get('http://localhost:8080').then(res => { alert(res.data) })
}
}
}
</script>
可以看到我们的请求已经成功了
为了模拟后台接口提供页面需要的数据,引入mock.js
安装依赖:npm install mockjs -dev
安装完成,在src新建一个mock目录,创建mock.js,在里面模拟两个接口,分别拦截用户和菜单的请求并返回相应数据。
import Mock from 'mockjs'
Mock.mock('http://localhost:8080/user', {
'name': '@name', // 随机生成姓名
'name': '@email', // 随机生成邮箱
'age|1-12': 7, // 年龄1-12之间
})
Mock.mock('http://localhost:8080/menu', {
'id': '@increment', // id自增
'name': 'menu', // 名称为menu
'order|1-10': 6, // 排序1-10之间
})
修改Home.vue,在页面添加两个按钮,分别触发用户和菜单请求。成功后弹出返回结果
注意:要在页面引入mock import mock from '@/mock/mock.js'
Home.vue
<template>
<div class="page">
<h2>Home Page</h2>
<el-button type="primary" @click="testAxios()">测试Axios调用</el-button>
<el-button type="primary" @click="getUser()">获取用户信息</el-button>
<el-button type="primary" @click="getMenu()">获取菜单信息</el-button>
</div>
</template>
<script>
import axios from 'axios'
import mock from '@/mock/mock.js'
export default {
name: 'Home',
methods: {
testAxios() {
axios.get('http://localhost:8080').then(res => { alert(res.data) })
},
getUser() {
axios.get('http://localhost:8080/user').then(res => { alert(JSON.stringify(res.data)) })
},
getMenu() {
axios.get('http://localhost:8080/menu').then(res => { alert(JSON.stringify(res.data)) })
}
}
}
</script>
点击获取用户信息
点击获取菜单信息
可以看到我们已经得到响应数据,这样mock就集成进来了
看完记得点赞哦
蓝蓝设计( www.lanlanwork.com )是一家专注而深入的界面设计公司,为期望卓越的国内外企业提供卓越的UI界面设计、BS界面设计 、 cs界面设计 、 ipad界面设计 、 包装设计 、 图标定制 、 用户体验 、交互设计、 网站建设 、平面设计服务
        文章来源:网络某处。

分享此文一切功德,皆悉回向给文章原作者及众读者.

免责声明:蓝蓝设计尊重原作者,文章的版权归原作者。如涉及版权问题,请及时与我们取得联系,我们立即更正或删除。
参考 pm2从入门到精通
服务器上的项目需要保持稳定,即使发生故障项目也要自动重启以提供服务,这时需要托管工具对我们的项目进行托管。PM2正是这样一款工具,可以利用它来简化很多node应用管理的繁琐任务,如性能监控、自动重启、负载均衡等,而且使用非常简单。
$ npm install -g pm2
$ pm2 start app.js (--watch) # 加上watch参数后可以实时修改代码
$ pm2 list
$ pm2 stop <app name>
$ pm2 restart <app name>
$ pm2 delete <app name>
$ pm2 logs <app name>
$ pm2 logs
        蓝蓝设计( www.lanlanwork.com )是一家专注而深入的界面设计公司,为期望卓越的国内外企业提供卓越的UI界面设计、BS界面设计 、 cs界面设计 、 ipad界面设计 、 包装设计 、 图标定制 、 用户体验 、交互设计、 网站建设 、平面设计服务


        文章来源:网络某处。

分享此文一切功德,皆悉回向给文章原作者及众读者.

免责声明:蓝蓝设计尊重原作者,文章的版权归原作者。如涉及版权问题,请及时与我们取得联系,我们立即更正或删除。
什么是Unix时间戳(Unix timestamp): Unix时间戳(Unix timestamp),或称Unix时间(Unix time)、POSIX时间(POSIX time),是一种时间表示方式,定义为从格林威治时间1970年01月01日00时00分00秒起至现在的总秒数。Unix时间戳不仅被使用在Unix系统、类Unix系统中,也在许多其他操作系统中被广泛采用。
目前相当一部分操作系统使用32位二进制数字表示时间。此类系统的Unix时间戳最多可以使用到格林威治时间2038年01月19日03时14分07秒(二进制:01111111 11111111 11111111 11111111)。其后一秒,二进制数字会变为10000000 00000000 00000000 00000000,发生溢出错误,造成系统将时间误解为1901年12月13日20时45分52秒。这很可能会引起软件故障,甚至是系统瘫痪。使用64位二进制数字表示时间的系统(最多可以使用到格林威治时间292,277,026,596年12月04日15时30分08秒)则基本不会遇到这类溢出问题。
1.js获取当前时间戳的方法
var timestamp1 = Date.parse(new Date());
var timestamp2 = (new Date()).valueOf();
var timestamp3 = new Date().getTime();
第一种:获取的时间戳是把毫秒改成000显示,第二种和第三种是获取了当前毫秒的时间戳。
2.js获取制定时间戳的方法
var oldTime = (new Date("2015/06/23 08:00:20")).getTime()/1000;
getTime()返回数值的单位是毫秒。
1.Date toLocaleStdding方法
function getLocalTime(nS) { return new Date(parseInt(nS) * 1000).toLocaleStdding().replace(/:\d{1,2}$/,' ');
}
parseInt() 函数可解析一个字符串,并返回一个整数。
js中时间操作单位是毫秒。
toLocaleStdding() 方法可根据本地时间把 Date 对象转换为字符串,并返回结果。
replace() 方法用于在字符串中用一些字符替换另一些字符,或替换一个与正则表达式匹配的子串。
replace(/:\d{1,2}$/,' ')验证替换以:开始有一位或二位数字的结束字符串,就是秒;替换为空
显示如下:
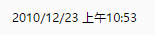
所以我们可以利用正则表达式改变我们想要的日期格式。
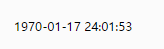
2.Date 属性方法

function add0(m){return m<10?'0'+m:m } function format(shijianchuo)
{ //shijianchuo是整数,否则要parseInt转换 var time = new Date(shijianchuo); var y = time.getFullYear(); var m = time.getMonth()+1; var d = time.getddate(); var h = time.getHours(); var mm = time.getMinutes(); var s = time.getSeconds(); return y+'-'+add0(m)+'-'+add0(d)+' '+add0(h)+':'+add0(mm)+':'+add0(s);
}
蓝蓝设计( www.lanlanwork.com )是一家专注而深入的界面设计公司,为期望卓越的国内外企业提供卓越的UI界面设计、BS界面设计 、 cs界面设计 、 ipad界面设计 、 包装设计 、 图标定制 、 用户体验 、交互设计、 网站建设 、平面设计服务
文章来源:网络某处。
分享此文一切功德,皆悉回向给文章原作者及众读者.
免责声明:蓝蓝设计尊重原作者,文章的版权归原作者。如涉及版权问题,请及时与我们取得联系,我们立即更正或删除。
html:<span class="shaky">你在说什么( ,,´・ω・)ノ"(´っω・`。)</span>
css:.shaky { display: inline-block; padding: 1px; font-size: 12px; -webkit-transform-origin: center center; -ms-transform-origin: center center; transform-origin: center center; -webkit-animation-name: shaky-slow; -ms-animation-name: shaky-slow; animation-name: shaky-slow; -webkit-animation-duration: 4s; -ms-animation-duration: 4s; animation-duration: 4s; -webkit-animation-iteration-count: infinite; -ms-animation-iteration-count: infinite; animation-iteration-count: infinite; -webkit-animation-timing-function: ease-in-out; -ms-animation-timing-function: ease-in-out; animation-timing-function: ease-in-out; -webkit-animation-delay: 0s; -ms-animation-delay: 0s; animation-delay: 0s; -webkit-animation-play-state: running; -ms-animation-play-state: running; animation-play-state: running; } @-webkit-keyframes shaky-slow { 0% { -webkit-transform: translate(0px, 0px) rotate(0deg) } 2% { -webkit-transform: translate(-1px, 1.5px) rotate(1.5deg) } 4% { -webkit-transform: translate(1.3px, 0px) rotate(-0.5deg) } 6% { -webkit-transform: translate(1.4px, 1.4px) rotate(-2deg) } 8% { -webkit-transform: translate(-1.3px, -1px) rotate(-1.5deg) } 10% { -webkit-transform: translate(1.4px, 0px) rotate(-2deg) } 12% { -webkit-transform: translate(-1.3px, -1px) rotate(-2deg) } 14% { -webkit-transform: translate(1.5px, 1.3px) rotate(1.5deg) } 16% { -webkit-transform: translate(1.5px, -1.5px) rotate(-1.5deg) } 18% { -webkit-transform: translate(1.3px, -1.3px) rotate(-2deg) } 20% { -webkit-transform: translate(1px, 1px) rotate(-0.5deg) } 22% { -webkit-transform: translate(1.3px, 1.5px) rotate(-2deg) } 24% { -webkit-transform: translate(-1.4px, -1px) rotate(2deg) } 26% { -webkit-transform: translate(1.3px, -1.3px) rotate(0.5deg) } 28% { -webkit-transform: translate(1.6px, -1.6px) rotate(-2deg) } 30% { -webkit-transform: translate(-1.3px, -1.3px) rotate(-1.5deg) } 32% { -webkit-transform: translate(-1px, 0px) rotate(2deg) } 34% { -webkit-transform: translate(1.3px, 1.3px) rotate(-0.5deg) } 36% { -webkit-transform: translate(1.3px, 1.6px) rotate(1.5deg) } 38% { -webkit-transform: translate(1.3px, -1.6px) rotate(1.5deg) } 40% { -webkit-transform: translate(-1.4px, -1px) rotate(-0.5deg) } 42% { -webkit-transform: translate(-1.4px, 1.3px) rotate(-0.5deg) } 44% { -webkit-transform: translate(-1.6px, 1.4px) rotate(0.5deg) } 46% { -webkit-transform: translate(-2.1px, -1.3px) rotate(-0.5deg) } 48% { -webkit-transform: translate(1px, 1.6px) rotate(1.5deg) } 50% { -webkit-transform: translate(1.6px, 1.6px) rotate(1.5deg) } 52% { -webkit-transform: translate(-1.4px, 1.6px) rotate(0.5deg) } 54% { -webkit-transform: translate(1.6px, -1px) rotate(-2deg) } 56% { -webkit-transform: translate(1.3px, -1.6px) rotate(-2deg) } 58% { -webkit-transform: translate(-1.3px, -1.6px) rotate(0.5deg) } 60% { -webkit-transform: translate(1.3px, 1.6px) rotate(-0.5deg) } 62% { -webkit-transform: translate(0px, 0px) rotate(-1.5deg) } 64% { -webkit-transform: translate(-1.6px, -1.6px) rotate(-2deg) } 66% { -webkit-transform: translate(1.6px, -1.6px) rotate(0.5deg) } 68% { -webkit-transform: translate(0px, -1.6px) rotate(-2deg) } 70% { -webkit-transform: translate(-1.6px, 1px) rotate(1.5deg) } 72% { -webkit-transform: translate(-1.6px, 1.6px) rotate(2deg) } 74% { -webkit-transform: translate(1.3px, -1.6px) rotate(-0.5deg) } 76% { -webkit-transform: translate(1.4px, 1px) rotate(-0.5deg) } 78% { -webkit-transform: translate(-1px, 1.4px) rotate(2deg) } 80% { -webkit-transform: translate(1.4px, 1.6px) rotate(2deg) } 82% { -webkit-transform: translate(-1.6px, -1.6px) rotate(-0.5deg) } 84% { -webkit-transform: translate(-1.4px, 1.4px) rotate(-2deg) } 86% { -webkit-transform: translate(1px, 1.4px) rotate(-2deg) } 88% { -webkit-transform: translate(-1.4px, 1.4px) rotate(-1.5deg) } 90% { -webkit-transform: translate(-1.6px, -1.6px) rotate(-2deg) } 92% { -webkit-transform: translate(-1.6px, 1.6px) rotate(2deg) } 94% { -webkit-transform: translate(-1.6px, -1.6px) rotate(-2deg) } 96% { -webkit-transform: translate(-1.4px, 1.3px) rotate(-2deg) } 98% { -webkit-transform: translate(1.3px, 1px) rotate(-0.5deg) } } @keyframes shaky-slow { 0% { transform: translate(0px, 0px) rotate(0deg) } 2% { transform: translate(-1px, 1.5px) rotate(1.5deg) } 4% { transform: translate(1.3px, 0px) rotate(-0.5deg) } 6% { transform: translate(1.4px, 1.4px) rotate(-2deg) } 8% { transform: translate(-1.3px, -1px) rotate(-1.5deg) } 10% { transform: translate(1.4px, 0px) rotate(-2deg) } 12% { transform: translate(-1.3px, -1px) rotate(-2deg) } 14% { transform: translate(1.5px, 1.3px) rotate(1.5deg) } 16% { transform: translate(1.5px, -1.5px) rotate(-1.5deg) } 18% { transform: translate(1.3px, -1.3px) rotate(-2deg) } 20% { transform: translate(1px, 1px) rotate(-0.5deg) } 22% { transform: translate(1.3px, 1.5px) rotate(-2deg) } 24% { transform: translate(-1.4px, -1px) rotate(2deg) } 26% { transform: translate(1.3px, -1.3px) rotate(0.5deg) } 28% { transform: translate(1.6px, -1.6px) rotate(-1.5deg) } 30% { transform: translate(-1.3px, -1.3px) rotate(-1.5deg) } 32% { transform: translate(-1px, 0px) rotate(2deg) } 34% { transform: translate(1.3px, 1.3px) rotate(-0.5deg) } 36% { transform: translate(1.3px, 1.6px) rotate(1.5deg) } 38% { transform: translate(1.3px, -1.6px) rotate(1.5deg) } 40% { transform: translate(-1.4px, -1px) rotate(-0.5deg) } 42% { transform: translate(-1.4px, 1.3px) rotate(-0.5deg) } 44% { transform: translate(-1.6px, 1.4px) rotate(0.5deg) } 46% { transform: translate(-2.1px, -1.3px) rotate(-0.5deg) } 48% { transform: translate(1px, 1.6px) rotate(1.5deg) } 50% { transform: translate(1.6px, 1.6px) rotate(1.5deg) } 52% { transform: translate(-1.4px, 1.6px) rotate(0.5deg) } 54% { transform: translate(1.6px, -1px) rotate(-2deg) } 56% { transform: translate(1.3px, -1.6px) rotate(-2deg) } 58% { transform: translate(-1.3px, -1.6px) rotate(0.5deg) } 60% { transform: translate(1.3px, 1.6px) rotate(-0.5deg) } 62% { transform: translate(0px, 0px) rotate(-1.5deg) } 64% { transform: translate(-1.6px, -1.6px) rotate(-2deg) } 66% { transform: translate(1.6px, -1.6px) rotate(0.5deg) } 68% { transform: translate(0px, -1.6px) rotate(-2deg) } 70% { transform: translate(-1.6px, 1px) rotate(1.5deg) } 72% { transform: translate(-1.6px, 1.6px) rotate(2deg) } 74% { transform: translate(1.3px, -1.6px) rotate(-0.5deg) } 76% { transform: translate(1.4px, 1px) rotate(-0.5deg) } 78% { transform: translate(-1px, 1.4px) rotate(2deg) } 80% { transform: translate(1.4px, 1.6px) rotate(2deg) } 82% { transform: translate(-1.6px, -1.6px) rotate(-0.5deg) } 84% { transform: translate(-1.4px, 1.4px) rotate(-2deg) } 86% { transform: translate(1px, 1.4px) rotate(-2deg) } 88% { transform: translate(-1.4px, 1.4px) rotate(-1.5deg) } 90% { transform: translate(-1.6px, -1.6px) rotate(-2deg) } 92% { transform: translate(-1.4px, 1.6px) rotate(2deg) } 94% { transform: translate(-1.6px, -1.6px) rotate(-2deg) } 96% { transform: translate(-1.4px, 1.3px) rotate(-2deg) } 98% { transform: translate(1.3px, 1px) rotate(-0.5deg) } }
蓝蓝设计( www.lanlanwork.com )是一家专注而深入的界面设计公司,为期望卓越的国内外企业提供卓越的UI界面设计、BS界面设计 、 cs界面设计 、 ipad界面设计 、 包装设计 、 图标定制 、 用户体验 、交互设计、 网站建设 、平面设计服务
文章来源:网络某处。
分享此文一切功德,皆悉回向给文章原作者及众读者.
免责声明:蓝蓝设计尊重原作者,文章的版权归原作者。如涉及版权问题,请及时与我们取得联系,我们立即更正或删除。
注:服务器为CentOS 7.3.1611,使用Xshell6 + Xftp6工具完成服务器远程操作
通过Xshell连接服务器成功之后就可以开始以下工作
yum remove nodejs npm -y
然后手动进入以下目录删除相关文件
进入 /usr/local/lib 删除所有 node 和 node_modules文件夹
进入 /usr/local/include 删除所有 node 和 node_modules 文件夹
进入 /usr/local/bin 删除 node 的可执行文件
https://nodejs.org/en/download/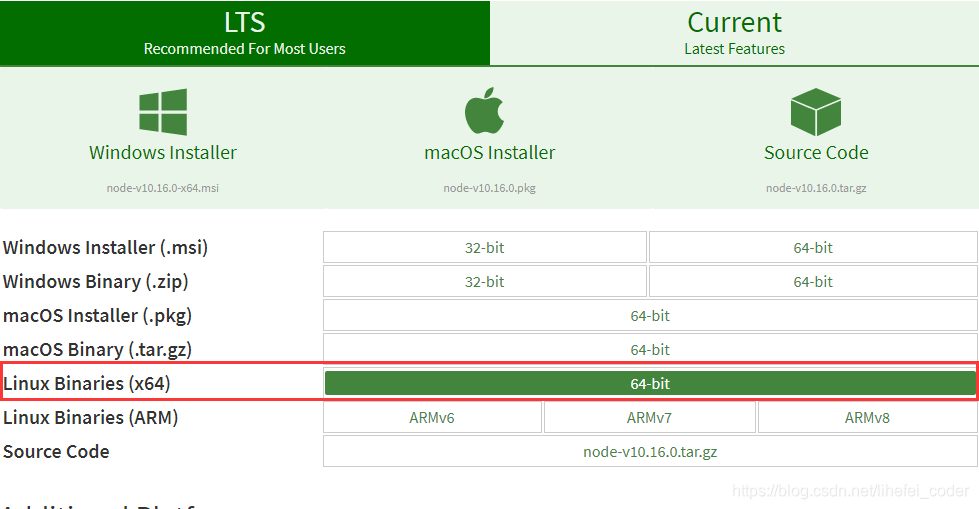
cd /usr/local/
wget https://nodejs.org/dist/v10.16.0/node-v10.16.0-linux-x64.tar.xz
xz -d node-v10.16.0-linux-x64.tar.xz
tar -xvf node-v10.16.0-linux-x64.tar
mv node-v10.16.0-linux-x64 nodejs
cd nodejs
ln -s /usr/local/nodejs/bin/node /usr/local/bin/node
ln -s /usr/local/nodejs/bin/npm /usr/local/bin/npm
如果不小心输错了路径,重新创建会提示:‘ln: 无法创建符号链接"/usr/local/bin/npm": 文件已存在’,输入rm /usr/local/bin/npm命令清除后可以重新创建
node -v
npm -v
npm install -g cnpm
ln -s /usr/local/nodejs/bin/cnpm /usr/local/bin/cnpm
cd /var/www/
注:如果没有www目录就在var目录下输入命令mkdir www手动创建一个,并进入到www目录
mkdir demo
cd demo
npm init -y
注:这里的-y意思是省略创建过程中一直输yes的步骤
cnpm i express -D
mkdir app.js
const fs = require('fs'); //文件模块 const path = require('path'); //路径模块 const express = require('express'); //express框架模块 const app = express(); const hostName = '11.22.33.44'; //ip const port = 9999; //端口 app.use(express.static(path.resolve(__dirname, './dist'))); // 设置静态项目访问路径(此处的dist为webpack打包生成的项目文件夹名称) app.get('*', function(req, res) { const html = fs.readFileSync(path.resolve(__dirname, './dist/index.html'), 'utf-8'); // 设置所有访问服务请求默认返回index.html文件 res.send(html); }); app.listen(port, hostName, function() { console.log(`服务器运行在http://${hostName}:${port}`); });
npm run build
生成的dist文件夹就是我们需要部署到服务器上的项目
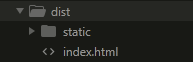
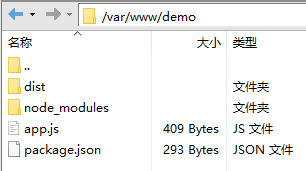
node app.js
如果能正常访问项目地址表示已经搭建成功。
请求后端接口跨域方案请见:
跨域代理方案1:Nginx使用教程
跨域代理方案2:Nodejs 中使用http-proxy-middleware实现代理跨域
在xshell里用node默认的启动方式有一个缺点,xshell退出后nodejs项目便会停止
使用pm2这个托管工具可以很好的解决这个问题,而且当代码有更改时会自动重启服务更新
1.首先多按两次ctrl +c结束之前的运行程序,接着输入下面的命令安装pm2并创建软链接
cnpm install pm2 -g
ln -s /usr/local/nodejs/bin/pm2 /usr/local/bin/pm2
2.然后输入下面的命令启动托管任务,abc为托管项目定义的名称
pm2 start app.js --name abc
以下为pm2常用命令说明
| 命令 | 功能 |
|---|---|
| pm2 start app.js --name abc | 启动(--name为定义任务名称的指令,abc为任务名称值) |
| pm2 start app.js --watch | 启动( --watch为监听应用目录的变化的指令) |
| pm2 restart app.js | 重启任务 |
| pm2 stop abc | 结束(abc为任务名称或id) |
| pm2 list | 查看所有任务列表 |
pm2基本功能命令
| 功能 | 命令 |
|---|---|
| 启动进程/应用 | pm2 start bin/abc 或 pm2 start app.js |
| 重命名进程/应用 | pm2 start app.js --name abc |
| 添加进程/应用 | pm2 start bin/abc --watch |
| 结束进程/应用 | pm2 stop abc |
| 结束所有进程/应用 | pm2 stop all |
| 删除进程/应用 | pm2 delete abc |
| 删除所有进程/应用 | pm2 delete all |
| 列出所有进程/应用 | pm2 list |
| 查看进程/应用详情 | pm2 show abc 或 pm2 describe abc |
| 查看进程/应用资源消耗 | pm2 monit |
| 查看进程/应用日志 | pm2 logs abc |
| 查看所有进程/应用日志 | pm2 logs |
| 重新启动进程/应用 | pm2 restart abc |
| 重新启动所有进程/应用 | pm2 restart all |
pm2使用教程参考链接:
https://www.cnblogs.com/chyingp/p/pm2-documentation.html
https://www.jb51.net/article/113398.htm
转自:csdn。作者:lihefei_coder
蓝蓝设计( www.lanlanwork.com )是一家专注而深入的界面设计公司,为期望卓越的国内外企业提供卓越的UI界面设计、BS界面设计 、 cs界面设计 、 ipad界面设计 、 包装设计 、 图标定制 、 用户体验 、交互设计、 网站建设 、平面设计服务
本文由小芭乐发表
首先举一个例子:
模拟在输入框输入后做ajax查询请求,没有加入防抖和节流的效果,这里附上完整可执行代码:
<!DOCTYPE html> <html lang="en"> <head> <meta charset="UTF-8"> <title>没有防抖</title> <style type="text/css"></style> <script type="text/javascript"> window.onload = function () { //模拟ajax请求 function ajax(content) { console.log('ajax request ' + content) } let inputNormal = document.getElementById('normal'); inputNormal.addEventListener('keyup', function (e) { ajax(e.target.value) }) } </script> </head> <body> <div> 1.没有防抖的输入: <input type="text" name="normal" id="normal"> </div> </body> </html> 效果:在输入框里输入一个,就会触发一次“ajax请求”(此处是console)。
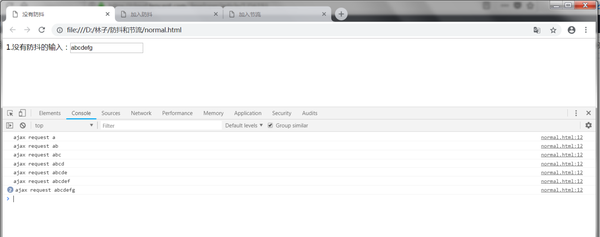
没有防抖和节流
缺点:浪费请求资源,可以加入防抖和节流来优化一下。
本文会分别介绍什么是防抖和节流,它们的应用场景,和实现方式。防抖和节流都是为了解决短时间内大量触发某函数而导致的性能问题,比如触发频率过高导致的响应速度跟不上触发频率,出现延迟,假死或卡顿的现象。但二者应对的业务需求不一样,所以实现的原理也不一样,下面具体来看看吧。
在事件被触发n秒后再执行回调函数,如果在这n秒内又被触发,则重新计时。
(1) 用户在输入框中连续输入一串字符后,只会在输入完后去执行最后一次的查询ajax请求,这样可以有效减少请求次数,节约请求资源;
(2) window的resize、scroll事件,不断地调整浏览器的窗口大小、或者滚动时会触发对应事件,防抖让其只触发一次;
还是上述列子,这里加入防抖来优化一下,完整代码如下:
<!DOCTYPE html> <html lang="en"> <head> <meta charset="UTF-8"> <title>加入防抖</title> <style type="text/css"></style> <script type="text/javascript"> window.onload = function () { //模拟ajax请求 function ajax(content) { console.log('ajax request ' + content) } function debounce(fun, delay) { return function (args) { //获取函数的作用域和变量 let that = this let _args = args //每次事件被触发,都会清除当前的timeer,然后重写设置超时调用 clearTimeout(fun.id) fun.id = setTimeout(function () { fun.call(that, _args) }, delay) } } let inputDebounce = document.getElementById('debounce') let debounceAjax = debounce(ajax, 500) inputDebounce.addEventListener('keyup', function (e) { debounceAjax(e.target.value) }) } </script> </head> <body> <div> 2.加入防抖后的输入: <input type="text" name="debounce" id="debounce"> </div> </body> </html> 代码说明:
1.每一次事件被触发,都会清除当前的 timer 然后重新设置超时调用,即重新计时。 这就会导致每一次高频事件都会取消前一次的超时调用,导致事件处理程序不能被触发;
2.只有当高频事件停止,最后一次事件触发的超时调用才能在delay时间后执行;
效果:
加入防抖后,当持续在输入框里输入时,并不会发送请求,只有当在指定时间间隔内没有再输入时,才会发送请求。如果先停止输入,但是在指定间隔内又输入,会重新触发计时。
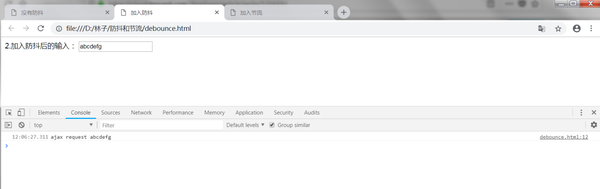
加入防抖
规定一个单位时间,在这个单位时间内,只能有一次触发事件的回调函数执行,如果在同一个单位时间内某事件被触发多次,只有一次能生效。
(1)鼠标连续不断地触发某事件(如点击),只在单位时间内只触发一次;
(2)在页面的无限加载场景下,需要用户在滚动页面时,每隔一段时间发一次 ajax 请求,而不是在用户停下滚动页面操作时才去请求数据;
(3)监听滚动事件,比如是否滑到底部自动加载更多,用throttle来判断;
还是上述列子,这里加入节流来优化一下,完整代码如下:
<!DOCTYPE html> <html lang="en"> <head> <meta charset="UTF-8"> <title>加入节流</title> <style type="text/css"></style> <script type="text/javascript"> window.onload = function () { //模拟ajax请求 function ajax(content) { console.log('ajax request ' + content) } function throttle(fun, delay) { let last, deferTimer return function (args) { let that = this; let _args = arguments; let now = +new Date(); if (last && now < last + delay) { clearTimeout(deferTimer); deferTimer = setTimeout(function () { last = now; fun.apply(that, _args); }, delay) } else { last = now; fun.apply(that, _args); } } } let throttleAjax = throttle(ajax, 1000) let inputThrottle = document.getElementById('throttle') inputThrottle.addEventListener('keyup', function (e) { throttleAjax(e.target.value) }) } </script> </head> <body> <div> 3.加入节流后的输入: <input type="text" name="throttle" id="throttle"> </div> </body> </html> 效果:实验可发现在持续输入时,会安装代码中的设定,每1秒执行一次ajax请求
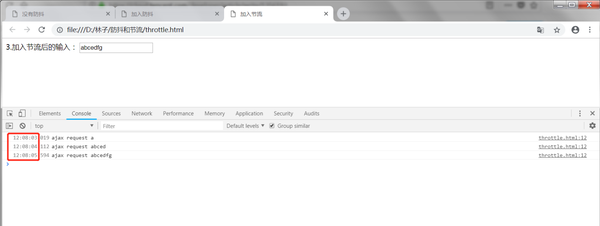
加入节流
总结下防抖和节流的区别:
-- 效果:
函数防抖是某一段时间内只执行一次;而函数节流是间隔时间执行,不管事件触发有多频繁,都会保证在规定时间内一定会执行一次真正的事件处理函数。
-- 原理:
防抖是维护一个计时器,规定在delay时间后触发函数,但是在delay时间内再次触发的话,都会清除当前的 timer 然后重新设置超时调用,即重新计时。这样一来,只有最后一次操作能被触发。
节流是通过判断是否到达一定时间来触发函数,若没到规定时间则使用计时器延后,而下一次事件则会重新设定计时器。
如有问题,欢迎指正。
转自知乎 原文链接:https://zhuanlan.zhihu.com/p/51608574
蓝蓝设计( www.lanlanwork.com )是一家专注而深入的界面设计公司,为期望卓越的国内外企业提供卓越的UI界面设计、BS界面设计 、 cs界面设计 、 ipad界面设计 、 包装设计 、 图标定制 、 用户体验 、交互设计、 网站建设 、平面设计服务
蓝蓝设计的小编 http://www.lanlanwork.com