首页

node.js案例,写一个简单的get请求,请求有50%的概率,要求数据在一个json文件中

前端达人

  • 案例目标:实现GET的主要属性为req.method,并且生成随机数

  1. 使用nodejs,实现一个Ajax的get请求方式
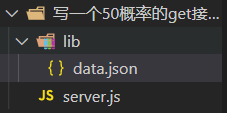
  2. 将lib里的data.json文件请求获取出来
  3. data里面的数据为
    
                            
    1. {
    2. "success":[
    3. {
    4. "data": "你赢了",
    5. "message":"请求成功",
    6. "code": "200"
    7. }
    8. ],
    9. "fail":[
    10. {
    11. "data": "你输了",
    12. "message":"请求失败",
    13. "code": "200"
    14. }
    15. ]
    16. }
  •  案例准备

  •  案例代码


    1. // 1.定义核心模块 http fs path
    2. const http = require('http')
    3. const fs = require('fs')
    4. const path = require('path')
    5. // 2.创建服务
    6. const server = http.createServer((req, res) => {
    7. // 2.1 如果url地址为/getList 执行代码
    8. // -req.method 为请求类型
    9. // 生成随机数,大于0.5为0,小于为1
    10. let render = Math.random() > 0.5 ? 0 : 1
    11. // console.log(render)
    12. // 2.2 拼接字符串,为读取数据传参
    13. // -__dirname为获取的目录地址
    14. // -lib为存放数据的名字,data.json为读取的文件
    15. const filepath = path.join(__dirname, 'lib', 'data.json')
    16. // -console.log('拼接的地址', filepath)
    17. if (render === 0 && req.url === '/getList' && req.method === 'GET') {
    18. // 2.3 读取data文件
    19. fs.readFile(filepath, 'utf8', (err, data) => {
    20. // - 打印错误信息
    21. if (err) {
    22. console.log('错误日志', err)
    23. return
    24. }
    25. // 读取的为json数据,设置请求头,如果不设置,则打印乱码信息
    26. res.setHeader('content-type', 'application/json;charset=utf8')
    27. // - 返回数据
    28. let jsonArr = JSON.parse(data)['success']
    29. let jsonStr = JSON.stringify(jsonArr)
    30. res.end(jsonStr)
    31. })
    32. } else if (render === 1 && req.url === '/getList' && req.method === 'GET') {
    33. fs.readFile(filepath, 'utf8', (err, data) => {
    34. // - 打印错误信息
    35. if (err) {
    36. console.log('错误日志', err)
    37. return
    38. }
    39. // 读取的为json数据,设置请求头,如果不设置,则打印乱码信息
    40. res.setHeader('content-type', 'application/json;charset=utf8')
    41. // - 返回数据
    42. let jsonArr = JSON.parse(data)['fail']
    43. let jsonStr = JSON.stringify(jsonArr)
    44. res.end(jsonStr)
    45. })
    46. }
    47. })
    48. // 3.启动服务
    49. // 8111为端口号,默认8000,尽量使用8开头,如果使用其他,咋不会正常运行,会报错
    50. server.listen(8111, () => {
    51. // 服务提示信息,运行代码后的提示
    52. console.log('端口1111已经开启')
    53. })


蓝蓝设计建立了UI设计分享群,每天会分享国内外的一些优秀设计,如果有兴趣的话,可以进入一起成长学习,请扫码蓝小助,报下信息,蓝小助会请您入群。欢迎您加入噢~~希望得到建议咨询、商务合作,也请与我们联系。

分享此文一切功德,皆悉回向给文章原作者及众读者.

转自:csdn
免责声明:蓝蓝设计尊重原作者,文章的版权归原作者。如涉及版权问题,请及时与我们取得联系,我们立即更正或删除。

蓝蓝设计www.lanlanwork.com )是一家专注而深入的界面设计公司,为期望卓越的国内外企业提供卓越的UI界面设计、BS界面设计 、 cs界面设计 、 ipad界面设计 、 包装设计 、 图标定制 、 用户体验 、交互设计、 网站建设 平面设计服务

JavaScript作用域和闭包

前端达人


前言

深入了解闭包和作用域链就需先了解函数预编译的过程


一、预编译

JavaScript:运行三部曲:
语法分析–预编译–解释执行
预编译:
发生在函数执行的前一刻。
函数声明整体提升,变量只声明提升。
1.函数预编译的过程:
1.创建AO对象Activation Object(执行期上下文,其作用就是我们理解的作用域,函数产生的执行空间库)
2.找形参和变量声明,将变量和形参名作为AO属性名,值为undefined
3.将实参值与形参统一
4.找到函数声明,将函数名作为属性名,值为函数体。
例:

function test (a, b){ console.log(a); c = 0; var c; a = 3; b = 2; console.log(b); function b (){}; function d (){}; console.log(b); } test(1); /*答案:1,2,2
答题过程:找形参和变量声明,将变量和形参名作为 AO 属性名,值为 undefined, AO{
 a : 1,
 b : undefined,
 c : undefined
}
函数声明 function b(){}和 function d(){},AO{
 a : 1,
 b : function b(){},
 c : undefined,
 d : function d(){}
}
执行 console.log(a);答案是 1
执行 c = 0;变 AO{
 a : 1,
 b : function b(){},
 c : 0,
 d : function d(){}
}
var c 不用管,因为 c 已经在 AO 里面了
执行 a = 3;改 AO{
 a : 3,
 b : function b(){},
 c : 0,
 d : function d(){}
}
执行 b = 2;改 AO{
 a : 3,
 b : 2,
 c : 0,
 d : function d(){}
}
执行 console.log(b);答案是 2
function b () {}和 function d(){}已经提过了,不用管
执行 console.log(b);答案是 2*/ 
  • 1
  • 2
  • 3
  • 4
  • 5
  • 6
  • 7
  • 8
  • 9
  • 10
  • 11
  • 12
  • 13
  • 14
  • 15
  • 16
  • 17
  • 18
  • 19
  • 20
  • 21
  • 22
  • 23
  • 24
  • 25
  • 26
  • 27
  • 28
  • 29
  • 30
  • 31
  • 32
  • 33
  • 34
  • 35
  • 36
  • 37
  • 38
  • 39
  • 40
  • 41
  • 42
  • 43
  • 44
  • 45
  • 46
  • 47

2.全局预编译它和函数预编译步骤一样,但它创造的是GO(全局对象):
1.生成了一个 GO 的对象 Global Object(window 就是 GO
2.找变量声明…
3.找函数声明…

任何全局变量都是 window 上的属性
变量没有声明就赋值了,归 window 所有,就是在 GO 里面预编译。
例 :

function test(){ var a = b =123; console.log(window.b); } test(); 答案 a 是 undefined,b 是 123 先生成 GO{ b : 123 } 再有 AO{ a : undefined } 
  • 1
  • 2
  • 3
  • 4
  • 5
  • 6
  • 7
  • 8
  • 9
  • 10
  • 11
  • 12

想执行全局,先生成 GO,在执行 test 的前一刻生成 AO
函数里找变量,因为GO和AO有几层嵌套关系,近的优先,从近的到远的, AO里有就看 AO,AO 没有才看 GO。所以函数局部变量和全局变量同名,函数内只会用局部。

二、作用域精讲

作用域定义:变量(变量作用于又称上下文)和函数生效(能被访问)的区域
全局、局部变量
作用域的访问顺序:函数外面不能用函数里面的。里面的可以访问外面的,外面的不能访问里面的,彼此独立的区间不能相互访问。

1.[[scope]]: 每个 javascript 函数都是一个对象,对象中有些属性我们可以访问,但有些不可以,这些属性仅供 javascript 引擎存取,[[scope]]就是其中一个。[[scope]]指的就是我们所说的作用域,其中存储了运行期上下文的集合。

2.执行期上下文: 当函数在执行的前一刻,会创建一个称为执行期上下文的内部对象(AO)。
一个执行期上下文定义了一个函数执行时的环境,函数每次执行时对应的执行上下文都是独一无二的,所以多次调用一个函数会导致创建多个执行上下文,当函数执行完毕,执行上下文被销毁。

3.作用域链:[[scope]]中所存储的执行期上下文对象的集合(GO和AO),这个集合呈链式链接,我们把这种链式链接叫做作用域链。

4.查找变量: 在哪个函数里面查找变量,就从哪个函数作用域链的顶端依次向下查找(先查自己的AO,再查父级的AO,一直到最后的GO)。
函数类对象,我们能访问 test.name
test.[[scope]]隐式属性——作用域

作用域链图解:

function a (){ function b (){ var bb = 234; aa = 0; } var aa = 123; b(); console.log(aa) } var glob = 100; a(); 
  • 1
  • 2
  • 3
  • 4
  • 5
  • 6
  • 7
  • 8
  • 9
  • 10
  • 11
  • 12

0 是最顶端,1 是次顶端,查找顺序是从最顶端往下查
在这里插入图片描述
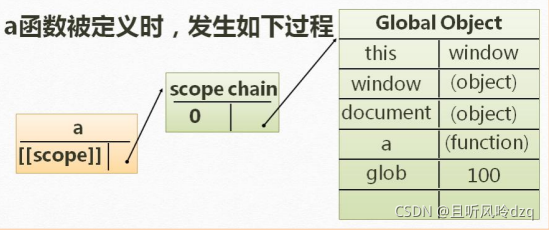
在全局预编译中函数a定义时,它的[[scope]]属性中有GO对象。
在这里插入图片描述
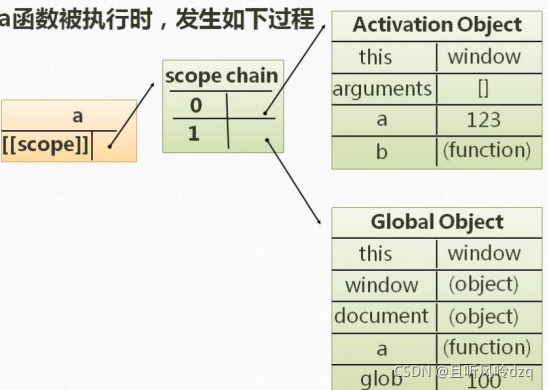
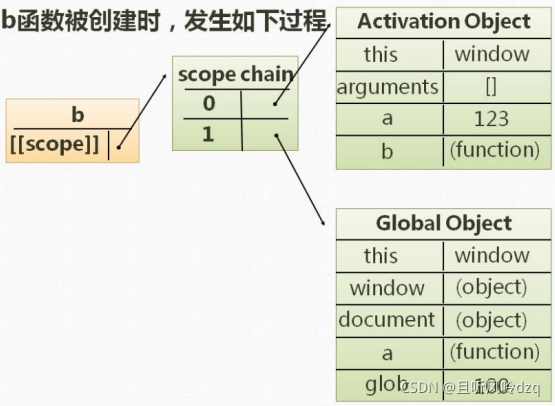
在函数a执行前先函数预编译,创建自己的AO对象,并存储在[[scope]]属性上,与之前存储的GO成链式。同时函数b被创建定义。
在这里插入图片描述
在b被创建时,它生成的[[scope]]属性直接存储了父级的[[scope]],它有了父级的AO和GO。
在这里插入图片描述
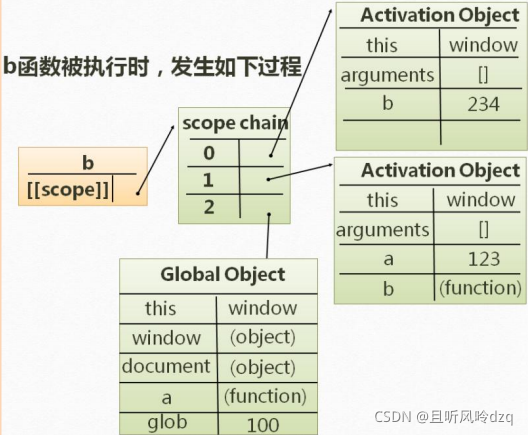
b函数执行前预编译,生成自己的AO,存储在[[scope]]属性中。

详解过程: 注意[[scope]]它是数组,存储的都是引用值。
b 中 a 的 AO 与 a 的 AO,就是同一个 AO,b 只是引用了 a 的 AO,GO 也都是同一个。
function b(){}执行完,干掉的是 b 自己的 AO(销毁执行期上下文)(去掉连接线),下次 function b 被执行时,产生的是新的 b 的 AO。b 执行完只会销毁自己的 AO,不会销毁 a 的 AO。会退回到b被定义时(仍有父级的AO和GO)。
function a(){}执行完,会把 a 自己的 AO 销毁【也会把 function b的[[scope]]也销毁】,只剩 GO(回归到 a 被定义的时候),等下次 function a再次被执行时,会产生一个全新的 AO,里面有一个新的 b 函数。。。。。。周而复始。

思考一个问题:如果 function a 不被执行,下面的 function b 和 function c 都是看不到的(也不会被执行,被折叠)。只有 function a 被执行,才能执行 function a 里面的内容a();不执行,根本看不到 function a (){}里面的内容,但我们想在a函数外面调用b函数怎么办呢,于是闭包出现了。

三、闭包

闭包的定义

当内部函数被保存到外部时,将会生成闭包。但凡是内部的函数被保存到外部,一定生成闭包。
闭包的问题:闭包会导致原有作用域链不释放,作用域中的局部变量一直被使用着,导致该作用域释放不掉,造成内存泄露(就是占有过多内存,导致内存越来越少,就像泄露了一样)
例:

function a(){ function b(){ var b=456; console.log(a); console.log(b); } var a=123; return b; } var glob = a(); glob(); 
  • 1
  • 2
  • 3
  • 4
  • 5
  • 6
  • 7
  • 8
  • 9
  • 10
  • 11

答案 123,456。
function a(){ }是在 return b 之后才执行完,才销毁。而return b 把 b(包括 a 的 AO)保存到外部了(放在全局)当 a 执行完砍掉自己的 AO 时(砍掉对AO存储地址的指针),因为b还保存着对a的AO的引用,所以内存清除机制不会清除掉a的AO, b 依然可以访问到 a 的 AO。

闭包的作用:

1.实现共有变量

function test(){ var num=100; function a(){ num++; } function b(){ num--; } return [a,b]; } var myArr=test(); myArr[0](); myArr[1](); 
  • 1
  • 2
  • 3
  • 4
  • 5
  • 6
  • 7
  • 8
  • 9
  • 10
  • 11
  • 12
  • 13

答案 101 和 100。
思考过程:说明两个用的是一个 AO。
myArr[0]是数组第一位的意思,即 a,myArr0;就是执行函数 a 的意思;
myArr[1]是数组第二位的意思,即 b,myArr1; 就是执行函数 b 的意思。
test doing test[[scope]] 0:testAO
1:GO
a defined a.[[scope]] 0 : testAO
1 : GO
b defined b.[[scope]] 0 : testAO
1 : GO
return[a, b]将 a 和 b 同时被定义的状态被保存出来了
当执行 myArr0;时
a doing a.[[scope]] 0 : aAO
1 : testAO
2 : GO
当执行 myArr1;时
b doing b.[[scope]] 0 : bAO
1 : a 运行后的 testAO
2 : GO
a 运行后的 testAO, 与 a doing 里面的 testAO 一模一样
a 和 b 连线的都是 test 环境,对应的一个闭包

2.可以做缓存(存储结构)

function eater(){ var food=""; var obj={ eat : function (myFood){ console.log("i am eating"+food); food =""; }, push : function (myFood){ food = myFood; } } return obj; } var eater1 = eater(); eater1.push("banana"); eater1.eat(); 
  • 1
  • 2
  • 3
  • 4
  • 5
  • 6
  • 7
  • 8
  • 9
  • 10
  • 11
  • 12
  • 13
  • 14
  • 15
  • 16
  • 17

答案 i am eating banana,eat 和 push 操作的是同一个 food
在 function eater(){里面的 food}就相当于一个隐式存储的机构
obj 对象里面是可以有 function 方法的,也可以有属性,方法就是函数的表现形式

3.可以实现封装,属性私有化
只能调用函数方法,不能修改函数的属性。

4.模块化开发,防止污染全局变量


蓝蓝设计建立了UI设计分享群,每天会分享国内外的一些优秀设计,如果有兴趣的话,可以进入一起成长学习,请扫码蓝小助,报下信息,蓝小助会请您入群。欢迎您加入噢~~希望得到建议咨询、商务合作,也请与我们联系。

分享此文一切功德,皆悉回向给文章原作者及众读者.

转自:csdn
免责声明:蓝蓝设计尊重原作者,文章的版权归原作者。如涉及版权问题,请及时与我们取得联系,我们立即更正或删除。

蓝蓝设计www.lanlanwork.com )是一家专注而深入的界面设计公司,为期望卓越的国内外企业提供卓越的UI界面设计、BS界面设计 、 cs界面设计 、 ipad界面设计 、 包装设计 、 图标定制 、 用户体验 、交互设计、 网站建设 平面设计服务

React 组件中的事件处理、组件(受控、非受控)、函数柯里化

前端达人

事件处理

在React中获取虚拟组件中的标签的值

  1. 使用组件的 refs属性
  2. 在虚拟组件的标签中定义事件,在事件中通过 箭头函数 获取标签的值
  3. 使用事件对象——event

事件处理:

  • 通过onXxx属性指定事件处理函数(注意大小写)
    • React使用的是自定义(合成)事件, 而不是使用的原生DOM事件 ———为了更好的兼容性
    • React中的事件是通过事件委托方式处理的(委托给组件最外层的元素) ————为了高效
  • 通过event.target得到发生事件的DOM元素对象 ———不要过度使用ref

使用event.target属性:

//创建组件 class Demo extends React.Component{ myRef = React.createRef() //展示输入框的数据 showData = (event)=>{ alert(event.target.value); } render(){ return( <div> <input onBlur={this.showData} type="text" placeholder="失去焦点提示数据"/> </div> ) } } //渲染组件到页面 ReactDOM.render(<Demo/>,document.getElementById('test')) 
  • 1
  • 2
  • 3
  • 4
  • 5
  • 6
  • 7
  • 8
  • 9
  • 10
  • 11
  • 12
  • 13
  • 14
  • 15
  • 16
  • 17
  • 18

React事件处理和Dom事件处理区别:

1、在 语法 上的不同点:

  • React事件名采用驼峰命名法,即事件名首字母大写。如onclick(Dom)——onClick(React)

  • 响应事件的函数在React中以 对象方式 赋值,Dom是以 字符串方式 赋值

    <button onclick= ' clickMe( ) '>提交</button> ——Dom方式 <button onClick={ clickMe( ) }>提交</button> ——React方式 
            
    • 1
    • 2

2、在阻止事件的默认行为有区别:React事件是合成的,DOM事件是原生

  • Dom:返回false
  • React:显示的调用事件对象event.preventDefault

React事件处理函数

  • 1、使用ES6的箭头函数

    class MyComponent extends React.Component{ constructor(props){ super(props); this.state={ number:0 } handleClick=()=>{ ++this.state.number; console.log(this.state.number); } render(){ return( <div> <button type='button' onClick={this.handleClick}>点我</button> </div> ) } } ReactDOM.render(<MyComponent/>,document.getElementById('example')); 
            
    • 1
    • 2
    • 3
    • 4
    • 5
    • 6
    • 7
    • 8
    • 9
    • 10
    • 11
    • 12
    • 13
    • 14
    • 15
    • 16
    • 17
    • 18
    • 19
  • 2、在组件中定义事件处理函数

    class MyComponent extends React.Component{ constructor(props){ super(props); this.state={ number:0 } this.handleClick=this.handleClick.bind(this); } handleClick(){ ++this.state.number; console.log(this.state.number); } render(){ return( <div> <button type='button' onClick={this.handleClick}>点我</button> </div> ) } } ReactDOM.render(<MyComponent/>,document.getElementById('example')); 
            
    • 1
    • 2
    • 3
    • 4
    • 5
    • 6
    • 7
    • 8
    • 9
    • 10
    • 11
    • 12
    • 13
    • 14
    • 15
    • 16
    • 17
    • 18
    • 19
    • 20
    • 21
    • 注:这种方法的好处是每次render渲染都不会重新创建一个回调函数,没有额外的性能损失,但是如果在一个组件中有很多的事件函数时这种在构造函数中绑定this的方法会显得繁琐
  • 3、在给事件赋值时绑定this

    class MyComponent extends React.Component{ constructor(props){ super(props); this.state={ number:0 } } handleClick(){ ++this.state.number; console.log(this.state.number); } render(){ return( <div> <button type='button' onClick={this.handleClick.bind(this)}>点我</button> </div> ) } } ReactDOM.render(<MyComponent/>,document.getElementById('example')); 
            
    • 1
    • 2
    • 3
    • 4
    • 5
    • 6
    • 7
    • 8
    • 9
    • 10
    • 11
    • 12
    • 13
    • 14
    • 15
    • 16
    • 17
    • 18
    • 19
    • 20
    • 注:但是此方法在每次render时都会重新创建一个新的函数,性能有一定的损失,但在事件处理函数需要传参数时,这种方法就比较好

事件流

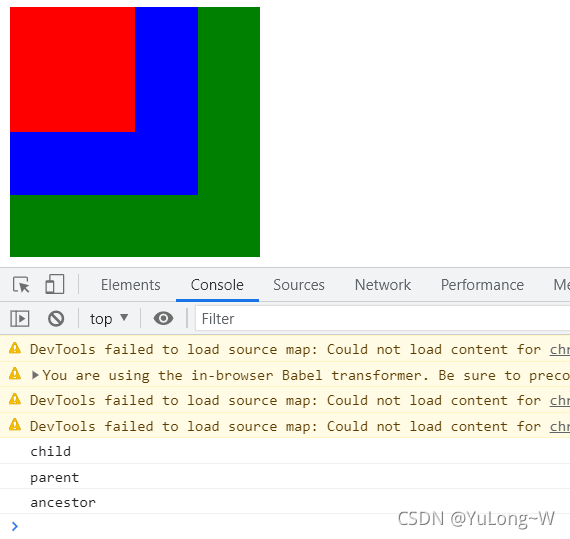
在该示例中,3个div嵌套显示,并且每个元素上均绑定onClick事件。当用户点击红色区域的div元素时,可以看到,控制台先后输出了child -> parent -> ancestor,这是因为在React的事件处理系统中,默认的事件流就是冒泡。

const style={ child:{ width:'100px', height:'100px', background:'red' }, parent:{ width:'150px', height:'150px', background:'blue' }, ancestor:{ width:'200px', height:'200px', background:'green' } } class Example extends React.Component{ render(){ return( <div onClickCapture={()=> console.log('ancestor')} style={style.ancestor}> <div onClickCapture={ ()=> console.log('parent')} style={style.parent}> <div onClickCapture={ ()=> console.log('child')} style={style.child}></div> </div> </div> ) } } ReactDOM.render(<Example/>,document.getElementById('example')); 
  • 1
  • 2
  • 3
  • 4
  • 5
  • 6
  • 7
  • 8
  • 9
  • 10
  • 11
  • 12
  • 13
  • 14
  • 15
  • 16
  • 17
  • 18
  • 19
  • 20
  • 21
  • 22
  • 23
  • 24
  • 25
  • 26
  • 27
  • 28
  • 29
  • 30
  • 31

在这里插入图片描述

  • React默认的事件触发方式:冒泡方式
  • 若将事件触发改为捕获方式:需要在事件名后带上 Capture 后缀
<div onClickCapture={()=> console.log('ancestor')} style={style.ancestor}> <div onClickCapture={ ()=> console.log('parent')} style={style.parent}> <div onClickCapture={ ()=> console.log('child')} style={style.child}></div> </div> </div> 
  • 1
  • 2
  • 3
  • 4
  • 5

事件委托

在合成事件系统中,所有的事件都是绑定在document元素上,即虽然在某个React元素上绑定了事件,但是,最后事件都委托给document统一触发。因此,在合成事件中只能阻止合成事件中的事件传播

React 阻止的事件流,并没有阻止真正DOM元素的事件触发,还是按照冒泡的方式,层层将事件交给上级元素进行处理,最后事件传播到docuement,触发合成事件,在合成事件中,child触发时,e.stopPropagation() 被调用,合成事件中的事件被终止。因此,合成事件中的stopPropagation无法阻止事件在真正元素上的传递,它只阻止合成事件中的事件流。相反,如果绑定一个真正的事件,那么,合成事件则会被终止。

  • 默认事件流是冒泡的,所有事件统一由document触发,在React中阻止冒泡方法是调用e.stopPropagation()
  • React的合成事件是可以找到原生的事件对象
  • React中的合成事件中只有一个全局对象event,该对象不是原生的event,但通过它可以获得event对象的部分属性。每个事件触发完后React的全局对象event就会被清空,因此不能在异步操作使用

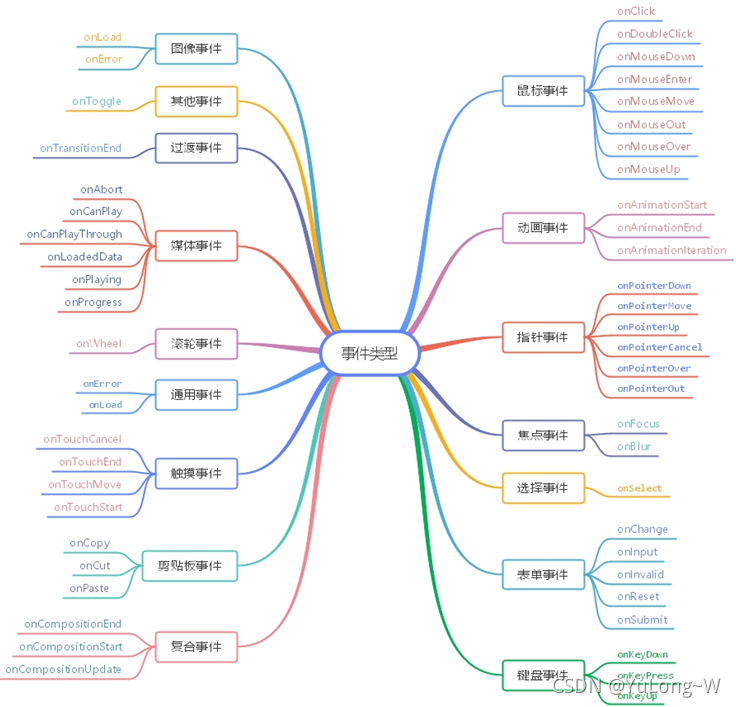
事件类型:
在这里插入图片描述

收集表单数据

非受控组件

表单数据由DOM本身处理。即不受setState()的控制,与传统的HTML表单输入相似,input输入值即显示最新值(使用 ref 从DOM获取表单值),即不受React控制改变表单元素提交的值的方式,称为:“非受控组件”

class Login extends React.Component{ handleSubmit = (event)=>{ event.preventDefault() //阻止表单提交 const {username,password} = this alert(`你输入的用户名是:${username.value},你输入的密码是:${password.value}`) } render(){ return( <form onSubmit={this.handleSubmit}> 用户名:<input ref={c => this.username = c} type="text" name="username"/> 密码:<input ref={c => this.password = c} type="password" name="password"/> <button>登录</button> </form> ) } } //渲染组件 ReactDOM.render(<Login/>,document.getElementById('test')) 
  • 1
  • 2
  • 3
  • 4
  • 5
  • 6
  • 7
  • 8
  • 9
  • 10
  • 11
  • 12
  • 13
  • 14
  • 15
  • 16
  • 17
  • 18

受控组件

在HTML中,标签<input><textarea><select>的值的改变通常是根据用户输入进行更新。在React中,可变状态通常保存在组件的状态属性中,并且只能使用 setState() 更新,而呈现表单的React组件也控制着在后续用户输入时该表单中发生的情况,以这种由React控制的输入表单元素而改变其值的方式,称为:“受控组件”。

class Login extends React.Component{ //初始化状态 state = { username:'', //用户名 password:'' //密码 } //保存用户名到状态中 saveUsername = (event)=>{ this.setState({username:event.target.value}) } //保存密码到状态中 savePassword = (event)=>{ this.setState({password:event.target.value}) } //表单提交的回调 handleSubmit = (event)=>{ event.preventDefault() //阻止表单提交 const {username,password} = this.state alert(`你输入的用户名是:${username},你输入的密码是:${password}`) } render(){ return( <form onSubmit={this.handleSubmit}> 用户名:<input onChange={this.saveUsername} type="text" name="username"/> 密码:<input onChange={this.savePassword} type="password" name="password"/> <button>登录</button> </form> ) } } //渲染组件 ReactDOM.render(<Login/>,document.getElementById('test')) 
  • 1
  • 2
  • 3
  • 4
  • 5
  • 6
  • 7
  • 8
  • 9
  • 10
  • 11
  • 12
  • 13
  • 14
  • 15
  • 16
  • 17
  • 18
  • 19
  • 20
  • 21
  • 22
  • 23
  • 24
  • 25
  • 26
  • 27
  • 28
  • 29
  • 30
  • 31
  • 32

受控和非受控元素都有其优点,根据具体情况选择

特征 非受控制 受控
一次性检索(例如表单提交)
及时验证 ×
有条件的禁用提交按钮 ×
执行输入格式 ×
一个数据的几个输入 ×
动态输入 ×

函数柯里化

高阶函数:如果一个函数符合下面2个规范中的任何一个,那该函数就是高阶函数。

  1. 若A函数,接收的参数是一个函数,那么A就可以称之为高阶函数
  2. 若A函数,调用的返回值依然是一个函数,那么A就可以称之为高阶函数

常见的高阶函数有:Promise、setTimeout、arr.map()等等

函数的柯里化:通过函数调用继续返回函数的方式,实现多次接收参数最后统一处理的函数编码形式。

function sum(a){ return(b)=>{ return (c)=>{ return a+b+c } } } 
  • 1
  • 2
  • 3
  • 4
  • 5
  • 6
  • 7

函数柯里化的实现

class Login extends React.Component{ //初始化状态 state = { username:'', //用户名 password:'' //密码 } //保存表单数据到状态中 saveFormData = (dataType)=>{ return (event)=>{ this.setState({[dataType]:event.target.value}) } } //表单提交的回调 handleSubmit = (event)=>{ event.preventDefault() //阻止表单提交 const {username,password} = this.state alert(`你输入的用户名是:${username},你输入的密码是:${password}`) } render(){ return( <form onSubmit={this.handleSubmit}> 用户名:<input onChange={this.saveFormData('username')} type="text" name="username"/> 密码:<input onChange={this.saveFormData('password')} type="password" name="password"/> <button>登录</button> </form> ) } } //渲染组件 ReactDOM.render(<Login/>,document.getElementById('test')) 
  • 1
  • 2
  • 3
  • 4
  • 5
  • 6
  • 7
  • 8
  • 9
  • 10
  • 11
  • 12
  • 13
  • 14
  • 15
  • 16
  • 17
  • 18
  • 19
  • 20
  • 21
  • 22
  • 23
  • 24
  • 25
  • 26
  • 27
  • 28
  • 29
  • 30


蓝蓝设计建立了UI设计分享群,每天会分享国内外的一些优秀设计,如果有兴趣的话,可以进入一起成长学习,请扫码蓝小助,报下信息,蓝小助会请您入群。欢迎您加入噢~~希望得到建议咨询、商务合作,也请与我们联系。

分享此文一切功德,皆悉回向给文章原作者及众读者.

转自:csdn 免责声明:蓝蓝设计尊重原作者,文章的版权归原作者。如涉及版权问题,请及时与我们取得联系,我们立即更正或删除。

蓝蓝设计www.lanlanwork.com )是一家专注而深入的界面设计公司,为期望卓越的国内外企业提供卓越的UI界面设计、BS界面设计 、 cs界面设计 、 ipad界面设计 、 包装设计 、 图标定制 、 用户体验 、交互设计、 网站建设 平面设计服务

axios 封装,API接口统一管理,支持动态API!

前端达人

分享一个自己封装的 axios 网络请求

主要的功能及其优点:

将所有的接口放在一个文件夹中管理(api.js)。并且可以支持动态接口,就是 api.js 文件中定义的接口可以使用 :xx 占位,根据需要动态的改变。动态接口用法模仿的是vue的动态路由,如果你不熟悉动态路由可以看看我的这篇文章:Vue路由传参详解(params 与 query)

1.封装请求:

  1. 首先在 src 目录下创建 http 目录。继续在 http 目录中创建 api.js 文件与 index.js 文件。
  2. 然后再 main.js 文件中导入 http 目录下的 index.js 文件。将请求注册为全局组件。
  3. 将下面封装所需代码代码粘到对应的文件夹

2.基本使用:

//示例:获取用户列表 getUsers() { const { data } = await this.$http({ url: 'users' //这里的 users 就是 api.js 中定义的“属性名” }) }, 
  • 1
  • 2
  • 3
  • 4
  • 5
  • 6

3.动态接口的使用:

//示例:删除用户 deleteUser() { const { data } = await this.$http({ method: 'delete', //动态接口写法模仿的是vue的动态路由 //这里 params 携带的是动态参数,其中 “属性名” 需要与 api 接口中的 :id 对应 //也就是需要保证携带参数的 key 与 api 接口中的 :xx 一致 url: { // 这里的 name 值就是 api.js 接口中的 “属性名” name: 'usersEdit', params: { id: userinfo.id, }, }, }) }, 
  • 1
  • 2
  • 3
  • 4
  • 5
  • 6
  • 7
  • 8
  • 9
  • 10
  • 11
  • 12
  • 13
  • 14
  • 15
  • 16

4.不足:

封装的请求只能这样使用 this.$http() 。不能 this.$http.get() 或 this.$http.delete()

由于我感觉使用 this.$http() 这种就够了,所以没做其他的封装处理

如果你有更好的想法可以随时联系我

如下是封装所需代码:

  • api.js 管理所有的接口
// 如下接口地址根据自身项目定义 const API = { // base接口 baseURL: 'http://127.0.0.1:8888/api/private/v1/', // 用户 users: '/users', // “修改”与“删除”用户接口(动态接口) usersEdit: '/users/:id', } export default API 
  • 1
  • 2
  • 3
  • 4
  • 5
  • 6
  • 7
  • 8
  • 9
  • 10
  • 11
  • 12
  • index.js 逻辑代码
// 这里请求封装的主要逻辑,你可以分析并将他优化,如果有更好的封装方法欢迎联系我Q:2356924146 import axios from 'axios' import API from './api.js' const instance = axios.create({ baseURL: API.baseURL, timeout: '8000', method: 'GET' }) // 请求拦截器 instance.interceptors.request.use( config => { // 此处编写请求拦截代码,一般用于加载弹窗,或者每个请求都需要携带的token console.log('正在请求...') // 请求携带的token config.headers.Authorization = sessionStorage.getItem('token') return config }, err => { console.log('请求失败', err) } ) // 响应拦截器 instance.interceptors.response.use( res => { console.log('响应成功') //该返回对象会绑定到响应对象中 return res }, err => { console.log('响应失败', err) } ) //options 接收 {method, url, params/data} export default function(options = {}) { return instance({ method: options.method, url: (function() { const URL = options.url if (typeof URL === 'object') { //拿到动态 url let DynamicURL = API[URL.name] //将 DynamicURL 中对应的 key 进行替换 for (const key of Object.keys(URL.params)) { DynamicURL = DynamicURL.replace(':' + key, URL.params[key]) } return DynamicURL } else { return API[URL] } })(), //获取查询字符串参数 params: options.params, //获取请求体字符串参数 data: options.data }) } 
  • 1
  • 2
  • 3
  • 4
  • 5
  • 6
  • 7
  • 8
  • 9
  • 10
  • 11
  • 12
  • 13
  • 14
  • 15
  • 16
  • 17
  • 18
  • 19
  • 20
  • 21
  • 22
  • 23
  • 24
  • 25
  • 26
  • 27
  • 28
  • 29
  • 30
  • 31
  • 32
  • 33
  • 34
  • 35
  • 36
  • 37
  • 38
  • 39
  • 40
  • 41
  • 42
  • 43
  • 44
  • 45
  • 46
  • 47
  • 48
  • 49
  • 50
  • 51
  • 52
  • 53
  • 54
  • 55
  • 56
  • 57
  • 58
  • 59
  • 60
  • 61
  • 62
  • 63
  • 64
  • main.js 将请求注册为全局组件
import Vue from 'vue' // 会自动导入 http 目录中的 index.js 文件 import http from './http' Vue.prototype.$http = http

蓝蓝设计建立了UI设计分享群,每天会分享国内外的一些优秀设计,如果有兴趣的话,可以进入一起成长学习,请扫码蓝小助,报下信息,蓝小助会请您入群。欢迎您加入噢~~希望得到建议咨询、商务合作,也请与我们联系。

分享此文一切功德,皆悉回向给文章原作者及众读者 转自:csdn. 免责声明:蓝蓝设计尊重原作者,文章的版权归原作者。如涉及版权问题,请及时与我们取得联系,我们立即更正或删除。

蓝蓝设计www.lanlanwork.com )是一家专注而深入的界面设计公司,为期望卓越的国内外企业提供卓越的UI界面设计、BS界面设计 、 cs界面设计 、 ipad界面设计 、 包装设计 、 图标定制 、 用户体验 、交互设计、 网站建设 平面设计服务

elementui导出数据为xlsx、excel表格

前端达人

我这里为了同学们好理解,把所有元素都写到一个页面。

1.第一步安装插件


  1. npm install file-saver
  2. npm install xlsx

2.第二步在mian.js中设置全局


  1. // vue中导出excel表格模板
  2. import FileSaver from 'file-saver'
  3. import XLSX from 'xlsx'
  4. Vue.prototype.$FileSaver = FileSaver; //设置全局
  5. Vue.prototype.$XLSX = XLSX; //设置全局

3.第三步使用 


  1. <template>
  2. <div class="daochu">
  3. <el-button @click="o" type="success" round>导出</el-button>
  4. <el-table
  5. id="ou"
  6. :data="tableData"
  7. style="width: 100%"
  8. :default-sort="{ prop: 'date', order: 'descending' }"
  9. >
  10. <el-table-column prop="date" label="日期" sortable width="180">
  11. </el-table-column>
  12. <el-table-column prop="name" label="姓名" sortable width="180">
  13. </el-table-column>
  14. <el-table-column prop="address" label="地址" :formatter="formatter">
  15. </el-table-column>
  16. </el-table>
  17. </div>
  18. </template>
  19. <script>
  20. export default {
  21. data() {
  22. return {
  23. tableData: [
  24. {
  25. date: "2016-05-02",
  26. name: "王小虎",
  27. address: "上海市普陀区金沙江路 1518 弄",
  28. },
  29. {
  30. date: "2016-05-04",
  31. name: "王小虎",
  32. address: "上海市普陀区金沙江路 1517 弄",
  33. }
  34. ],
  35. };
  36. },
  37. methods:{
  38. o() {
  39. let tables = document.getElementById("ou");
  40. let table_book = this.$XLSX.utils.table_to_book(tables);
  41. var table_write = this.$XLSX.write(table_book, {
  42. bookType: "xlsx",
  43. bookSST: true,
  44. type: "array",
  45. });
  46. try {
  47. this.$FileSaver.saveAs(
  48. new Blob([table_write], { type: "application/octet-stream" }),
  49. "sheetjs.xlsx"
  50. );
  51. } catch (e) {
  52. if (typeof console !== "undefined") console.log(e, table_write);
  53. }
  54. return table_write;
  55. },
  56. }
  57. }
  58. </script>

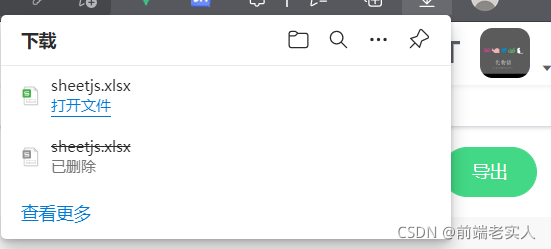
可以看到已经导出 

实际工作中导出按钮单独抽离出去做到可以复用才是比较合理的


蓝蓝设计建立了UI设计分享群,每天会分享国内外的一些优秀设计,如果有兴趣的话,可以进入一起成长学习,请扫码蓝小助,报下信息,蓝小助会请您入群。欢迎您加入噢~~希望得到建议咨询、商务合作,也请与我们联系。

分享此文一切功德,皆悉回向给文章原作者及众读者.

转自:csdn
免责声明:蓝蓝设计尊重原作者,文章的版权归原作者。如涉及版权问题,请及时与我们取得联系,我们立即更正或删除。

蓝蓝设计www.lanlanwork.com )是一家专注而深入的界面设计公司,为期望卓越的国内外企业提供卓越的UI界面设计、BS界面设计 、 cs界面设计 、 ipad界面设计 、 包装设计 、 图标定制 、 用户体验 、交互设计、 网站建设 平面设计服务


MAC上 nodejs express 安装

前端达人

最近在MAC上搭建 nodejs环境以及安装 express 框架,遇到了一些问题,不过最后总算还是安装成功了,下面是操作步骤

1.node js 安装

访问nodejs官网进入下载mac上的安装包 , 从这里下载    这里可以选mac installer 的 pkg 安装包,下载后直接点击安装就好,当然了也可以选择 binary 包进行安装,下载后用 tar -zxvf 命令先解压开然后 编译 在安装。新版本的安装包会把 npm(nodejs 的package管理工具)都会安装上,测试是否安装成功可以下方式测试。

用 node -v 和 npm -v 来查看各自的版本信息,如果node 命令找不到 可以先用 which node 命令来看看安装目录 ,然后就可以用了

其次可以按照nodejs 官网首页提供的 demo js 脚本,写一个hello world 程序, 然后在浏览器中访问看看是否ok,到这里 node js 安装完毕

2.express 安装

express 作为 node js 的一个框架,该框架提供了很多组件,方便了 nodejs 的快速开发。这个就类似与其他语言的一些快速的框架, php中的yii,yp、java中的 SSH。

安装express的时候也可以参考 express官网 的 Getting started 步骤去安装 , 但是我按照这个是没有安装起来。

现在最新的express版本都是 4.0以上 , express4.0以后版本把express命令行工具从express library 中分离出来了(https://github.com/expressjs/generator) , 所安装的方式也变化了。之前一直用

npm istall -g express


这个命令工具进行安装,显示成功了,但是命令行中无法使用 express 这个命令。

现在进行全局安装 , 这里根据自己的需求选择是否全局安装。命令如下

npm install -g express-generator 

等到上面的express命令行工具安装完毕后,就可以安装 express 框架

cd /var/www/node
express test && cd test //安装express框架依赖 npm install //启动test这个项目 npm start

这里启动过的时候 不要用 node app.js 这种方式, 你可以 用 vim 命令看看test目录下的 package.json 这个文件的内容,其中找到scripts 哪一行

接着就访问 http://localhost:3000 , 可以看到 welcome express !!!

到这就完毕了


分享此文一切功德,皆悉回向给文章原作者及众读者.
免责声明:蓝蓝设计尊重原作者,文章的版权归原作者。如涉及版权问题,请及时与我们取得联系,我们立即更正或删除。
来源:博客园

蓝蓝设计www.lanlanwork.com )是一家专注而深入的界面设计公司,为期望卓越的国内外企业提供卓越的UI界面设计、BS界面设计 、 cs界面设计 、 ipad界面设计 、 包装设计 、 图标定制 、 用户体验 、交互设计、 网站建设 平面设计服务


在MAC环境下之以太坊(ethereum)开发环境安装

前端达人

先访问github上go语言开发客户端网址:

安装ethereum

在MAC上安装

brew tap ethereum/ethereum

brew install ethereum


dogiant@bogon : /usr/local $brew tap ethereum/ethereum
Updating Homebrew...
==> Tapping ethereum/ethereum
Cloning into '/usr/local/Homebrew/Library/Taps/ethereum/homebrew-ethereum'...
remote: Counting objects: 6, done.
remote: Compressing objects: 100% (6/6), done.
remote: Total 6 (delta 1), reused 1 (delta 0), pack-reused 0
Unpacking objects: 100% (6/6), done.
Checking connectivity... done.
Tapped 3 formulae (31 files, 33.9K)
dogiant@bogon : /usr/local $brew install ethereum
==> Installing ethereum from ethereum/ethereum
==> Installing dependencies for ethereum/ethereum/ethereum: go
==> Installing ethereum/ethereum/ethereum dependency: go
==> Downloadinghttps://homebrew.bintray.com/bottles/go-1.7.4_1.el_capitan.bottle.tar.gz
######################################################################## 100.0%
==> Pouring go-1.7.4_1.el_capitan.bottle.tar.gz
==> Caveats
As of go 1.2, a valid GOPATH is required to use the `go get` command:
  https://golang.org/doc/code.html#GOPATH

You may wish to add the GOROOT-based install location to your PATH:
  export PATH=$PATH:/usr/local/opt/go/libexec/bin
==> Summary
��  /usr/local/Cellar/go/1.7.4_1: 6,438 files, 250.7M
==> Installing ethereum/ethereum/ethereum
==> Cloninghttps://github.com/ethereum/go-ethereum.git
Cloning into '/Users/dogiant/Library/Caches/Homebrew/ethereum--git'...
remote: Counting objects: 2737, done.
remote: Compressing objects: 100% (2066/2066), done.
remote: Total 2737 (delta 963), reused 1654 (delta 553), pack-reused 0
Receiving objects: 100% (2737/2737), 14.91 MiB | 112.00 KiB/s, done.
Resolving deltas: 100% (963/963), done.
Checking connectivity... done.
Note: checking out 'ff07d54843ea7ed9997c420d216b4c007f9c80c3'.

You are in 'detached HEAD' state. You can look around, make experimental
changes and commit them, and you can discard any commits you make in this
state without impacting any branches by performing another checkout.

If you want to create a new branch to retain commits you create, you may
do so (now or later) by using -b with the checkout command again. Example:

  git checkout -b <new-branch-name>

Checking out files: 100% (2487/2487), done.
==> Checking out tag v1.5.5
==> go env
==> make all
==> Caveats
To have launchd start ethereum/ethereum/ethereum now and restart at login:
  brew services start ethereum/ethereum/ethereum
==> Summary
��  /usr/local/Cellar/ethereum/1.5.5: 9 files, 47.7M, built in 5 minutes 30 seconds


安装完毕后

geth -h

列出当前的用户
geth account list 
显示空

dogiant@bogon : ~/ethereum/workspace $geth --datadir "~/ethdev" --dev
I1228 15:16:46.907316 cmd/utils/flags.go:615] WARNING: No etherbase set and no accounts found as default
I1228 15:16:46.907493 ethdb/database.go:83] Allotted 128MB cache and 1024 file handles to /Users/dogiant/ethdev/geth/chaindata
I1228 15:16:46.911765 ethdb/database.go:176] closed db:/Users/dogiant/ethdev/geth/chaindata
I1228 15:16:46.912892 node/node.go:176] instance: Geth/v1.5.5-stable-ff07d548/darwin/go1.7.4
I1228 15:16:46.912925 ethdb/database.go:83] Allotted 128MB cache and 1024 file handles to /Users/dogiant/ethdev/geth/chaindata
I1228 15:16:46.935109 eth/backend.go:280] Successfully wrote custom genesis block: e5be92145a301820111f91866566e3e99ee344d155569e4556a39bc71238f3bc
I1228 15:16:46.935127 eth/backend.go:299] ethash used in test mode
I1228 15:16:46.935536 eth/db_upgrade.go:346] upgrading db log bloom bins
I1228 15:16:46.935580 eth/db_upgrade.go:354] upgrade completed in 48.143µs
I1228 15:16:46.935601 eth/backend.go:191] Protocol Versions: [63 62], Network Id: 1
I1228 15:16:46.935744 eth/backend.go:219] Chain config: {ChainID: 1 Homestead: 1150000 DAO: 1920000 DAOSupport: true EIP150: 2463000 EIP155: 2675000 EIP158: 2675000}
I1228 15:16:46.935983 core/blockchain.go:219] Last header: #0 [e5be9214…] TD=131072
I1228 15:16:46.935998 core/blockchain.go:220] Last block: #0 [e5be9214…] TD=131072
I1228 15:16:46.936007 core/blockchain.go:221] Fast block: #0 [e5be9214…] TD=131072
I1228 15:16:46.936626 p2p/server.go:342] Starting Server
I1228 15:16:49.127910 p2p/discover/udp.go:227] Listening, enode://05399f51a43805c17f82e5016d5969d14b3092018cae87eec77ed52291d66c50c7d7bf024d953b0afcccd44c717f17aaf251b897d770054205ea268b49a3050b@10.0.37.126:58049
I1228 15:16:49.128111 whisper/whisperv2/whisper.go:176] Whisper started
I1228 15:16:49.128115 p2p/server.go:610] Listening on [::]:55739
I1228 15:16:49.129641 node/node.go:341] IPC endpoint opened: /Users/dogiant/ethdev/geth.ipc


dogiant@dubiaoqideMBP : ~ $geth --dev console 2>> file_to_log_output
Welcome to the Geth JavaScript console!

instance: Geth/v1.5.5-stable-ff07d548/darwin/go1.7.4
 modules: admin:1.0 debug:1.0 eth:1.0 miner:1.0 net:1.0 personal:1.0 rpc:1.0 shh:1.0 txpool:1.0 web3:1.0

> eth.accounts
[]
> personal.newAccount('123456')
"0x556d64ecb09b5df590a2ab842b53a8041e3961b4"
> eth.accounts
[
 "0x556d64ecb09b5df590a2ab842b53a8041e3961b4" ]
> eth.accounts
[
 "0x556d64ecb09b5df590a2ab842b53a8041e3961b4" ]
> personal.newAccount('123456')
"0xb0945a303834ff763695e21ed8acbe80aefee9bb"
> eth.accounts
[
 "0x556d64ecb09b5df590a2ab842b53a8041e3961b4" , "0xb0945a303834ff763695e21ed8acbe80aefee9bb" ]
>


dogiant@dubiaoqideMBP : ~ $geth --dev account list
Account #0: {556d64ecb09b5df590a2ab842b53a8041e3961b4} /var/folders/jy/q2f6pdjn6p11ytfx0xk8yp7m0000gn/T/ethereum_dev_mode/keystore/UTC--2016-12-28T07-20-52.337017793Z--556d64ecb09b5df590a2ab842b53a8041e3961b4
Account #1: {b0945a303834ff763695e21ed8acbe80aefee9bb} /var/folders/jy/q2f6pdjn6p11ytfx0xk8yp7m0000gn/T/ethereum_dev_mode/keystore/UTC--2016-12-28T07-25-51.683157537Z—b0945a303834ff763695e21ed8acbe80aefee9bb


> user1 = eth.accounts[0]
"0x556d64ecb09b5df590a2ab842b53a8041e3961b4"
> user2 = eth.accounts[1]
"0xb0945a303834ff763695e21ed8acbe80aefee9bb"
> user1
"0x556d64ecb09b5df590a2ab842b53a8041e3961b4"
> user2
"0xb0945a303834ff763695e21ed8acbe80aefee9bb"
> eth.getBalance(user1)
0
> eth.getBalance(user2)
0
> eth.blockNumber
0
> miner.start()
true
> eth.getBalance(user1)
390000000000000000000

> eth.getBalance(user2)
0
> miner.stop()
true
> eth.blockNumber
99
> eth.getBalance(user1)
495000000000000000000
> eth.getBalance(user2)
0
> eth.sendTransaction({from:user1,to:user2,value:web3.toWei(3,"ether")})
Error: account is locked
    at web3.js:3119:20
    at web3.js:6023:15
    at web3.js:4995:36
    at <anonymous>:1:1

> personal.unlockAccount("0x556d64ecb09b5df590a2ab842b53a8041e3961b4","123456")

true
> eth.sendTransaction({from:user1,to:user2,value:web3.toWei(3,"ether")})
"0x39d604a1df899f6c80ce33279abe88aec28b6d97f83e2dda5f062dd3c099fcf3"
> eth.getBalance(user2)
0
> miner.start()
true
> miner.stop()
true
> eth.getBalance(user2)
3000000000000000000


问题1:一开始用get account list总是看不到新建的用户,后来考虑是开发控制台创建的用户要跟开发一致 加了 —dev后看到正常显示账号

看日志以太币转账,转账后需要挖矿确认


分享此文一切功德,皆悉回向给文章原作者及众读者.
免责声明:蓝蓝设计尊重原作者,文章的版权归原作者。如涉及版权问题,请及时与我们取得联系,我们立即更正或删除。
来源:csdn
蓝蓝设计www.lanlanwork.com )是一家专注而深入的界面设计公司,为期望卓越的国内外企业提供卓越的UI界面设计、BS界面设计 、 cs界面设计 、 ipad界面设计 、 包装设计 、 图标定制 、 用户体验 、交互设计、 网站建设 平面设计服务


二、学习基础智能合约

前端达人

第一讲 介绍

1、 智能合约是什么?

智能合约并非现实中常见的合同,而是存在区块链上,可以被触发执行的一段程序代码,这些代码实现了某种预定的规则,是存在于区块链执行环境中的“自治代理”。智能合约需要被触发,代码才会执行,不被触发他的状态将会始终保持一个状态,并且部署后的智能合约将不可被修改。智能合约语言的语法和js脚本语言很像,因此有过js开发经验的小伙伴们学习起来会很快。

2、 编程工具的介绍。

我们都知道“预先善其事、必先利其器”的道理,现实中织布是需要织布机才能完成织布,同样的我们的智能合约学习也是要有编程工具的使用的。我们本套课程都将以 remix 为编程工具进行讲解课程。remix 就是我们手里的织布机,能织出什么布就看我们这些使用 remix 的程序员了。
地址为(http://remix.ethereum.org/)可以直接在浏览器中开发,很方便,只要有一个 google chrome 谷歌浏览器就可以开发了。

remix 有几个主要的常用面板,分别是文件面板、编译器、运行器、以及占用最大一部分的文本编辑器组成。

文件面板:我们可以在这个面板进行创建文件、选择文件等管理文件的操作。
编译器:我们可以将sol文件进行编译,编译不通过将不能执行合约,并且可以得到code.json以及abi.json。我们可以将他们在支持sol语言的公链上运行。
运行器:可以将sol智能合约部署在eth链上,并且能对合约的方法进行调用等操作。
文本编辑器:我们的代码就是写在这个位置的,后面基本大部分时间你将面对的是这个页面。

3、 我的第一个智能合约程序

下面的智能合约是我们第一个合约程序,因此我们命名为 “FirstContract.sol” 文件名

pragma solidity ^0.6.0;

// first contract
contract FirstContract {
    // first method
    function firstMethod() public pure returns (string memory) {
        return 'I am first method !!!';
    }
} 
  • 1
  • 2
  • 3
  • 4
  • 5
  • 6
  • 7
  • 8
  • 9

上面代码很多小伙伴应该不是很懂什么意思,不懂没关系,我来给大家一行一行讲解。
pragma solidity ^0.6.0;
这一行是说明使用solidity 0.6.0版本写的,可以运行在0.6.0到0.7.0之间的版本上。
contract FirstContract {
这一句是定义一个叫 FirstContract 名称的合约。
function firstMethod() public pure returns (string memory){
这一行是定义一个方法叫做 firstMethod, 该方法有返回值,类型是 string 类型的。
return ‘I am first method !!!’;
这一行是这个方法将会返回 “I am first method !!!”。

看起来可能还是会有小伙伴们有不明白的地方,但是我们先只教这么多,关于什么是string,string 就是字符串的意思,字符串你就可以当作是任意的abcde这些字母等还有标点符号写在了单引号或者双引号中。这就是字符串最通俗易懂的解释了,小伙伴们,大家可以动手试试自定义一些字符串让他返回。

第二讲 智能合约结构

在solidity中,合约有点类似面向对象语言中的类,每个合约中包含状态变量、函数、函数变量、函数修饰器、事件、结构、和枚举类的声明,合约也可以继承其他的合约。大家可能对类和类中的结构的概念没有什么了解,我简单给大家举个例子。一个类可以比作是汽车,汽车里面的油就是变量,然后油门、刹车等就是函数,我们踩油门相当于调用类中的函数,汽车动起来,油减少,相当于变量值改变了。

我们来根据上面的描述写一个汽车的合约。先使用remix 创建一个CarContract1.sol文件,然后设定一个CarContract1名字的合约。汽车有了,还要有一个油箱,设定一个变量_gasoline,作为油箱。然后我们再给汽车加一个油门,写一个startUp函数作为油门。现在有了油箱但是不知道有多少油,再加gatGasoline函数作为一个仪表盘。咱们只有油箱没有油汽车也跑不了,在加一个加油的接口,给汽车加油,使用addGasoline函数进行加油。下面就是我们完整的小汽车的代码。

CarContract1.sol

pragma solidity ^0.6.0;

contract CarContract1 {
    uint256 _gasoline;

    function startUp() public {
        require(_gasoline >= 1, "gasoline is not haved");
        _gasoline = _gasoline - 1;
    }

    function getGasoline() public view returns(uint256 gasoline) {
        return _gasoline;
    }

    function addGasoline(uint256 gasoline) public {
        _gasoline = _gasoline + gasoline;
    }

} 
  • 1
  • 2
  • 3
  • 4
  • 5
  • 6
  • 7
  • 8
  • 9
  • 10
  • 11
  • 12
  • 13
  • 14
  • 15
  • 16
  • 17
  • 18
  • 19

1、 状态变量

小汽车合约中的_gasoline就是我们定义的状态变量,类型是 uint256 类型。 该变量是存储在链上的,也就是说他的数据是被保存起来的,每次改动都会记录下来。因此我们在进行调用 addGasoline 函数时,会给这个小汽车加油成功,_gasoline 的值会变化,同样的我们调用 startUp 函数时,_gasoline 的值也会变化。

2、 函数

在CarContract1小汽车中,startUp()、getGasoline()、addGasoline(uint256 gasoline) 都是函数。这些函数有的是没有参数的,又叫无参函数,比如:startUp()、getGasoline()。有的是有参数的,就叫有参函数,比如:addGasoline(uint256 gasoline)。这些函数,有的有返回值,有的没有返回值,根据具体场景来定,一般call操作都是有返回值的,call操作不会改变合约状态。只有send操作,才会进行改变合约的状态。

3、 函数变量
我们都知道加不同的型号汽油会有不一样的效果,我们来给汽车换下不同的型号汽油,在汽车上我们放置一个桶名字是_bucket,用来装另一个型号的汽油。如果我们自己的两个容器里面有一个是空的,我们可以直接进行转换汽油。但是我们自己的两个容器中都有油的时候,两个容器很明显不能进行交换汽油,这个时候我们需要向隔壁的老李借一个桶 __tempBucket,这样三个容器就能进行转换油箱里面的汽油和桶里面的汽油进行对换了,换完以后把桶还回去。

我们进行在进行造一个新的小汽车名字是CarContract2,增加一个桶,设定变量为_bucket,作为桶。还需要记录当前汽车的油的型号。设定变量 _gasolineType 为当前油类型,默认是 1类型。设定一个函数 changeGasolineType,进行交换汽油类型,在设定一个函数进行查看当前汽车的类型 getGasolineType 。至此我们小汽车升级成功。

CarContract2.sol

pragma solidity ^0.6.0;

contract CarContract2 {
    uint256 _gasoline;
    uint256 _bucket;
    int _gasolineType = 1;

    function startUp() public {
        require(_gasoline >= 1, "gasoline is not haved");
        _gasoline = _gasoline - 1;
    }

    function getGasoline() public view returns(uint256 gasoline) {
        return _gasoline;
    }

    function addGasoline(uint256 gasoline) public {
        _gasoline += gasoline;
    }

    function changeGasolineType() public {
        require(_gasoline != 0 || _bucket != 0, "can not change");

        if (_gasoline == 0) {
            _gasoline = _bucket;
            _bucket = 0;
        } else if (_bucket == 0) {
            _bucket = _gasoline;
            _gasoline = 0;
        } else {
            uint256 __tempBucket = _gasoline;
            _gasoline = _bucket;
            _bucket = __tempBucket;
        }

        _gasolineType = -1 * _gasolineType;
    }

    function getGasolineType() public view returns(int gasolineType) {
        return _gasolineType;
    }

} 
  • 1
  • 2
  • 3
  • 4
  • 5
  • 6
  • 7
  • 8
  • 9
  • 10
  • 11
  • 12
  • 13
  • 14
  • 15
  • 16
  • 17
  • 18
  • 19
  • 20
  • 21
  • 22
  • 23
  • 24
  • 25
  • 26
  • 27
  • 28
  • 29
  • 30
  • 31
  • 32
  • 33
  • 34
  • 35
  • 36
  • 37
  • 38
  • 39
  • 40
  • 41
  • 42
  • 43
  • 44

上面的小汽车2代正式出炉,我来给大家讲下做了那些升级,首先我们的changeGasolineType内部定义了 __tempBucket 变量,该变量就是函数变量,是临时创建的并且不会被记录在链上的变量,也就是我们用完就还给隔壁老李了,还回去的时候桶是空的。

4、 函数修饰器

我们的小汽车还是很简单,我们在给他加一点东西,规定小汽车要想启动必须关闭车门。

下面我们再一次修改我们的小汽车,加一个_doorStatus状态变量作为我们的车门状态。再加连个函数getDoorStatus()、changeDoorStatus(),用来控制开门/关门并且查看门的状态。并且加入一个whenDoorClose()作为我们的判断器。

pragma solidity ^0.6.0;

contract CarContract3 {
    uint256 _gasoline;
    uint256 _bucket;
    int _gasolineType = 1;

    bool _doorStatus;

    modifier whenDoorClose() {
        require(!_doorStatus, "door is not close");
        _;

    }

    function startUp() public whenDoorClose {
        require(_gasoline >= 1, "gasoline is not haved");
        _gasoline = _gasoline - 1;
    }

    function getGasoline() public view returns(uint256 gasoline) {
        return _gasoline;
    }

    function addGasoline(uint256 gasoline) public {
        _gasoline += gasoline;
    }

    function changeGasoline() public {
        require(_gasoline != 0 || _bucket != 0, "can not change");

        if (_gasoline == 0) {
            _gasoline = _bucket;
            _bucket = 0;
        } else if (_bucket == 0) {
            _bucket = _gasoline;
            _gasoline = 0;
        } else {
            uint256 __tempBucket = _gasoline;
            _gasoline = _bucket;
            _bucket = __tempBucket;
        }

        _gasolineType = -1 * _gasolineType;
    }

    function getGasolineType() public view returns(int gasolineType) {
        return _gasolineType;
    }

    function getDoorStatus() public view returns(bool doorStatus) {
        return _doorStatus;
    }

    function changeDoorStatus() public {
        _doorStatus = ! _doorStatus;
    }
} 
  • 1
  • 2
  • 3
  • 4
  • 5
  • 6
  • 7
  • 8
  • 9
  • 10
  • 11
  • 12
  • 13
  • 14
  • 15
  • 16
  • 17
  • 18
  • 19
  • 20
  • 21
  • 22
  • 23
  • 24
  • 25
  • 26
  • 27
  • 28
  • 29
  • 30
  • 31
  • 32
  • 33
  • 34
  • 35
  • 36
  • 37
  • 38
  • 39
  • 40
  • 41
  • 42
  • 43
  • 44
  • 45
  • 46
  • 47
  • 48
  • 49
  • 50
  • 51
  • 52
  • 53
  • 54
  • 55
  • 56
  • 57
  • 58
  • 59

上面我们的3代小汽车已经完成了,whenDoorClose() 就是我们定义的函数修饰器 使用modifier 来定义的。

5、 事件

每次都到没有油了才去加油,我们加一个功能,当行驶时油量低于5的时候我们要进行预警。

我们加入一个 gasolineAlarm 事件,该事件有一个参数,当前的油量。这样我们在启动的函数中加入这个事件的调用,判断本次使用后的油量是否小于等于5,是的话进行调用该事件

pragma solidity ^0.6.0;

contract CarContract4 {
    uint256 _gasoline;
    uint256 _bucket;
    int _gasolineType = 1;

    bool _doorStatus;

    modifier whenDoorClose() {
        require(!_doorStatus, "door is not close");
        _;

    }

    event gasolineAlarm(uint256 gasoline);

    function startUp() public whenDoorClose {
        require(_gasoline >= 1, "gasoline is not haved");
        _gasoline = _gasoline - 1;
        if (_gasoline <= 5) {
            emit gasolineAlarm(_gasoline);
        }
    }

    function getGasoline() public view returns(uint256 gasoline) {
        return _gasoline;
    }

    function addGasoline(uint256 gasoline) public {
        _gasoline += gasoline;
    }

    function changeGasoline() public {
        require(_gasoline != 0 || _bucket != 0, "can not change");

        if (_gasoline == 0) {
            _gasoline = _bucket;
            _bucket = 0;
        } else if (_bucket == 0) {
            _bucket = _gasoline;
            _gasoline = 0;
        } else {
            uint256 __tempBucket = _gasoline;
            _gasoline = _bucket;
            _bucket = __tempBucket;
        }

        _gasolineType = -1 * _gasolineType;
    }

    function getGasolineType() public view returns(int gasolineType) {
        return _gasolineType;
    }

    function getDoorStatus() public view returns(bool doorStatus) {
        return _doorStatus;
    }

    function changeDoorStatus() public {
        _doorStatus = ! _doorStatus;
    }
} 
  • 1
  • 2
  • 3
  • 4
  • 5
  • 6
  • 7
  • 8
  • 9
  • 10
  • 11
  • 12
  • 13
  • 14
  • 15
  • 16
  • 17
  • 18
  • 19
  • 20
  • 21
  • 22
  • 23
  • 24
  • 25
  • 26
  • 27
  • 28
  • 29
  • 30
  • 31
  • 32
  • 33
  • 34
  • 35
  • 36
  • 37
  • 38
  • 39
  • 40
  • 41
  • 42
  • 43
  • 44
  • 45
  • 46
  • 47
  • 48
  • 49
  • 50
  • 51
  • 52
  • 53
  • 54
  • 55
  • 56
  • 57
  • 58
  • 59
  • 60
  • 61
  • 62
  • 63
  • 64

我们已经更新到第四代小汽车了,四代小汽车的gasolineAlarm 就是我们定义的事件,事件是会在虚拟机上记录一条日志的,我么可以通过查询日志的方式得到事件内容。

6、 结构

我们的汽车感觉成熟了,这个时候我们要给我们的汽车打上一些特性,比如颜色,比如车轮数,比如车门数等等。

我们在小汽车里面加入CarInfo结构体,里面可以定义color颜色,wheelNum 车轮数等等,然后我们加入设置和获取的函数:setCarInfo()、getCarInfo(), 这样我们的小汽车就有了一些参数了。

pragma solidity ^0.6.0;

contract CarContract5 {
    uint256 _gasoline;
    uint256 _bucket;
    int _gasolineType = 1;
    bool _doorStatus;

    struct CarInfo {
        string color;
        uint8 wheelNum;
    }

    CarInfo _carInfo;

    modifier whenDoorClose() {
        require(!_doorStatus, "door is not close");
        _;

    }

    event gasolineAlarm(uint256 gasoline);

    function startUp() public whenDoorClose {
        require(_gasoline >= 1, "gasoline is not haved");
        _gasoline = _gasoline - 1;
        if (_gasoline <= 5) {
            emit gasolineAlarm(_gasoline);
        }
    }

    function getGasoline() public view returns(uint256 gasoline) {
        return _gasoline;
    }

    function addGasoline(uint256 gasoline) public {
        _gasoline += gasoline;
    }

    function changeGasoline() public {
        require(_gasoline != 0 || _bucket != 0, "can not change");

        if (_gasoline == 0) {
            _gasoline = _bucket;
            _bucket = 0;
        } else if (_bucket == 0) {
            _bucket = _gasoline;
            _gasoline = 0;
        } else {
            uint256 __tempBucket = _gasoline;
            _gasoline = _bucket;
            _bucket = __tempBucket;
        }

        _gasolineType = -1 * _gasolineType;
    }

    function getGasolineType() public view returns(int gasolineType) {
        return _gasolineType;
    }

    function getDoorStatus() public view returns(bool doorStatus) {
        return _doorStatus;
    }

    function changeDoorStatus() public {
        _doorStatus = ! _doorStatus;
    }

    function setCarInfo(string memory color, uint8 wheelNum) public {
        _carInfo.color = color;
        _carInfo.wheelNum = wheelNum;

        //_carInfo = CarInfo(color, wheelNum);

    }

    function getCarInfo() public view returns(string memory color, int wheelNum) {
        color = _carInfo.color;
        wheelNum = _carInfo.wheelNum;
    }
} 
  • 1
  • 2
  • 3
  • 4
  • 5
  • 6
  • 7
  • 8
  • 9
  • 10
  • 11
  • 12
  • 13
  • 14
  • 15
  • 16
  • 17
  • 18
  • 19
  • 20
  • 21
  • 22
  • 23
  • 24
  • 25
  • 26
  • 27
  • 28
  • 29
  • 30
  • 31
  • 32
  • 33
  • 34
  • 35
  • 36
  • 37
  • 38
  • 39
  • 40
  • 41
  • 42
  • 43
  • 44
  • 45
  • 46
  • 47
  • 48
  • 49
  • 50
  • 51
  • 52
  • 53
  • 54
  • 55
  • 56
  • 57
  • 58
  • 59
  • 60
  • 61
  • 62
  • 63
  • 64
  • 65
  • 66
  • 67
  • 68
  • 69
  • 70
  • 71
  • 72
  • 73
  • 74
  • 75
  • 76
  • 77
  • 78
  • 79
  • 80
  • 81
  • 82
  • 83

我们的5代小汽车加入了CarInfo就是结构体,结构体中不能进行设置初值,我们能把一类的属性等进行分类的放在结构体中,可以充当我们的数据模型。

7、 枚举类

我们的小汽车想要开门,需要打开车锁,车锁是一种状态,开/关。

我们加入枚举类DoorSwitch,定义两个状态open,close 。在定义whenDoorSwitch函数修饰器,进行判断。

pragma solidity ^0.6.0;

contract CarContract6 {
    uint256 _gasoline;
    uint256 _bucket;
    int _gasolineType = 1;
    bool _doorStatus;

    enum DoorSwitch{ open, close }

    DoorSwitch _doorSwitch;

    struct CarInfo {
        string color;
        uint8 wheelNum;
    }

    CarInfo _carInfo;

    modifier whenDoorClose() {
        require(!_doorStatus, "door is not close");
        _;

    }

    modifier whenDoorSwitch() {
        if (!_doorStatus) {
            require(_doorSwitch == DoorSwitch.open, "door switch is close");
        }
        _;
    }

    event gasolineAlarm(uint256 gasoline);

    function startUp() public whenDoorClose {
        require(_gasoline >= 1, "gasoline is not haved");
        _gasoline = _gasoline - 1;
        if (_gasoline <= 5) {
            emit gasolineAlarm(_gasoline);
        }
    }

    function getGasoline() public view returns(uint256 gasoline) {
        return _gasoline;
    }

    function addGasoline(uint256 gasoline) public {
        _gasoline += gasoline;
    }

    function changeGasoline() public {
        require(_gasoline != 0 || _bucket != 0, "can not change");

        if (_gasoline == 0) {
            _gasoline = _bucket;
            _bucket = 0;
        } else if (_bucket == 0) {
            _bucket = _gasoline;
            _gasoline = 0;
        } else {
            uint256 __tempBucket = _gasoline;
            _gasoline = _bucket;
            _bucket = __tempBucket;
        }

        _gasolineType = -1 * _gasolineType;
    }

    function getGasolineType() public view returns(int gasolineType) {
        return _gasolineType;
    }

    function getDoorStatus() public view returns(bool doorStatus) {
        return _doorStatus;
    }

    function changeDoorStatus() public {
        _doorStatus = ! _doorStatus;
    }

    function setCarInfo(string memory color, uint8 wheelNum) public {
        _carInfo.color = color;
        _carInfo.wheelNum = wheelNum;

        //_carInfo = CarInfo(color, wheelNum);
    }

    function getCarInfo() public view returns(string memory color, int wheelNum) {
        color = _carInfo.color;
        wheelNum = _carInfo.wheelNum;
    }

    function setDoorSwitch(DoorSwitch doorSwitch) public {
        _doorSwitch = doorSwitch; 
    }
} 
  • 1
  • 2
  • 3
  • 4
  • 5
  • 6
  • 7
  • 8
  • 9
  • 10
  • 11
  • 12
  • 13
  • 14
  • 15
  • 16
  • 17
  • 18
  • 19
  • 20
  • 21
  • 22
  • 23
  • 24
  • 25
  • 26
  • 27
  • 28
  • 29
  • 30
  • 31
  • 32
  • 33
  • 34
  • 35
  • 36
  • 37
  • 38
  • 39
  • 40
  • 41
  • 42
  • 43
  • 44
  • 45
  • 46
  • 47
  • 48
  • 49
  • 50
  • 51
  • 52
  • 53
  • 54
  • 55
  • 56
  • 57
  • 58
  • 59
  • 60
  • 61
  • 62
  • 63
  • 64
  • 65
  • 66
  • 67
  • 68
  • 69
  • 70
  • 71
  • 72
  • 73
  • 74
  • 75
  • 76
  • 77
  • 78
  • 79
  • 80
  • 81
  • 82
  • 83
  • 84
  • 85
  • 86
  • 87
  • 88
  • 89
  • 90
  • 91
  • 92
  • 93
  • 94
  • 95
  • 96
  • 97
  • 98

我们已经更新到6代小汽车了,在6代小汽车中我们加入了DoorSwitch车门的开关,使用的就是枚举定义的,在实际项目中枚举定义的话,一般使用在状态和类型的定义上,方便进行管理。

到此我们的小汽车已经完成了,经历了6代的更新,相信大家对于本节课程有空了一定的了解了。智能合约包含的状态变量、函数、函数变量、函数修饰器、事件、结构、枚举类都已经在制作和升级小汽车中使用了。

第三讲 数据类型

在solidity中有专门的数据类型,什么是数据类型呢,我们可以认为数字是类型,是否是类型,地址是类型等。在solidity中存在以下常用的类型,uint/int、bool、 address、 mapping、bytes、string、fixed/ufixed 常用的类型。

pragma solidity ^0.6.0;

contract Test {
    uint v1 = 1;
    int v2 = -2;
    bool v3 = true;
    address v4 = 0x8a5fa31F2bf83812ECd8E5Ef1878dD12bBaDb40C;
    mapping(uint => uint) v5;
    bytes v6 = "0x123"; 
    string v7 = "asd";
    fixed v8 = 1.3;
    ufixed v9 = 1.2;
} 
  • 1
  • 2
  • 3
  • 4
  • 5
  • 6
  • 7
  • 8
  • 9
  • 10
  • 11
  • 12
  • 13
  • 14

1、 uint/int类型

uint/int 类型都是整型,也就是都是整数。1、2、3、4类似的数没有小数点。区别是uint是没有符号的。看代码中的 v1 就是无符号整数,v2就是有符号整数。默认是0

2、bool

bool 中文是布尔类型,表示是/否的类型。v3就是bool类型,只有两个值 true/false,默认是false

3、address

address是地址类型,存储地址的,账户地址,合约地址等,都可以。

4、mapping

映射类型示例中的代码不是很全,我来解释下,实际上他是一个key-value模型,也就是一个key对应一个value。比如我们说小明,我们就是到小明这个人。就是这个道理。

5、bytes

定长数组,就是说他的长度是固定的,不能改变,设定是多少就是多少。

6、string

字符串类型,可以放字符串,长度是255位二级制数。

7、fixed/ufixed

浮点类型,就是带有小数点的,1.2、1.4、1.9这类数值。也是分为有无符号项。

第四讲 控制语句

在solidity中可以使用以下控制结构,有 if,else,while,for,break,continue,return,? : 我们来以此介绍这些结构。

1、if else语句

大家肯定好奇什么是if else语句。他就是我们说的如果 否者。也就是说如果我怎么样否者我怎么样。注意else只能与if一同使用,大家一起来看下面代码:

pragma solidity ^0.6.0;

contract Test {
    uint256 temp;

    function test1(bool doorSwitch) public {
        if (doorSwitch) {
            temp = 1;
        }
    }

    function test2(bool doorSwitch) public {
        if (doorSwitch) {
            temp = 1;
        }
        temp = 2;
    }

    function test3(bool doorSwitch) public {
        if (doorSwitch) {
            temp = 1;
        } else {
            temp = 2;
        }
    }

    function getTemp() public view returns(uint256){
        return temp;
    }
} 
  • 1
  • 2
  • 3
  • 4
  • 5
  • 6
  • 7
  • 8
  • 9
  • 10
  • 11
  • 12
  • 13
  • 14
  • 15
  • 16
  • 17
  • 18
  • 19
  • 20
  • 21
  • 22
  • 23
  • 24
  • 25
  • 26
  • 27
  • 28
  • 29
  • 30
  • 31
  • 32

上面代码中我们定义了三个测试方法,以及一个获取temp值的方法。第一个测试方法表示如果我们传进去的doorSwitch是true,门是开的,那么temp就等于1,否者doorSwitch等于false的话temp值不变。第二个测试方法表示如果我们传进去的doorSwitch是true,门是开的,那么temp就先等于1,然后等于2,否者doorSwitch等于false的话temp直接等于2。第三个测试方法表示如果我们传进去的doorSwitch是true,门是开的,那么temp就等于1,否者doorSwitch等于false的话temp等于2。

2、while语句

while 语句是循环语句,表示满足条件就一直循环,一般我么会和break来使用,当达到某种情况进行跳出循环,可以让循环体自动结束循环。

pragma solidity ^0.6.0;

contract Test {
    function test1() public {
        int a = 1;
        while(true) {
            if (a == 5) {
                break;
            }
            a++;
        }
    }

    function test2() public {
        int a = 1;
        while(a != 5) {

            a++;
        }
    }
} 
  • 1
  • 2
  • 3
  • 4
  • 5
  • 6
  • 7
  • 8
  • 9
  • 10
  • 11
  • 12
  • 13
  • 14
  • 15
  • 16
  • 17
  • 18
  • 19
  • 20
  • 21
  • 22

上面两个函数内部都有一个循环,实际上两个循环的效果是一样的,有一些细微的差别,需要根据具体业务场景分析了,不建议使用while 一不小心死循环就不好玩了。

3、for循环

for循环概念直接上代码大家好理解些。

pragma solidity ^0.6.0;

contract Test {
    function test1() public {
        for(uint8 i = 0; i < 10; i ++) {
            ...
        }
    }
} 
  • 1
  • 2
  • 3
  • 4
  • 5
  • 6
  • 7
  • 8
  • 9
  • 10

上面就是一个常用的for循环使用方式,循环10次 “…” 的内容。

4、continue 语句

continue语句是跳过本次循环进入下一次循环,来看代码:

pragma solidity ^0.6.0;

contract Test {
    function test1() public {
        for(uint8 i = 0; i < 10; i ++) {
            if (i == 3) {
                continue;
            }

            ...
        }
    }
} 
  • 1
  • 2
  • 3
  • 4
  • 5
  • 6
  • 7
  • 8
  • 9
  • 10
  • 11
  • 12
  • 13
  • 14

上面的代码是如果i = 3后跳过这次循环。

5、return 语句

return 是返回的命令当遇到return时就是表示结束了。看代码:

pragma solidity ^0.6.0;

contract Test {
    function test1() public {
        for(uint8 i = 0; i < 10; i ++) {
            if (i == 3) {
                return;
            }

            ...
        }
    }
} 
  • 1
  • 2
  • 3
  • 4
  • 5
  • 6
  • 7
  • 8
  • 9
  • 10
  • 11
  • 12
  • 13
  • 14

上面的代码可以看出,运行到i = 3时,程序直接结束。

6、 结束

到此我们的控制语句基本学习结束。这些概念每个语言都差不多,所以很重要。多练小伙伴!

结束

学习完上面的课程大家对于智能合约基本已经学习好了,但是还是缺乏使用,只是知道有啥东西,什么时候用不知道,这个时候需要大家进行锻炼了,多写一些小东西练习。

分享此文一切功德,皆悉回向给文章原作者及众读者.
免责声明:蓝蓝设计尊重原作者,文章的版权归原作者。如涉及版权问题,请及时与我们取得联系,我们立即更正或删除。
来源:csdn
作者:

蓝蓝设计www.lanlanwork.com )是一家专注而深入的界面设计公司,为期望卓越的国内外企业提供卓越的UI界面设计、BS界面设计 、 cs界面设计 、 ipad界面设计 、 包装设计 、 图标定制 、 用户体验 、交互设计、 网站建设 平面设计服务


一、Conflux 网页钱包创建

前端达人

相信每一位新加入的小伙伴都有一个疑问,去中心化的钱包到底是什么,如何拥有一个自己钱包,如何使用这个钱包吧,下面我将会为大家讲解如何创建钱包、导入钱包、使用钱包三个方面讲解下。

一、创建钱包

首先大家进入钱包网站登录页面 (大家可以将该网址收藏), 可以看到页面上有两个选择,一个是创建钱包,一个是进入钱包(即导入钱包),我们先讲创建钱包然后在讲如何导入钱包。

我们点击创建钱包,将会弹出下面页面中的密码输入框,这里大家输入一个记得住得的密码(如果记不住写在小本本上藏起来),本教程输入密码为 000000000 然后点击继续。

我们会进入下面的页面,提示大家进行下载Keystore文件,大家点击下载就好了,这里的keystore千万不要丢了,和上面密码一样很重要。在进行导入钱包时,会根据大家的keystore文件以及密码进行计算出大家的私钥,因此很重要,最好备份到U盘中,以及打印一份。

下面是本次教程下载的keystore文件。

{"version":3,"id":"74e5b4a2-4894-4144-837c-61479487a565","address":"ad9af053f4ffed7a061226663ec50ce46736da9a","crypto":{"ciphertext":"eaeced1cd595adb51832c03feca291794eb593270e733776543ea4f095110bfb","cipherparams":{"iv":"73ca3e626b5625817679f43e2a81ec10"},"cipher":"aes-128-ctr","kdf":"scrypt","kdfparams":{"dklen":32,"salt":"4e914d37a14cd522dc70dd88e079170481e82d45418cfd34a5c1ccbf8d0a409c","n":8192,"r":8,"p":1},"mac":"16769410e64e4ed4e0b89c43a84a338569696f46cf9ec604b82c87d4e99385ea"}} 
  • 1

我们下载好以后,会进入看到下面的页面弹窗。我们点击进入钱包。

点击进入钱包后,会进入个人的钱包页面,这个钱包中有CFX(测试币)、以及FC(合约币)。会发现都是0余额,很正常,刚刚创建嘛,是0就对了。

到此我们就有了一个钱包了,是不是很简单,温馨提示大家,密码 + keystore文件很重要,不要搞没了,没了就找不回来了。也不要公开,别人拿到了以后,就相当于知道你的钱包了,就可以把你的余额等都转走。

二、导入钱包

上面我们讲解了如何创建钱包,下面我们来讲解下如何导入钱包,已经使用钱包的小伙伴已经发现了吧,当我们刷新浏览器页面时,会直接进入到钱包登录页面,这个时候我们已经创建了钱包,肯定不会在创建一个了,那么我们就看下如何进入钱包(即导入钱包)吧。我们点击进入钱包,

会弹出下面页面,我们继续点击继续按钮

会让我们选择文件,这里直接选择我们在上面创建的钱包时,下载的keystore文件,点击打开

这里会让我们输入密码,就是上面创建钱包时的密码,输入密码后点击进入

是不是进入了大家熟悉的钱包页面啦!

导入钱包是不是很简单,这会知道keystore和密码重要性了吧!!!

三、钱包使用

小伙伴是不是还是很懵,我有了钱包能做什么,我来给大家介绍下钱包如何使用。大家可以看到下面钱包页面上我标注的10个功能序号。我将为大家介绍这10个功能。

功能1,复制钱包公钥地址,这个钱包公钥地址,可以进行公开,这个合约地址就是大家进行接受转账的地址,每个人都有一个唯一的公钥地址。

功能2, 钱包公钥地址二维码,可以使用支持扫码的dapp进行扫码来解析出来你的公钥地址,同样是可以公开的。

功能3, 区块浏览器,可以在该页面查询某个账户地址余额,出块情况,交易hash等等信息。

功能4,钱包私钥,这个私钥很重要,和上面的keystore+密码是一样重要的,可以直接通过私钥,进行进入你的钱包中,因此,不能进行公开。

功能5,cfx发送, 这里点击发送后会让我们输入转出cfx余额,以及发送地址,还有燃油费等信息,大家可以在测试网建两个账号相互转转,挺有意思的。

功能6,cfx接收,这个就是功能1和功能2的集合体。

功能7,申领测试币,可以申请测试币,每次会申请100测试币,大家随便使用,反正上线后会清除的,没啥用。

功能8,fc发送,这个功能可以在两个账户间来回转下,大家不要随便转给别人,不然就找不回来了。这里的fc是真正的可以在上线后也是能用的。

功能9,fc接收,和功能6一样的东西。

功能10,这个是查看合约信息的情况的入口。可以看到总量等信息。

四、钱包转账

我们以CFX钱包账户来进行转账,转给某个社区的小伙伴的账户地址(0x10898FD8a20C28A2F2Ea46428cAfBD2B58c1E363)这个小伙伴是谁我也不知道。我们点击CFX下面的发送按钮。进入下面页面

我们在发送至中填入这个小伙伴地址,发送cfx为10cfx.

点击发送看到下面的弹窗,我们这次不点击那个确定点击下面查看详情

可以看到进入了区块浏览器中了。里面的交易hash是本次交易的hash通过这个可以查找到本次交易情况,发送方就是你本人的公钥地址,接收方是对方的公钥地址,价值就是你转了多少cfx,差不多知道这些信息已经够了。

到此我们钱包课程已经基本介绍结束。

五、结束

感谢小伙伴们阅读本文。有对conflux感兴趣的小伙伴可以添加我微信好友(15832013094),我拉大家进入conflux社区群。一起共同学习进步。


分享此文一切功德,皆悉回向给文章原作者及众读者.
免责声明:蓝蓝设计尊重原作者,文章的版权归原作者。如涉及版权问题,请及时与我们取得联系,我们立即更正或删除。
来源:csdn
作者:

蓝蓝设计www.lanlanwork.com )是一家专注而深入的界面设计公司,为期望卓越的国内外企业提供卓越的UI界面设计、BS界面设计 、 cs界面设计 、 ipad界面设计 、 包装设计 、 图标定制 、 用户体验 、交互设计、 网站建设 平面设计服务

Conflux智能合约——1.入门篇

前端达人

Conflux移植了EVM,兼容以太坊的合约虚拟机,使用solidity作为合约语言。所以,开发需要使用remix进行合约十六进制码的生成。

Conflux合约需要相应的sdk部署到链上,形成智能合约地址,再使用call或send的方法,调用在链上的合约 。

我们使用node.js作为开发环境,需要安装node.js的环境和java sdk。node.js使用express框架,而合约部署需要对应的 js-conflux-sdk(npm install即为最新版)。建立文件夹sol,存放下面的.sol和两个.json文件,其它安装和检查办法略去2000字。

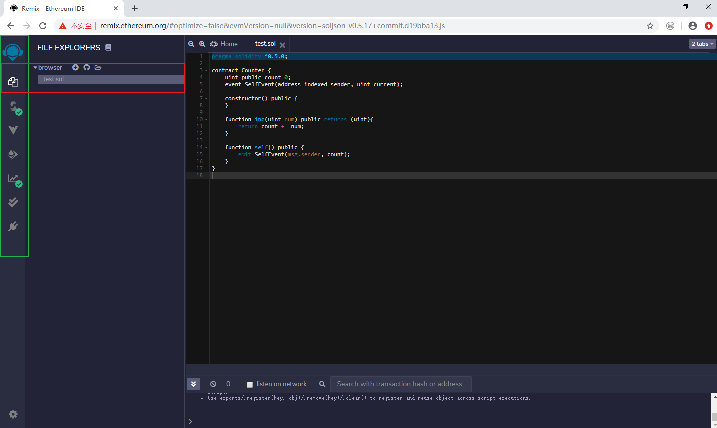
remix下删除所有的原来.sol文件,添加自己的test.sol文件,代码:

pragma solidity ^0.5.0;

contract Counter { uint public count=0; event SelfEvent(address indexed sender, uint current);

    constructor() public {
    } function inc(uint num) public returns (uint){ return count += num;
    } function self() public { emit SelfEvent(msg.sender, count);
    }
} 

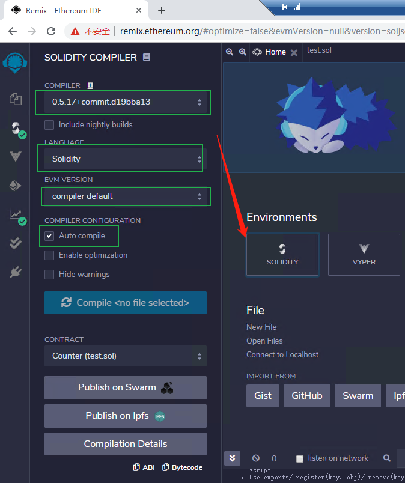
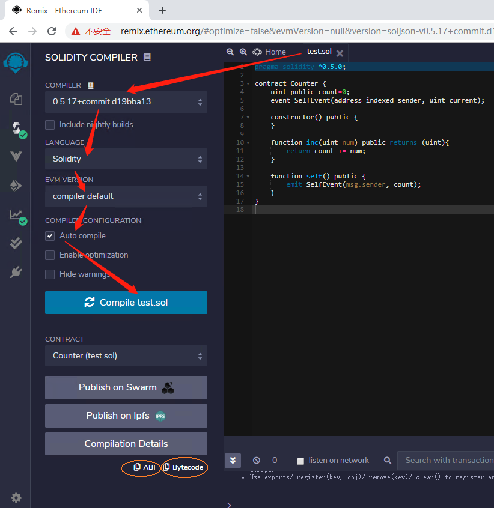
然后按图示选择配置,完成编译,分别生成一个abi.json和一个bytecode.json。

将bytecode文件里的bytecode字段保留值,其余内容都删除,另存为code.json。code.json内的内容仅为:“0x60.......”。例如:

"0x6080604052600080553480156100145......5056fea265627a7a72315820b814......0ff600baf64736f6c63430005110032"

写调用合约的代码deploy.js或者call.js。deploy.js 源码:

 // 私钥地址,即所用conflux的钱包私钥,注意保密 const PRIVATE_KEY = '0x20f9169d40801955faada641cdb029f8e42c581c0c991a62753c736a0a168e5e'; // 合约地址 const CONTRACT = ''; const { Conflux } = require('js-conflux-sdk'); async function main() { const cfx = new Conflux({ // 节点的地址和端口号,这里用的测试网。实际最好用最新的主网地址 url: 'http://testnet-jsonrpc.conflux-chain.org:12537',
    defaultGasPrice: 100,
    defaultGas: 1000000,
    logger: console,
  }); const account = cfx.Account(PRIVATE_KEY); // create account instance console.log(account.address); // create contract instance const contract = cfx.Contract({
    abi: require('./sol/abi.json'),
    code: require('./sol/code.json'),
  }); // deploy the contract const contractinfo = await contract.constructor()

    .sendTransaction({ from: account,

      gas: 100000000, // if not set gas, will use 'cfx.defaultGas' })
    .confirmed(); console.log(contractinfo.contractCreated);
}
main().catch(e => console.error(e)); 

而call.js源码:

 const { Conflux, util } = require('js-conflux-sdk'); // 这个地址是上面打印出来的 contractAddress 变量,钱包地址及私钥 const contractAddress = '0x2c692d83b1e4781fa9d894924f8a027c401ea9fa'; const PRIVATE_KEY = '0x20f9169d40801955faada641cdb029f8e42c581c0c991a62753c736a0a168e5e'; async function main() { const cfx = new Conflux({
    url: 'http://testnet-jsonrpc.conflux-chain.org:12537',
    defaultGasPrice: 100,
    defaultGas: 1000000,
  }); const contract = cfx.Contract({
    address : contractAddress,
    abi: require('./sol/abi.json'),
  }); // 不进行记录。注意,这里的inc就是定义在test.sol中的方法。.sol文件定义合约方法,被外部调用以实现应用目的 console.log("1输出" + await contract.inc(10)); const account = cfx.Account(PRIVATE_KEY); // 进行记录并花费燃油 const balance = await contract.inc(10).sendTransaction({ from: account }).confirmed();

}
main().catch(e => console.error(e)); 

call.js里的inc()就是定义在test.sol中的方法。.sol文件定义合约方法,被外部调用以实现应用目的。

将deploy.js和call.js放置在nodejs的工作目录下。

如果.js中的函数无错,链上节点正常使用,sdk版本匹配,启动node deploy.js或node call.js即可。如果有错误会有明显的error提示。


分享此文一切功德,皆悉回向给文章原作者及众读者.
免责声明:蓝蓝设计尊重原作者,文章的版权归原作者。如涉及版权问题,请及时与我们取得联系,我们立即更正或删除。
来源:开源博客

蓝蓝设计www.lanlanwork.com )是一家专注而深入的界面设计公司,为期望卓越的国内外企业提供卓越的UI界面设计、BS界面设计 、 cs界面设计 、 ipad界面设计 、 包装设计 、 图标定制 、 用户体验 、交互设计、 网站建设 平面设计服务

日历

链接

个人资料

蓝蓝设计的小编 http://www.lanlanwork.com

存档