首页

移动端、PC端 网页特效

前端达人

移动端网页特效

触屏事件

移动端浏览器兼容性较好,不需要考虑以前 JS 的兼容性问题,可以放心的使用原生 JS 书写效果,但是移动端也有自己独特的地方。比如触屏事件 touch(也称触摸事件),Android 和 IOS 都有。

touch 对象代表一个触摸点。触摸点可能是一根手指,也可能是一根触摸笔。触屏事件可响应用户手指(或触控笔)对屏幕或者触控板操作。

常见的触屏事件:
在这里插入图片描述
触摸事件对象(TouchEvent)

TouchEvent 是一类描述手指在触摸平面(触摸屏、触摸板等)的状态变化的事件。这类事件用于描述一个或多个触点,使开发者可以检测触点的移动,触点的增加和减少,等等

touchstart、touchmove、touchend 三个事件都会各自有事件对象。

触摸事件对象常见对象列表:
在这里插入图片描述
因为平时都是给元素注册触摸事件,所以重点记住 targetTocuhes

移动端拖动元素JS代码实现:

// (1) 触摸元素 touchstart:  获取手指初始坐标,同时获得盒子原来的位置 // (2) 移动手指 touchmove:  计算手指的滑动距离,并且移动盒子 // (3) 离开手指 touchend: var div = document.querySelector('div'); var startX = 0; //获取手指初始坐标 var startY = 0; var x = 0; //获得盒子原来的位置 var y = 0; div.addEventListener('touchstart', function(e) { //  获取手指初始坐标 startX = e.targetTouches[0].pageX; startY = e.targetTouches[0].pageY; x = this.offsetLeft; y = this.offsetTop; }); div.addEventListener('touchmove', function(e) { //  计算手指的移动距离: 手指移动之后的坐标减去手指初始的坐标 var moveX = e.targetTouches[0].pageX - startX; var moveY = e.targetTouches[0].pageY - startY; // 移动我们的盒子 盒子原来的位置 + 手指移动的距离 this.style.left = x + moveX + 'px'; this.style.top = y + moveY + 'px'; e.preventDefault(); // 阻止屏幕滚动的默认行为 }); 
  • 1
  • 2
  • 3
  • 4
  • 5
  • 6
  • 7
  • 8
  • 9
  • 10
  • 11
  • 12
  • 13
  • 14
  • 15
  • 16
  • 17
  • 18
  • 19
  • 20
  • 21
  • 22
  • 23
  • 24
  • 25

classList属性

classList属性是HTML5新增的一个属性。返回元素的类名,该属性用在元素中添加、移除及切换CSS类

<style> .bg { background-color: black; } </style> <body> <div class="one two"></div> <button> 开关灯</button> <script> // classList 返回元素的类名 var div = document.querySelector('div'); // console.log(div.classList[1]); // 1. 添加类名  是在后面追加类名不会覆盖以前的类名 注意前面不需要加. div.classList.add('three'); // 2. 删除类名 div.classList.remove('one'); // 3. 切换类 var btn = document.querySelector('button'); btn.addEventListener('click', function() { document.body.classList.toggle('bg'); }) </script> </body> 
  • 1
  • 2
  • 3
  • 4
  • 5
  • 6
  • 7
  • 8
  • 9
  • 10
  • 11
  • 12
  • 13
  • 14
  • 15
  • 16
  • 17
  • 18
  • 19
  • 20
  • 21
  • 22
  • 23
  • 24

常用开发插件

移动端 要求的是快速开发,所以经常会借助于一些插件来帮完成操作

JS 插件是 js 文件,它遵循一定规范编写,方便程序展示效果,拥有特定功能且方便调用。如轮播图和瀑布流插件

插件的使用:

  1. 引入 js 插件文件
  2. 按照规定语法使用

特点: 它一般是为了解决某个问题而专门存在,其功能单一,并且比较小。比如移动端常见插件:iScroll、Swiper、SuperSlider

PC端网页特效

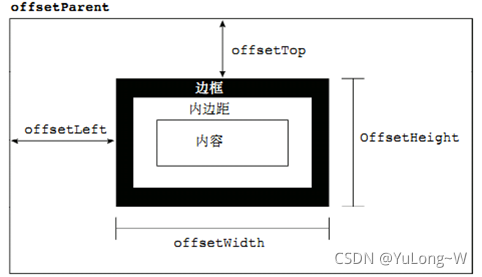
偏移量系列 offset

offset 翻译过来就是偏移量, 使用 offset 系列相关属性可以 动态 的得到该元素的位置(偏移)、大小等。

  • 获得元素距离带有定位父元素的位置
  • 获得元素自身的大小(宽度高度)
  • 注意: 返回的数值都不带单位

常用属性:
在这里插入图片描述
图示:
在这里插入图片描述

offset与style区别:

offset style
可以得到任意样式表中的样式值 只能得到行内样式表中的样式值
offset系列获得的数值是没有单位的 style.width 获得的是带有单位的字符串
offsetWidth 包含padding+border+width style.width 获得不包含padding和border 的值
offsetWidth 等属性是只读属性,只能获取不能赋值 style.width 是可读写属性,可以获取也可以赋值
获取元素大小位置,用offset更合适 元素更改值,则需要用style改变

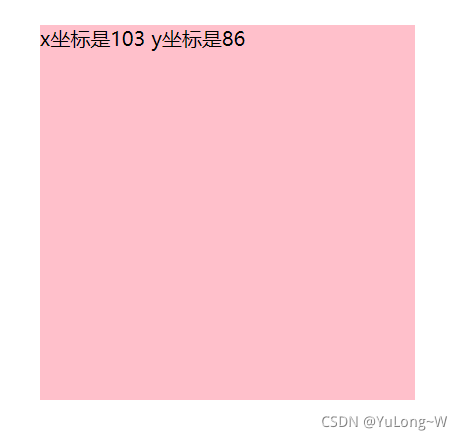
案例——获取鼠标在盒子内的坐标:

效果展示:
在这里插入图片描述

实现代码(JS):

// 在盒子内点击, 想要得到鼠标距离盒子左右的距离。 // 首先得到鼠标在页面中的坐标( e.pageX, e.pageY) // 其次得到盒子在页面中的距离(box.offsetLeft, box.offsetTop) // 用鼠标距离页面的坐标减去盒子在页面中的距离, 得到 鼠标在盒子内的坐标 var box = document.querySelector('.box'); box.addEventListener('mousemove', function(e) { // console.log(e.pageX); // console.log(e.pageY); // console.log(box.offsetLeft); var x = e.pageX - this.offsetLeft; var y = e.pageY - this.offsetTop; this.innerHTML = 'x坐标是' + x + ' y坐标是' + y; }) 
  • 1
  • 2
  • 3
  • 4
  • 5
  • 6
  • 7
  • 8
  • 9
  • 10
  • 11
  • 12
  • 13

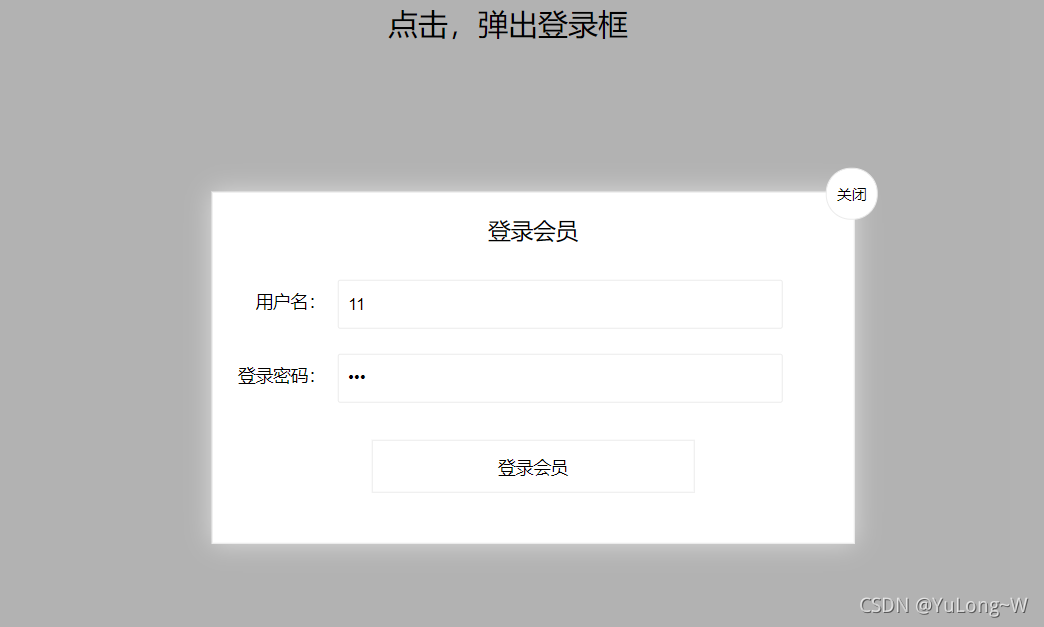
案例——模态拖拽框:

  • 点击弹出层, 会弹出模态框, 并且显示灰色半透明的遮挡层。
  • 点击关闭按钮,可以关闭模态框,并且同时关闭灰色半透明遮挡层。
  • 鼠标放到模态框最上面一行,可以按住鼠标拖拽模态框在页面中移动。
  • 鼠标松开,可以停止拖动模态框移动。

效果展示:
在这里插入图片描述

实现代码:

<head lang="en"> <meta charset="UTF-8"> <title></title> <style> .login-header { width: 100%; text-align: center; height: 30px; font-size: 24px; line-height: 30px; } ul,li,ol,dl,dt,dd,div,p,span,h1,h2,h3,h4,h5,h6,a { padding: 0px; margin: 0px; } .login { display: none; width: 512px; height: 280px; position: fixed; border: #ebebeb solid 1px; left: 50%; top: 50%; background: #ffffff; box-shadow: 0px 0px 20px #ddd; z-index: 9999; transform: translate(-50%, -50%); } .login-title { width: 100%; margin: 10px 0px 0px 0px; text-align: center; line-height: 40px; height: 40px; font-size: 18px; position: relative; cursor: move; } .login-input-content { margin-top: 20px; } .login-button { width: 50%; margin: 30px auto 0px auto; line-height: 40px; font-size: 14px; border: #ebebeb 1px solid; text-align: center; } .login-bg { display: none; width: 100%; height: 100%; position: fixed; top: 0px; left: 0px; background: rgba(0, 0, 0, .3); } a { text-decoration: none; color: #000000; } .login-button a { display: block; } .login-input input.list-input { float: left; line-height: 35px; height: 35px; width: 350px; border: #ebebeb 1px solid; text-indent: 5px; } .login-input { overflow: hidden; margin: 0px 0px 20px 0px; } .login-input label { float: left; width: 90px; padding-right: 10px; text-align: right; line-height: 35px; height: 35px; font-size: 14px; } .login-title span { position: absolute; font-size: 12px; right: -20px; top: -30px; background: #ffffff; border: #ebebeb solid 1px; width: 40px; height: 40px; border-radius: 20px; } </style> </head> <body> <div class="login-header"><a id="link" href="javascript:;">点击,弹出登录框</a></div> <div id="login" class="login"> <div id="title" class="login-title">登录会员 <span><a id="closeBtn" href="javascript:void(0);" class="close-login">关闭</a></span> </div> <div class="login-input-content"> <div class="login-input"> <label>用户名:</label> <input type="text" placeholder="请输入用户名" name="info[username]" id="username" class="list-input"> </div> <div class="login-input"> <label>登录密码:</label> <input type="password" placeholder="请输入登录密码" name="info[password]" id="password" class="list-input"> </div> </div> <div id="loginBtn" class="login-button"><a href="javascript:void(0);" id="login-button-submit">登录会员</a></div> </div> <!-- 遮盖层 --> <div id="bg" class="login-bg"></div> <script> // 1. 获取元素 var login = document.querySelector('.login'); var mask = document.querySelector('.login-bg'); var link = document.querySelector('#link'); var closeBtn = document.querySelector('#closeBtn'); var title = document.querySelector('#title'); // 2. 点击弹出层这个链接 link  让mask 和login 显示出来 link.addEventListener('click', function() { mask.style.display = 'block'; login.style.display = 'block'; }) // 3. 点击 closeBtn 就隐藏 mask 和 login  closeBtn.addEventListener('click', function() { mask.style.display = 'none'; login.style.display = 'none'; }) // 4. 开始拖拽 // (1) 当我们鼠标按下, 就获得鼠标在盒子内的坐标 title.addEventListener('mousedown', function(e) { var x = e.pageX - login.offsetLeft; var y = e.pageY - login.offsetTop; // (2) 鼠标移动的时候,把鼠标在页面中的坐标,减去 鼠标在盒子内的坐标就是模态框的left和top值 document.addEventListener('mousemove', move) function move(e) { login.style.left = e.pageX - x + 'px'; login.style.top = e.pageY - y + 'px'; } // (3) 鼠标弹起,就让鼠标移动事件移除 document.addEventListener('mouseup', function() { document.removeEventListener('mousemove', move); }) }) </script> </body> 
  • 1
  • 2
  • 3
  • 4
  • 5
  • 6
  • 7
  • 8
  • 9
  • 10
  • 11
  • 12
  • 13
  • 14
  • 15
  • 16
  • 17
  • 18
  • 19
  • 20
  • 21
  • 22
  • 23
  • 24
  • 25
  • 26
  • 27
  • 28
  • 29
  • 30
  • 31
  • 32
  • 33
  • 34
  • 35
  • 36
  • 37
  • 38
  • 39
  • 40
  • 41
  • 42
  • 43
  • 44
  • 45
  • 46
  • 47
  • 48
  • 49
  • 50
  • 51
  • 52
  • 53
  • 54
  • 55
  • 56
  • 57
  • 58
  • 59
  • 60
  • 61
  • 62
  • 63
  • 64
  • 65
  • 66
  • 67
  • 68
  • 69
  • 70
  • 71
  • 72
  • 73
  • 74
  • 75
  • 76
  • 77
  • 78
  • 79
  • 80
  • 81
  • 82
  • 83
  • 84
  • 85
  • 86
  • 87
  • 88
  • 89
  • 90
  • 91
  • 92
  • 93
  • 94
  • 95
  • 96
  • 97
  • 98
  • 99
  • 100
  • 101
  • 102
  • 103
  • 104
  • 105
  • 106
  • 107
  • 108
  • 109
  • 110
  • 111
  • 112
  • 113
  • 114
  • 115
  • 116
  • 117
  • 118
  • 119
  • 120
  • 121
  • 122
  • 123
  • 124
  • 125
  • 126
  • 127
  • 128
  • 129
  • 130
  • 131
  • 132
  • 133
  • 134
  • 135
  • 136
  • 137
  • 138
  • 139
  • 140
  • 141
  • 142
  • 143
  • 144
  • 145
  • 146
  • 147
  • 148
  • 149
  • 150
  • 151
  • 152
  • 153
  • 154
  • 155
  • 156
  • 157
  • 158
  • 159
  • 160
  • 161
  • 162
  • 163
  • 164
  • 165
  • 166
  • 167
  • 168

可视区系列 client

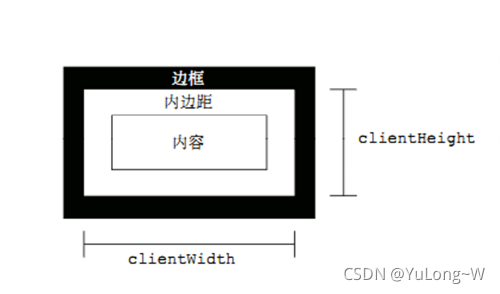
client 翻译过来就是客户端,使用 client 系列的相关属性来获取元素可视区的相关信息。通过 client 系列的相关属性可以动态的得到该元素的边框大小、元素大小等。

常用属性:
在这里插入图片描述
client和offset最大的区别就是 :不包含边框
图示:
在这里插入图片描述

滚动系列 scroll

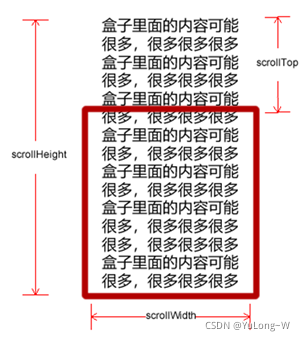
scroll 翻译过来就是滚动的,使用 scroll 系列的相关属性可以动态的得到该元素的大小、滚动距离等。

常用属性:
在这里插入图片描述
图示:
在这里插入图片描述

滚动条:

  • 如果浏览器的高(或宽)度不足以显示整个页面时,会自动出现滚动条。
  • 当滚动条向下滚动时,页面上面被隐藏掉的高度,称为页面被卷去的头部。
  • 滚动条在滚动时会触发 onscroll 事件。

案例——固定右侧侧边栏:

  • 原先侧边栏是绝对定位
  • 当页面滚动到一定位置,侧边栏改为固定定位
  • 页面继续滚动,会让 返回顶部显示出来

效果展示:
在这里插入图片描述

实现代码:

<head> <meta charset="UTF-8"> <meta name="viewport" content="width=device-width, initial-scale=1.0"> <meta http-equiv="X-UA-Compatible" content="ie=edge"> <title>Document</title> <style> .slider-bar { position: absolute; left: 50%; top: 300px; margin-left: 600px; width: 45px; height: 130px; background-color: pink; } .w { width: 1200px; margin: 10px auto; } .header { height: 150px; background-color: purple; } .banner { height: 250px; background-color: skyblue; } .main { height: 1000px; background-color: yellowgreen; } span { display: none; position: absolute; bottom: 0; } </style> </head> <body> <div class="slider-bar"> <span class="goBack">返回顶部</span> </div> <div class="header w">头部区域</div> <div class="banner w">banner区域</div> <div class="main w">主体部分</div> <script> //1. 获取元素 var sliderbar = document.querySelector('.slider-bar'); var banner = document.querySelector('.banner'); // banner.offestTop 就是被卷去头部的大小 一定要写到滚动的外面 var bannerTop = banner.offsetTop // 当侧边栏固定定位之后应该变化的数值 var sliderbarTop = sliderbar.offsetTop - bannerTop; // 获取main 主体元素 var main = document.querySelector('.main'); var goBack = document.querySelector('.goBack'); var mainTop = main.offsetTop; // 2. 页面滚动事件 scroll document.addEventListener('scroll', function() { // window.pageYOffset 页面被卷去的头部 // console.log(window.pageYOffset); // 3 .当页面被卷去的头部大于等于了 172 此时 侧边栏就要改为固定定位 if (window.pageYOffset >= bannerTop) { sliderbar.style.position = 'fixed'; sliderbar.style.top = sliderbarTop + 'px'; } else { sliderbar.style.position = 'absolute'; sliderbar.style.top = '300px'; } // 4. 当我们页面滚动到main盒子,就显示 goback模块 if (window.pageYOffset >= mainTop) { goBack.style.display = 'block'; } else { goBack.style.display = 'none'; } }) </script> </body> 
  • 1
  • 2
  • 3
  • 4
  • 5
  • 6
  • 7
  • 8
  • 9
  • 10
  • 11
  • 12
  • 13
  • 14
  • 15
  • 16
  • 17
  • 18
  • 19
  • 20
  • 21
  • 22
  • 23
  • 24
  • 25
  • 26
  • 27
  • 28
  • 29
  • 30
  • 31
  • 32
  • 33
  • 34
  • 35
  • 36
  • 37
  • 38
  • 39
  • 40
  • 41
  • 42
  • 43
  • 44
  • 45
  • 46
  • 47
  • 48
  • 49
  • 50
  • 51
  • 52
  • 53
  • 54
  • 55
  • 56
  • 57
  • 58
  • 59
  • 60
  • 61
  • 62
  • 63
  • 64
  • 65
  • 66
  • 67
  • 68
  • 69
  • 70
  • 71
  • 72
  • 73
  • 74
  • 75
  • 76
  • 77
  • 78
  • 79
  • 80
  • 81
  • 82
  • 83
  • 84

三大系列作用区别:
在这里插入图片描述

它们主要用法:

系列 作用 属性
offset 用于获得元素位置 offsetLeft offsetTop
client 用于获取元素大小 clientWidth clientHeight
scroll 用于获取滚动距离 scrollTop scrollLeft

注意:页面滚动的距离通过 window.pageXOffset 获得

动画原理

核心原理:通过定时器 setInterval() 不断移动盒子位置

实现步骤:

  1. 获得盒子当前位置
  2. 让盒子在当前位置加上1个移动距离
  3. 利用定时器不断重复这个操作
  4. 加一个结束定时器的条件
  5. 注意此元素需要添加定位,才能使用 element.style.left

简单动画函数封装:

// 简单动画函数封装obj目标对象 target 目标位置 function animate(obj, target) { var timer = setInterval(function() { if (obj.offsetLeft >= target) { // 停止动画 本质是停止定时器 clearInterval(timer); } //每次均匀向右移动1px obj.style.left = obj.offsetLeft + 1 + 'px'; }, 30); } 
  • 1
  • 2
  • 3
  • 4
  • 5
  • 6
  • 7
  • 8
  • 9
  • 10
  • 11
  • 12

缓动效果原理:

缓动动画就是让元素运动速度有所变化,最常见的是让速度慢慢停下来

  1. 让盒子每次移动的距离慢慢变小,速度就会慢慢落下来。
  2. 核心算法: (目标值 - 现在的位置 ) / 10 做为每次移动的距离步长
  3. 停止的条件是: 让当前盒子位置等于目标位置就停止定时器
  4. 注意步长值需要取整
// 缓动动画函数封装obj目标对象 target 目标位置 // 思路: // 1. 让盒子每次移动的距离慢慢变小, 速度就会慢慢落下来。 // 2. 核心算法:(目标值 - 现在的位置) / 10 做为每次移动的距离 步长 // 3. 停止的条件是: 让当前盒子位置等于目标位置就停止定时器 function animate(obj, target) { // 先清除以前的定时器,只保留当前的一个定时器执行 clearInterval(obj.timer); obj.timer = setInterval(function() { // 步长值写到定时器的里面 var step = (target - obj.offsetLeft) / 10; if (obj.offsetLeft == target) { // 停止动画 本质是停止定时器 clearInterval(obj.timer); } // 把每次加1 这个步长值改为一个慢慢变小的值  步长公式:(目标值 - 现在的位置) / 10 obj.style.left = obj.offsetLeft + step + 'px'; }, 15); } 
  • 1
  • 2
  • 3
  • 4
  • 5
  • 6
  • 7
  • 8
  • 9
  • 10
  • 11
  • 12
  • 13
  • 14
  • 15
  • 16
  • 17
  • 18
  • 19
  • 20

多个目标值之间移动:

当开始移动时候,判断步长是正值还是负值

  • 如果是正值,则步长 往大了取整
  • 如果是负值,则步长 向小了取整

动画函数封装到单独JS文件: animate.js

function animate(obj, target, callback) { // 先清除以前的定时器,只保留当前的一个定时器执行 clearInterval(obj.timer); obj.timer = setInterval(function() { // 步长值写到定时器的里面 // 把步长值改为整数 不要出现小数的问题 // var step = Math.ceil((target - obj.offsetLeft) / 10); var step = (target - obj.offsetLeft) / 10; step = step > 0 ? Math.ceil(step) : Math.floor(step); if (obj.offsetLeft == target) { // 停止动画 本质是停止定时器 clearInterval(obj.timer); // 回调函数写到定时器结束里面 // if (callback) { //     // 调用函数 //     callback(); // } callback && callback(); } // 把每次加1 这个步长值改为一个慢慢变小的值  步长公式:(目标值 - 现在的位置) / 10 obj.style.left = obj.offsetLeft + step + 'px'; }, 15); }

蓝蓝设计建立了UI设计分享群,每天会分享国内外的一些优秀设计,如果有兴趣的话,可以进入一起成长学习,请扫码蓝小助,报下信息,蓝小助会请您入群。欢迎您加入噢~~希望得到建议咨询、商务合作,也请与我们联系。

分享此文一切功德,皆悉回向给文章原作者及众读者.

转自:csdn 免责声明:蓝蓝设计尊重原作者,文章的版权归原作者。如涉及版权问题,请及时与我们取得联系,我们立即更正或删除。

蓝蓝设计www.lanlanwork.com )是一家专注而深入的界面设计公司,为期望卓越的国内外企业提供卓越的UI界面设计、BS界面设计 、 cs界面设计 、 ipad界面设计 、 包装设计 、 图标定制 、 用户体验 、交互设计、 网站建设 平面设计服务

CentOS7 升级PHP到7.2

前端达人

写在前面

CentOS7下安装PHP默认是5.4的,但是有些框架要求PHP的版本得在5.4以上,这就需要我们把PHP升级一下了。

yum provides php 
  • 1

开始升级PHP:

rpm -Uvh https://mirror.webtatic.com/yum/el7/epel-release.rpm #更新源
rpm -Uvh https://mirror.webtatic.com/yum/el7/webtatic-release.rpm
yum remove php-common -y  #移除系统自带的php-common
yum install -y php72w php72w-opcache php72w-xml php72w-mcrypt php72w-gd php72w-devel php72w-mysql php72w-intl php72w-mbstring  #安装依赖包 
  • 1
  • 2
  • 3
  • 4

查看版本

php -v 
  • 1

PHP 7.2.8 (cli) (built: Jul 20 2018 15:20:01) ( NTS )
Copyright (c) 1997-2018 The PHP Group
Zend Engine v3.2.0, Copyright (c) 1998-2018 Zend Technologies
    with Zend OPcache v7.2.8, Copyright (c) 1999-2018, by Zend Technologies

蓝蓝设计建立了UI设计分享群,每天会分享国内外的一些优秀设计,如果有兴趣的话,可以进入一起成长学习,请扫码蓝小助,报下信息,蓝小助会请您入群。欢迎您加入噢~~希望得到建议咨询、商务合作,也请与我们联系。

截屏2021-05-13 上午11.41.03.png


转自:csdn 作者:Peithon

分享此文一切功德,皆悉回向给文章原作者及众读者.

免责声明:蓝蓝设计尊重原作者,文章的版权归原作者。如涉及版权问题,请及时与我们取得联系,我们立即更正或删除。

蓝蓝设计www.lanlanwork.com )是一家专注而深入的界面设计公司,为期望卓越的国内外企业提供卓越的UI界面设计、BS界面设计 、 cs界面设计 、 ipad界面设计 、 包装设计 、 图标定制 、 用户体验 、交互设计、 网站建设 平面设计服务

centos7重启php环境

前端达人

apache
启动
systemctl start httpd
停止
systemctl stop httpd
重启
systemctl restart httpd
或者

service httpd stop

service httpd start

service httpd restart


mysql
启动
systemctl start mysqld
停止
systemctl stop mysqld
重启
systemctl restart mysqld

或者

service mysqld stop

service mysqld start

service mysqld restart


php-fpm
启动
systemctl start php-fpm
停止
systemctl stop php-fpm
重启
systemctl restart php-fpm


nginx
启动
systemctl start nginx
停止
systemctl stop nginx
重启
systemctl restart nginx

或者

service nginx stop
service nginx start
service nginx restart

开机自启

chkconfig httpd on

chkconfig mysqld on


一、MySQL启动方式

1

2

3

4

5

1、使用 service 启动:service mysqld start


2、使用 mysqld 脚本启动:/etc/init.d/mysqld start


3、使用 safe_mysqld 启动:safe_mysqld&

二、MySQL停止

1

2

3

4

5

1、使用 service 启动:   service mysqld stop


2、使用 mysqld 脚本启动:/etc/init.d/mysqld stop


3、mysqladmin shutdown

三、MySQL重启

1

2

3

1、使用 service 启动:service mysqld restart


2、使用 mysqld 脚本启动:/etc/init.d/mysqld restart

四、强制关闭

以上方法都无效的时候,可以通过强行命令:“killall mysql”来关闭MySQL,但是不建议用这样的方式,因为这种野蛮的方法会强行终止MySQL数据库服务,有可能导致表损坏……所以自己掂量着用。

Windows下重启MySQL服务,对于没装mysql图形管理端的用户来说启动和停止mysql服务:
…\…\bin>net stop mysql
…\…\bin>net start mysql


卸载PHP

yum remove php
yum remove php*
yum remove php-*
yum remove php7
yum remove php70
yum remove php7.0
yum remove php-common
这才是苦大仇深卸载个干干净净= w


Centos下Yum安装PHP5.5,5.6,7.0

默认的版本太低了,手动安装有一些麻烦,想采用Yum安装的可以使用下面的方案:

1.检查当前安装的PHP包

yum list installed | grep php

如果有安装的PHP包,先删除他们

 yum remove php.x86_64 php-cli.x86_64 php-common.x86_64 php-gd.x86_64 php-ldap.x86_64 php-mbstring.x86_64 php-mcrypt.x86_64 php-mysql.x86_64 php-pdo.x86_64

2.Centos 5.X

  rpm -Uvh http://mirror.webtatic.com/yum/el5/latest.rpm
  CentOs 6.x
  rpm -Uvh http://mirror.webtatic.com/yum/el6/latest.rpm
  CentOs 7.X
rpm -Uvh https://mirror.webtatic.com/yum/el7/epel-release.rpm
rpm -Uvh https://mirror.webtatic.com/yum/el7/webtatic-release.rpm

如果想删除上面安装的包,重新安装
rpm -qa | grep webstatic
rpm -e  上面搜索到的包即可

3.运行yum install

  yum install php55w.x86_64 php55w-cli.x86_64 php55w-common.x86_64 php55w-gd.x86_64 php55w-ldap.x86_64 php55w-mbstring.x86_64 php55w-mcrypt.x86_64 php55w-mysql.x86_64 php55w-pdo.x86_64
 

yum install php56w.x86_64 php56w-cli.x86_64 php56w-common.x86_64 php56w-gd.x86_64 php56w-ldap.x86_64 php56w-mbstring.x86_64 php56w-mcrypt.x86_64 php56w-mysql.x86_64 php56w-pdo.x86_64


注:如果想升级到5.6把上面的55w换成56w就可以了。

yum install php70w.x86_64 php70w-cli.x86_64 php70w-common.x86_64 php70w-gd.x86_64 php70w-ldap.x86_64 php70w-mbstring.x86_64 php70w-mcrypt.x86_64 php70w-mysql.x86_64 php70w-pdo.x86_64
4.安装PHP FPM

yum install php55w-fpm 
yum install php56w-fpm 
yum install php70w-fpm
注:如果想升级到5.6把上面的55w换成56w就可以了。

nginx重启不了


蓝蓝设计建立了UI设计分享群,每天会分享国内外的一些优秀设计,如果有兴趣的话,可以进入一起成长学习,请扫码蓝小助,报下信息,蓝小助会请您入群。欢迎您加入噢~~希望得到建议咨询、商务合作,也请与我们联系。

截屏2021-05-13 上午11.41.03.png


转自:csdn 作者:锅巴胸

分享此文一切功德,皆悉回向给文章原作者及众读者.

免责声明:蓝蓝设计尊重原作者,文章的版权归原作者。如涉及版权问题,请及时与我们取得联系,我们立即更正或删除。

蓝蓝设计www.lanlanwork.com )是一家专注而深入的界面设计公司,为期望卓越的国内外企业提供卓越的UI界面设计、BS界面设计 、 cs界面设计 、 ipad界面设计 、 包装设计 、 图标定制 、 用户体验 、交互设计、 网站建设 平面设计服务


outlook HTML签名制作方法

前端达人

   最近公司要求统一邮件签名格式,好一顿折腾啊!因为统一提供的签名是HTML格式 而outlook不直接提供HTML的签名生成和修改。但其实outlook的签名是有HTML格式的,并且可以直接编辑,方便而且更好控制,只是outlook对HTML的支持限制很多,很多元素无法使用。以前基本上不会写HTML,为了这个签名,HTML倒是学会了不少,也算意外收获吧。痛并快乐着!

      首先,要制作outlook签名,需要在outlook先生成一个签名,起个名字就行,反正内容是要重新修改的。打开outlook,依次打开工具-》选项-》邮件格式,就能看到签名按钮。点击签名按钮,打开签名和信纸对话框,选电子邮件签名选项卡,然后点击新建,输入个名字,OK。第一步到此结束。


      然后打开“C:\Users\你的用户名称\AppData\Roaming\Microsoft\Signatures”目录就可以看到三个文件,一个文件夹,其中那个htm文件就是我们签名的htm版本。用记事本打开这个文件后可以看到很多的html代码,这些都是outlook自动生成的,对我们没有用处,全选然后删除吧。.rtf和.txt两个文件是签名的富文本和纯文本格式,可以直接删除那两个文件。和.htm同名的文件夹千万不要删除,那个html文件需要那个文件夹,它们是一体的,这个文件夹里会缓存一些图片,看需求吧,不需要就可以直接删除,特别对于签名图片是网络引用的那种,一定要删了,要不然outlook只是用那些缓存图片,即使网络图片更换,它也不会变化。

      最后可以将以下代码复制进那个htm文件

<head> 
</head> 
<body> 
<hr style="width: 210px; height: 1px;" color="#b5c4df" size="1" align="left"> 
<table width="100%" border="0" cellspacing="0" cellpadding="0" class="1"> 
<tbody> 
<tr> 
<td valign="top" width="55" height="60"> 
<img src="http://www.xxxxxx.cn/email/logo.gif" width="45" height="45"> 
</td> 
<td valign="top" height="60" style="mso-line-height-rule:exactly; line-height:2.5;font-size:12px;"> 
<strong><span><font face="宋体">你的名字</font> ┃ <font face="宋体">营销中心</font><br></span></strong> 
<strong><span style="color:#C42634;"><font face="宋体">xxxxxxxxxx有限公司</font></span></strong> 
</td> 
</tr> 
</tbody> 
</table> 
<table width="100%" border="0" cellspacing="0" cellpadding="0" class="1"> 
<tbody> 
<tr> 
<td valign="top" style="mso-line-height-rule:exactly; line-height:2.5;font-size:12px;>  
 <span><font face="宋体">移动电话</font> <font face="Tahoma">Mobile:139-8765-4321</font> <font face="宋体">办公座机</font> <font face="Tahoma">Office Tel:029-1234 5678 Ext.604</font> <font face="宋体">公司网站</font> <font face="Tahoma">Web:http://www.xxxx.com</font></span><br> 
<span><font face="宋体">电子邮箱</font> <font face="Tahoma">E-mail:xxxxxx@xxxxx.com</font> <font face="宋体">公司地址</font> <font face="Tahoma">Address:</font><font face="宋体">xxxxxxxxxxx</font><font face="Tahoma">x</font><font face="宋体">层</font><font face="Tahoma">xxxx</font></span><br> 
</td> 
</tr> 
<tr> 
<td valign="top" style="mso-line-height-rule:exactly; line-height:1.5;font-size:10px;color:#CCCCCC;"> 
<span><font face="宋体">保密提示:本邮件及其附件含有保密信息,受商业秘密相关法律法规保护,不得泄露,仅限于发送给上面地址中列出的个人或群组合法使用。禁止任何其他人以任何形式使用(包括但不限于全部或部分地泄露、复制或散布)本邮件中的信息。如果您错收了本邮件,请您立即电话或邮件通知发件人并删除本邮件!谢谢您的合作。</font><font face="Tahoma"> Confidentiality Notice: This e-mail and its attachments contain confidential information, which is protected under commercial secrets related laws and regulations, and intended only for the legitimate use of person or entity whose address is listed above. Any use of the information contained herein in any way (including, but not limited to, total or partial disclosure, reproduction, or dissemination) by persons other than the intended recipient(s) is prohibited. If you receive this e-mail in error, please notify the sender by phone or email immediately and delete it.</font><br></span> 
</td> 
</tr> 
</tbody> 
</table> 
<img src="http://www.xxxxxx.cn/email/ad.gif"><br> 
</body> 
</html> 

      在outlook签名中最难处理的行高,line-height属性,outlook的这个属性只能支持在块上设置,比如可以给td标签设置line-height,但是不能给span设置line-height,否则行高设置是不起作用的。

     具体内容可以根据实际情况改写。修改签名文件后,最好关闭outlook重新打开一下,要不然outlook里面会有缓存,造成显示错误。


蓝蓝设计建立了UI设计分享群,每天会分享国内外的一些优秀设计,如果有兴趣的话,可以进入一起成长学习,请扫码蓝小助,报下信息,蓝小助会请您入群。欢迎您加入噢~~希望得到建议咨询、商务合作,也请与我们联系。

截屏2021-05-13 上午11.41.03.png


转自:csdn 作者:ssmile

分享此文一切功德,皆悉回向给文章原作者及众读者.

免责声明:蓝蓝设计尊重原作者,文章的版权归原作者。如涉及版权问题,请及时与我们取得联系,我们立即更正或删除。

蓝蓝设计www.lanlanwork.com )是一家专注而深入的界面设计公司,为期望卓越的国内外企业提供卓越的UI界面设计、BS界面设计 、 cs界面设计 、 ipad界面设计 、 包装设计 、 图标定制 、 用户体验 、交互设计、 网站建设 平面设计服务


使用outlook制作签名

前端达人

制作签名的几种方法

你好,最近公司需要我制作公司签名,之前就想着不就是签名嘛,多简单的事。
但是经过一系列的尝试之后,发现还真不容易。主要是因为outlook新建签名的编辑栏不支持直接使用html编辑。下面我介绍我尝试的几种方法

直接在编辑器中编辑

只有文字的话,那就直接在编辑器中输入文字进行排版就好了,没什么难度;

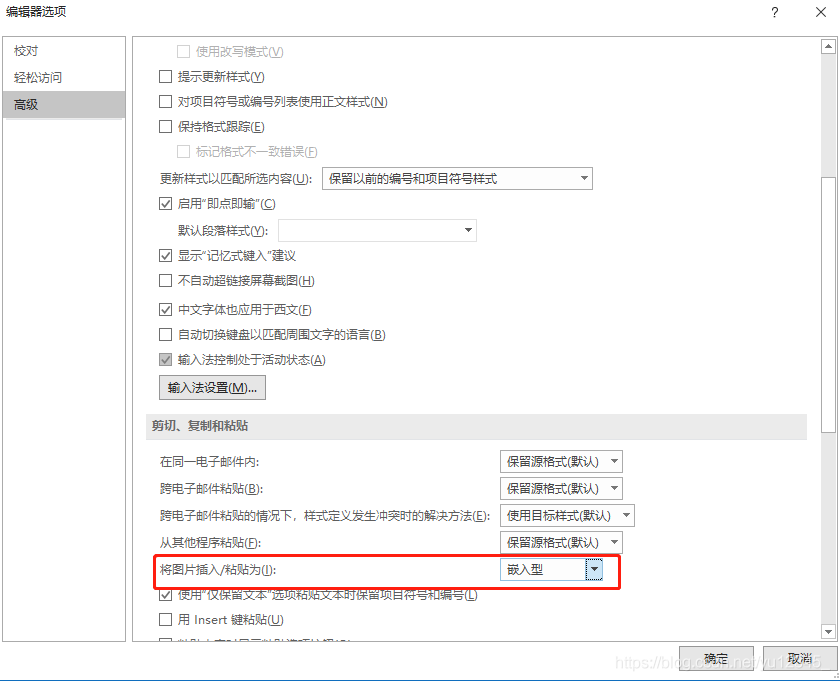
有文字与图片结合,这种情况就要看是怎样的排版了,outlook默认的图片插入模式是嵌入式,这样的话就在文字就在图片的右下角,不能并排显示,很不实用。那么想修改图片的插入模式可以在 “文件》选项》邮件》编辑器选项》高级“中修改 具体位置如图
修改图片插入/粘贴的方式这种方法的限制很多,比如你将图片插入修改为“四周紧密型”,那么你插入的图片在编辑器中看不到,实际使用的时候是可以看见的。这就很别扭了,还有就是图片好像会成为附件,如果有你的照片你不想别人每次下载附件将你的照片下载过去吧·······
由于这种方法并不能满足我的需求,所以我找啊找找到了另一种方法

在Word中编辑好了复制过去

在word中编辑好图片文字的样式与排版,直接复制,然后到outlook编辑签名的编辑器中邮件粘贴,注意粘贴的时候选择保留源格式。
这样有一个问题,就是你新建邮件选择你的签名时会发现排版可能跟你的不一样,或者到手机上文字直接成了一个字一行的现象
所以也直接pass

直接在生成的文件上编辑

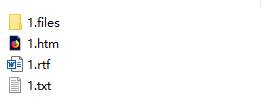
在后来一次偶然的机会我发现,每次新建签名就会在一个文件夹中生成四个文件,修改了这里面的文件也就修改了签名。所以我决定直接在源文件上修改。那个文件夹地址是:“C:\Users\×××\AppData\Roaming\Microsoft\Signatures”自己把×××换成自己的电脑用户名,如果不知道的话就Win+R,输入cmd,Users\后面的就是自己的电脑用户名。四个文件如下图:
四个源文件
其中.files文件是存放一些图片以及其他的几个必要文件;.htm文件就是代码源文件,类似于html;.rtf就是视图;.txt就是里面的纯文本。这里面最主要的就是files与htm。
所以我新建了一个空白签名,然后在htm里面修改代码,这需要一些html基础。把需要的图片放入files文件夹中。
但是这个有一个缺点,就是图片可能显示不了,你把图片放在服务器别人在outlook的PC端上看需要点击下载图片才能浏览,放在本地别人根本看不见。还有就是outlook限制了很多html的语法,很多样式什么的都不能用。
所以PASS

直接用word新建htm格式编辑

后来经过查找各种资料发现。word生成的htm文件其实是与outlook签名生成的htm类似的,他两的语法是一样的,毕竟是一家啊。还发现了任何签名其实对表格的适应性与兼容性是最好的。
所以我就用word新建了htm文件,然后用word编辑。首先是插入表格,然后在一整张表格中完成你的排版,添加图片什么得都没问题。排版完了之后,直接复制,到新建签名得编辑器中粘贴,注意保留源格式。。这里得图片插入模式要为嵌入式,怎么修改前面已经说了。
这种方法是最完美适应的!!!

图片不清晰问题

有时候会出现编辑的时候图片清晰,但是发送出去图片就模糊了;有两点:
1.修改图片的dpi为96,图片格式最好都为jpg吧 ,因为如果不是outlook会帮你改过来的;
2.插入的图片不要缩小,最好插入前就弄好像素大小,插入进去是怎样的大小就怎样。
否则都会被压缩。


蓝蓝设计建立了UI设计分享群,每天会分享国内外的一些优秀设计,如果有兴趣的话,可以进入一起成长学习,请扫码蓝小助,报下信息,蓝小助会请您入群。欢迎您加入噢~~希望得到建议咨询、商务合作,也请与我们联系。

截屏2021-05-13 上午11.41.03.png


转自:cadn 作者:ME小鬼

分享此文一切功德,皆悉回向给文章原作者及众读者.

免责声明:蓝蓝设计尊重原作者,文章的版权归原作者。如涉及版权问题,请及时与我们取得联系,我们立即更正或删除。

蓝蓝设计www.lanlanwork.com )是一家专注而深入的界面设计公司,为期望卓越的国内外企业提供卓越的UI界面设计、BS界面设计 、 cs界面设计 、 ipad界面设计 、 包装设计 、 图标定制 、 用户体验 、交互设计、 网站建设 平面设计服务

postMessage跨域、跨iframe窗口消息传递

前端达人

文章目录

  1. 作用
  2. 语法
  3. 使用
  4. 兼容性
  5. 应用场景

    说起postMessage 可能平时大家也不遇到,但是如果遇到问题了,又想不起它,这里记录下防止后面忘记它。


  6. 作用

    window.postMessage()方法可以安全地实现Window对象之间的跨域通信。例如,在一个页面和它生成的弹出窗口之间,或者是页面和嵌入其中的iframe之间。


    通常情况下,受浏览器“同源策略”的限制跨域问题一直是个问题,window.postMessage()提供了一个受控的机制来安全地规避这个限制(如果使用得当的话)。


  7. 语法

    一般来说,一个窗口可以获得对另一个窗口的引用(例如,通过targetWindow=window.opener),然后使用targetWindow.postMessage()在其上派发MessageEvent。接收窗口随后可根据需要自行处理此事件,传递给window.postMessage()的参数通过事件对象暴露给接收窗口。


    基本语法:


    targetWindow.postMessage(message, targetOrigin, [transfer]);

    1

    targetWindow

    targetWindow就是接收消息的窗口的引用。 获得该引用的方法包括:


    Window.open

    Window.opener

    HTMLIFrameElement.contentWindow

    Window.parent

    Window.frames +索引值

    message

    要发送到目标窗口的消息。 数据使用结构化克隆算法进行序列化。 这意味着我们可以将各种各样的数据对象安全地传递到目标窗口,而无需自己对其进行序列化。


    targetOrigin

    定目标窗口的来源,必须与消息发送目标相一致,可以是字符串或URI。 表示任何目标窗口都可接收,为安全起见,请一定要明确提定接收方的URI。如果为"*"则都可以接收。


    transfer

    可选属性。是一串和message同时传递的Transferable对象,这些对象的所有权将被转移给消息的接收方,而发送一方将不再保有所有权。


  8. 使用

    postMessage程序


    var receiver = document.getElementById('receiver').contentWindow;

    var btn = document.getElementById('send');

    btn.addEventListener('click', function (e) {

        e.preventDefault();

        var val = document.getElementById('text').value;

        receiver.postMessage("Hello "+val+"!", "http://www.xxx.com");

    }); 


    接收端


    window.addEventListener("message", receiveMessage, false);

    function receiveMessage(event){

      if (event.origin !== "http://www.xxx.com")

        return;

    }


    event对象有三个属性,分别是origin,data和source。event.data表示接收到的消息;event.origin表示postMessage的发送来源,包括协议,域名和端口;event.source表示发送消息的窗口对象的引用; 我们可以用这个引用来建立两个不同来源的窗口之间的双向通信。


  9. 兼容性


    总体兼容性还是很好的!


  10. 应用场景

    跨域通信(包括GET请求和POST请求)

    WebWorker

    vue项目中使用到了iframe并且需要传递参数


    ————————————————

    版权声明:本文为CSDN博主「zy1281539626」的原创文章,遵循CC 4.0 BY-SA版权协议,转载请附上原文出处链接及本声明。

    原文链接:https://blog.csdn.net/zy1281539626/article/details/114934551


    蓝蓝设计www.lanlanwork.com )是一家专注而深入的界面设计公司,为期望卓越的国内外企业提供卓越的UI界面设计BS界面设计 、 cs界面设计 、 ipad界面设计 、 包装设计 、 图标定制 、 用户体验 、交互设计、 网站建设 平面设计服


SpringBoot与Web开发

前端达人

SpringBoot与Web开发(超详细)

一、简介

二、SpringBoot对静态资源的映射规则

1、所有 /webjars/ ,都去 classpath:/META-INF/resources/webjars/ 找资源

2、"/
" 访问当前项目的任何资源,都去静态资源的文件夹找映射

3、欢迎页: 静态资源文件夹下的所有index.html页面,被"/"映射

三、模板引擎

1、引入Thymeleaf

2、Thymeleaf的使用

1、导入thymeleaf的名称空间

2、使用thymeleaf语法

3、Thymeleaf的语法规则

四、SpringMVC自动配置

1、Spring MVC auto-configuration

2、扩展SpringMVC

原理

3、全面接管SpringMVC

原理

五、如何修改SpringBoot的默认配置

一、简介

使用SpringBoot的步骤:


1、创建SpringBoot应用,选中我们需要的模块。

2、SpringBoot已经默认将这些场景配置好了,只需要在配置文件中指定少量配置就可以运行起来。

3、自己编写业务代码。


自动配置原理:


xxxxAutoConfiguration:帮我们给容器中自动配置组件

xxxxProperties:配置类来封装配置文件的内容

1

2

二、SpringBoot对静态资源的映射规则

@ConfigurationProperties(prefix = "spring.resources", ignoreUnknownFields = false)

public class ResourceProperties implements ResourceLoaderAware {

  //可以设置和静态资源有关的参数,缓存时间等

1

2

3

WebMvcAuotConfiguration:

@Override

public void addResourceHandlers(ResourceHandlerRegistry registry) {

if (!this.resourceProperties.isAddMappings()) {

logger.debug("Default resource handling disabled");

return;

}

Integer cachePeriod = this.resourceProperties.getCachePeriod();

if (!registry.hasMappingForPattern("/webjars/
")) {

customizeResourceHandlerRegistration(

registry.addResourceHandler("/webjars/**")

.addResourceLocations(

"classpath:/META-INF/resources/webjars/")

.setCachePeriod(cachePeriod));

}

String staticPathPattern = this.mvcProperties.getStaticPathPattern();

          //静态资源文件夹映射

if (!registry.hasMappingForPattern(staticPathPattern)) {

customizeResourceHandlerRegistration(

registry.addResourceHandler(staticPathPattern)

.addResourceLocations(

this.resourceProperties.getStaticLocations())

.setCachePeriod(cachePeriod));

}

}


       //配置欢迎页映射

@Bean

public WelcomePageHandlerMapping welcomePageHandlerMapping(

ResourceProperties resourceProperties) {

return new WelcomePageHandlerMapping(resourceProperties.getWelcomePage(),

this.mvcProperties.getStaticPathPattern());

}


      //配置喜欢的图标

@Configuration

@ConditionalOnProperty(value = "spring.mvc.favicon.enabled", matchIfMissing = true)

public static class FaviconConfiguration {


private final ResourceProperties resourceProperties;


public FaviconConfiguration(ResourceProperties resourceProperties) {

this.resourceProperties = resourceProperties;

}


@Bean

public SimpleUrlHandlerMapping faviconHandlerMapping() {

SimpleUrlHandlerMapping mapping = new SimpleUrlHandlerMapping();

mapping.setOrder(Ordered.HIGHEST_PRECEDENCE + 1);

              //所有  /favicon.ico 

mapping.setUrlMap(Collections.singletonMap("
/favicon.ico",

faviconRequestHandler()));

return mapping;

}


@Bean

public ResourceHttpRequestHandler faviconRequestHandler() {

ResourceHttpRequestHandler requestHandler = new ResourceHttpRequestHandler();

requestHandler

.setLocations(this.resourceProperties.getFaviconLocations());

return requestHandler;

}


}


1、所有 /webjars/ ,都去 classpath:/META-INF/resources/webjars/ 找资源

webjars:以jar包的方式引入静态资源。WebJars


访问localhost:8080/webjars/jquery/3.3.1/jquery.js的结果:


2、"/
" 访问当前项目的任何资源,都去静态资源的文件夹找映射

"classpath:/META-INF/resources/", 

"classpath:/resources/",

"classpath:/static/", 

"classpath:/public/" 

"/":当前项目的根路径


例子:访问localhost:8080/abc 就是去静态资源文件夹里面找abc


例如我们访问js文件夹下的Chart.min.js:


访问结果:


3、欢迎页: 静态资源文件夹下的所有index.html页面,被"/"映射

编写index.html文件。


访问结果:


三、模板引擎

常见的模板引擎:JSP、Velocity、Freemarker、Thymeleaf(springboot推荐,语法更简单,功能更强大)


1、引入Thymeleaf

Thymeleaf官网


在pom.xml中添加以下依赖:


 <dependency>

   <groupId>org.springframework.boot</groupId>

     <artifactId>spring-boot-starter-thymeleaf</artifactId>

 </dependency>


2、Thymeleaf的使用

@ConfigurationProperties(prefix = "spring.thymeleaf")

public class ThymeleafProperties {


private static final Charset DEFAULT_ENCODING = Charset.forName("UTF-8");


private static final MimeType DEFAULT_CONTENT_TYPE = MimeType.valueOf("text/html");


public static final String DEFAULT_PREFIX = "classpath:/templates/";


public static final String DEFAULT_SUFFIX = ".html";


1

只要我们把HTML页面放在classpath:/templates/,thymeleaf就能自动渲染。


success.html:


HelloController:


package com.keafmd.springboot.controller;


import org.springframework.stereotype.Controller;

import org.springframework.web.bind.annotation.RequestMapping;

import org.springframework.web.bind.annotation.ResponseBody;


/


  Keafmd


  @ClassName: HelloController

 
@Description:

  @author: 牛哄哄的柯南

 
@date: 2021-03-04 19:54

 */


@Controller

public class HelloController {


    @ResponseBody

    @RequestMapping("/hello")

    public String hello(){

        return "Hello World";

    }


    @RequestMapping("/success")

    public String success() {

        return "success";

    }

}


访问success的结果:


1、导入thymeleaf的名称空间

<html lang="en" xmlns:th="http://www.thymeleaf.org"&gt;

1

2、使用thymeleaf语法

HelloController:


package com.keafmd.springboot.controller;


import org.springframework.stereotype.Controller;

import org.springframework.web.bind.annotation.RequestMapping;

import org.springframework.web.bind.annotation.ResponseBody;


import java.util.Map;


/*

 
Keafmd


@ClassName: HelloController

  @Description:

 
@author: 牛哄哄的柯南

  @date: 2021-03-04 19:54

 
/


@Controller

public class HelloController {


    @ResponseBody

    @RequestMapping("/hello")

    public String hello(){

        return "Hello World";

    }


    /*

     
查出一些数据在页面显示

      @param map

     
@return

     */

    @RequestMapping("/success")

    public String success(Map<String,Object> map) {

        map.put("hello","你好");

        return "success";

    }

}


success.html:


<!DOCTYPE html>

<html lang="en" xmlns:th="http://www.thymeleaf.org"&gt;

<head>

    <meta charset="UTF-8">

    <title>Title</title>

</head>

<body>

    <h1>成功</h1>

    <!--th:text 将div里面的文本内容设置为-->

    <div th:text="${hello}"></div>

</body>

</html>


运行结果:


3、Thymeleaf的语法规则

1、th:任意html属性,来替换原生属性的值


th:text — 改变当前元素里面的文本内容

更多参考下图:


2、表达式


Simple expressions:(表达式语法)

    Variable Expressions: ${...}:获取变量值;OGNL;

    1)、获取对象的属性、调用方法

    2)、使用内置的基本对象:

    #ctx : the context object.

    #vars: the context variables.

                #locale : the context locale.

                #request : (only in Web Contexts) the HttpServletRequest object.

                #response : (only in Web Contexts) the HttpServletResponse object.

                #session : (only in Web Contexts) the HttpSession object.

                #servletContext : (only in Web Contexts) the ServletContext object.


                ${session.foo}

            3)、内置的一些工具对象:

execInfo : information about the template being processed.

messages : methods for obtaining externalized messages inside variables expressions, in the same way as they would be obtained using #{…} syntax.

uris : methods for escaping parts of URLs/URIs

conversions : methods for executing the configured conversion service (if any).

dates : methods for java.util.Date objects: formatting, component extraction, etc.

calendars : analogous to #dates , but for java.util.Calendar objects.

numbers : methods for formatting numeric objects.

strings : methods for String objects: contains, startsWith, prepending/appending, etc.

objects : methods for objects in general.

bools : methods for boolean evaluation.

arrays : methods for arrays.

lists : methods for lists.

sets : methods for sets.

maps : methods for maps.

aggregates : methods for creating aggregates on arrays or collections.

ids : methods for dealing with id attributes that might be repeated (for example, as a result of an iteration).


    Selection Variable Expressions: {...}:选择表达式:和${}在功能上是一样;

    补充:配合 th:object="${session.user}:

   <div th:object="${session.user}">

    <p>Name: <span th:text="
{firstName}">Sebastian</span>.</p>

    <p>Surname: <span th:text="{lastName}">Pepper</span>.</p>

    <p>Nationality: <span th:text="
{nationality}">Saturn</span>.</p>

    </div>


    Message Expressions: #{...}:获取国际化内容

    Link URL Expressions: @{...}:定义URL;

    @{/order/process(execId=${execId},execType='FAST')}

    Fragment Expressions: ~{...}:片段引用表达式

    <div th:insert="~{commons :: main}">...</div>


Literals(字面量)

      Text literals: 'one text' , 'Another one!' ,…

      Number literals: 0 , 34 , 3.0 , 12.3 ,…

      Boolean literals: true , false

      Null literal: null

      Literal tokens: one , sometext , main ,…

Text operations:(文本操作)

    String concatenation: +

    Literal substitutions: |The name is ${name}|

Arithmetic operations:(数学运算)

    Binary operators: + , - , * , / , %

    Minus sign (unary operator): -

Boolean operations:(布尔运算)

    Binary operators: and , or

    Boolean negation (unary operator): ! , not

Comparisons and equality:(比较运算)

    Comparators: > , < , >= , <= ( gt , lt , ge , le )

    Equality operators: == , != ( eq , ne )

Conditional operators:条件运算(三元运算符)

    If-then: (if) ? (then)

    If-then-else: (if) ? (then) : (else)

    Default: (value) ?: (defaultvalue)

Special tokens:

    No-Operation: _ 


注意:内容过多,详细内容参考官方文档。


示例:↓


HelloController:


package com.keafmd.springboot.controller;


import org.springframework.stereotype.Controller;

import org.springframework.web.bind.annotation.RequestMapping;

import org.springframework.web.bind.annotation.ResponseBody;


import java.util.Arrays;

import java.util.Map;


/*

 
Keafmd


@ClassName: HelloController

  @Description:

 
@author: 牛哄哄的柯南

  @date: 2021-03-04 19:54

 
/


@Controller

public class HelloController {


    @ResponseBody

    @RequestMapping("/hello")

    public String hello(){

        return "Hello World";

    }


    /*

     
查出一些数据在页面显示

      @param map

     
@return

     */

    @RequestMapping("/success")

    public String success(Map<String,Object> map) {

        map.put("hello","你好");

        map.put("hello1","<h1>你好</h1>");

        map.put("users", Arrays.asList("柯南","小兰","基德"));

        return "success";

    }

}


success.html:


<!DOCTYPE html>

<html lang="en" xmlns:th="http://www.thymeleaf.org"&gt;

<head>

    <meta charset="UTF-8">

    <title>Title</title>

</head>

<body>

    <h1>成功</h1>

    <!--th:text 将div里面的文本内容设置为-->

    <div id="div01" class="myDiv" th:id="${hello}" th:class="${hello}" th:text="${hello}">这里的内容被覆盖</div>


    <hr/>

    <div th:text="${hello1}"></div>

    <div th:utext="${hello1}"></div>

    <hr/>

    <!--th:each 每次遍历都会生成当前这个标签-->

    <h4 th:text="${user}" th:each="user:${users}"></h4>

    <hr/>

    <h4>

        <span th:each="user:${users}"> [[${user}]] </span>

    </h4>

</body>

</html>


效果:


四、SpringMVC自动配置

1、Spring MVC auto-configuration

参考官方文档:点这里


Spring Boot 自动配置好了SpringMVC


以下是SpringBoot对SpringMVC的默认配置:(WebMvcAutoConfiguration)


Inclusion of ContentNegotiatingViewResolver and BeanNameViewResolver beans.


自动配置了ViewResolver(视图解析器:根据方法的返回值得到视图对象(View),视图对象决定如何渲染(转发?重定向?))

ContentNegotiatingViewResolver:组合所有的视图解析器的。

如何定制:我们可以自己给容器中添加一个视图解析器;自动的将其组合进来。

Support for serving static resources, including support for WebJars (see below).静态资源文件夹路径,webjars


Static index.html support. 静态首页访问


Custom Favicon support (see below). favicon.ico


自动注册了 of Converter, GenericConverter, Formatter beans.


Converter:转换器; public String hello(User user):类型转换使用Converter

Formatter :格式化器; 2017.12.17===Date

@Bean

@ConditionalOnProperty(prefix = "spring.mvc", name = "date-format")//在文件中配置日期格式化的规则

public Formatter<Date> dateFormatter() {

    return new DateFormatter(this.mvcProperties.getDateFormat());//日期格式化组件

}

1

2

3

4

5

自己添加的格式化器转换器,我们只需要放在容器中即可


Support for HttpMessageConverters (see below).


HttpMessageConverter:SpringMVC用来转换Http请求和响应的;User—Json


HttpMessageConverters 是从容器中确定;获取所有的HttpMessageConverter


自己给容器中添加HttpMessageConverter,只需要将自己的组件注册容器中(@Bean,@Component)


Automatic registration of MessageCodesResolver (see below):定义错误代码生成规则


Automatic use of a ConfigurableWebBindingInitializer bean (see below).


我们可以配置一个ConfigurableWebBindingInitializer来替换默认的(添加到容器)


初始化WebDataBinder

请求数据=====JavaBean

1

2

org.springframework.boot.autoconfigure.web:web的所有自动场景


If you want to keep Spring Boot MVC features, and you just want to add additional MVC configuration (interceptors, formatters, view controllers etc.) you can add your own @Configuration class of type WebMvcConfigurerAdapter, but without @EnableWebMvc. If you wish to provide custom instances of RequestMappingHandlerMapping, RequestMappingHandlerAdapter or ExceptionHandlerExceptionResolver you can declare a WebMvcRegistrationsAdapter instance providing such components.


如果你想保持Spring Boot MVC 功能,你只是想添加额外的(MVC配置)(https://docs.spring.io/spring/docs/4.3.14.RELEASE/spring-framework-reference/htmlsingle MVC)(拦截器,格式器,视图控制器等)您可以添加自己的@ configuration类WebMvcConfigurerAdapter类型,但没有@EnableWebMvc。如果你想提供RequestMappingHandlerMapping, RequestMappingHandlerAdapter或ExceptionHandlerExceptionResolver的自定义实例,你可以声明一个WebMvcRegistrationsAdapter实例来提供这样的组件。


If you want to take complete control of Spring MVC, you can add your own @Configuration annotated with @EnableWebMvc.


如果你想完全控制Spring MVC,你可以添加你自己的@Configuration注解@EnableWebMvc。


2、扩展SpringMVC

实现如下功能:


<mvc:view-controller path="/hello" view-name="success"></mvc:view-controller>


<mvc:interceptors>

    <mvc:interceptor>

        <mvc:mapping path="/hello"/>

        <bean></bean>

    </mvc:interceptor>

</mvc:interceptors>


做法:编写一个配置类(@Configuration),是WebMvcConfigurerAdapter类型;不能标注@EnableWebMvc


特点:既保留了所有的自动配置,也能用我们扩展的配置。


在config包下创建个MyMvcConfig。


代码实现:


package com.keafmd.springboot.config;


import org.springframework.context.annotation.Configuration;

import org.springframework.web.servlet.config.annotation.ViewControllerRegistry;

import org.springframework.web.servlet.config.annotation.WebMvcConfigurer;


/*

 
Keafmd


@ClassName: MyMvcConfig

  @Description:

 
@author: 牛哄哄的柯南

  @date: 2021-03-17 20:26

 
/

@Configuration

public class MyMvcConfig implements WebMvcConfigurer {

    @Override

    public void addViewControllers(ViewControllerRegistry registry) {

        //浏览器发送 /keafmd 请求 来到success页面

        registry.addViewController("/keafmd").setViewName("success");

    }

}


原理

1、WebMvcAutoConfiguration是SpringMVC的自动配置类。

2、在做其他自动配置时会导入,@Import(EnableWebMvcConfiguration.class)。


   @Configuration

public static class EnableWebMvcConfiguration extends DelegatingWebMvcConfiguration {

     private final WebMvcConfigurerComposite configurers = new WebMvcConfigurerComposite();


     //从容器中获取所有的WebMvcConfigurer

     @Autowired(required = false)

     public void setConfigurers(List<WebMvcConfigurer> configurers) {

         if (!CollectionUtils.isEmpty(configurers)) {

             this.configurers.addWebMvcConfigurers(configurers);

            //一个参考实现;将所有的WebMvcConfigurer相关配置都来一起调用;  

            @Override

            // public void addViewControllers(ViewControllerRegistry registry) {

             //    for (WebMvcConfigurer delegate : this.delegates) {

              //       delegate.addViewControllers(registry);

              //   }

             }

         }

}


3、容器中所有的WebMvcConfigurer都会一起起作用。

4、我们的配置类也会被调用。


效果:SpringMVC的自动配置和我们的扩展配置都会起作用。


3、全面接管SpringMVC

SpringBoot对SpringMVC的自动配置不需要了,所有都是我们自己配置,所有的SpringMVC的自动配置都失效了。


做法:我们需要在配置类中添加@EnableWebMvc即可。


@EnableWebMvc

@Configuration

public class MyMvcConfig implements WebMvcConfigurer {

    @Override

    public void addViewControllers(ViewControllerRegistry registry) {

        //浏览器发送 /keafmd 请求 来到success页面

        registry.addViewController("/keafmd").setViewName("success");

    }

}


全面接管后,静态资源失效。

不推荐这样全面接管。


原理

加了@EnableWebMvc自动配置就失效了。


1、@EnableWebMvc的核心:


@Import({DelegatingWebMvcConfiguration.class})

public @interface EnableWebMvc {


2、DelegatingWebMvcConfiguration


@Configuration(

    proxyBeanMethods = false

)

public class DelegatingWebMvcConfiguration extends WebMvcConfigurationSupport {


3、WebMvcAutoConfiguration


@Configuration(

    proxyBeanMethods = false

)

@ConditionalOnWebApplication(

    type = Type.SERVLET

)

@ConditionalOnClass({Servlet.class, DispatcherServlet.class, WebMvcConfigurer.class})

//容器中没有这个组件的时候,这个自动配置类才生效

@ConditionalOnMissingBean({WebMvcConfigurationSupport.class})

@AutoConfigureOrder(-2147483638)

@AutoConfigureAfter({DispatcherServletAutoConfiguration.class, TaskExecutionAutoConfiguration.class, ValidationAutoConfiguration.class})

public class WebMvcAutoConfiguration {


4、@EnableWebMvc将WebMvcConfigurationSupport组件导入进来,自动配置类失效了。


5、导入的WebMvcConfigurationSupport只是SpringMVC最基本的功能。


五、如何修改SpringBoot的默认配置

1、SpringBoot在自动配置很多组件的时候,先看容器中有没有用户自己配置的(@Bean、@Component)如果有就用用户配置的,如果没有,才自动配置;如果有些组件可以有多个(ViewResolver)将用户配置的和自己默认的组合起来。

2、在SpringBoot中会有非常多的xxxConfigurer帮助我们进行扩展配置。

3、在SpringBoot中会有很多的xxxCustomizer帮助我们进行定制配置。


以上就是SpringBoot与Web开发(超详细)篇一的全部内容。

————————————————

版权声明:本文为CSDN博主「牛哄哄的柯南」的原创文章,遵循CC 4.0 BY-SA版权协议,转载请附上原文出处链接及本声明。

原文链接:https://blog.csdn.net/weixin_43883917/article/details/114375472


蓝蓝设计www.lanlanwork.com )是一家专注而深入的界面设计公司,为期望卓越的国内外企业提供卓越的UI界面设计BS界面设计 、 cs界面设计 、 ipad界面设计 、 包装设计 、 图标定制 、 用户体验 、交互设计、 网站建设 平面设计服


日历

链接

blogger

蓝蓝 http://www.lanlanwork.com

存档