密码强度验证
需求
首先我们需要知道需求是什么? 这很重要!
要知道 我们写的一切逻辑都是建立在需求之上
当输入框聚焦时提示密码要求
当密码符合要求时 隐藏提示 并给予反馈
密码等级低时 提示密码等级为低
密码等级一般时 提示密码等级为中
密码等级高时 提示密码等级为高
当密码不符合要求时 重新打开提示
思考如何构建函数
通过上面的需求 你能想到的函数时什么?你能想到的逻辑又是什么?
首先 提示的显示隐藏我们可以用事件绑定或者事件监听来做
其次 我们需要利用正则来判断密码等级
当密码等级为低时 显示红色
当密码等级为中时 显示黄色
当密码等级为高时 显示绿色
最后 根据密码等级来渲染页面 也就是反馈给用户的样式
建议 :
在这里 尽量把每个函数的功能区分好 构思好
不仅要让自己能看懂 还要让别人能看懂
这样的代码才是好的代码 可读性更好 可维护性更高
在提示盒子的内部写3个div 不同等级给予不同颜色不同数量的提示
 密码 : <input type="text" id="ipt">
    <p id="p">请输入6-20位的带有数字字母或者特殊符号的密码</p>
    <div class="box">
        <span></span>
        <div></div>
        <div></div>
        <div></div>
    </div>
不管样式行为再怎么花里胡哨 也一定要先把结构里要出现的元素写出来
由于考虑到等级分为三种 所以给提示盒子分3中不同的class类名
每一个类名对应的子元素的样式也不同
到js部分我们只需要操作class类名就可以了
   <style>
        *{
            margin : 0 ;
            padding : 0 ;
        }
        //提示盒子
        .box{
            position : absolute;
            top : 2px;
            left : 200px;
        }
        .box div,
        .box span{
            margin-right : 5px;
            width : 20px;
            height : 20px;
            float : left;
        }
        //低等级
        .box.low :nth-child(2){
            background : red;
        }
        //中等级
        .box.middle div{
            background : yellow;
        }
        .box.middle :last-child{
            background: #fff;
        }
        //高等级
        .box.high div{
            background : green;
        }
        //提示文字默认隐藏
        p{
            display : none;
        }
    </style>
 <script>
        //获取需要操作的元素
        let ipt = document.getElementById('ipt');
        let p = document.getElementById('p');
        let div = document.getElementsByClassName('box')[0];
        var tip = false; //聚焦显示提示的开关
        //添加聚焦事件
        ipt.addEventListener('focus' , () => {
            //由于存在用户输入正确的密码失焦再操作的可能 所以需要验证开关
            if(!tip) {
                p.style.display = 'block';
            }
            //默认选中文字 提升用户体验
            ipt.select();
        })
        //添加输入时的事件
        ipt.addEventListener('input' , () => {
            //拿到用户输入的密码字符串
            let str = ipt.value;
            //当密码不符合要求时 要及时给予反馈 及时清除样式
            if(str.length < 6 ||str.length > 20 || /[^(\da-zA-Z\_\#\@\$\^\%\*\&\!\~\+\-)]/.test(str) || str === "") {
                p.style.display = 'block';
                removeClass(div);
                div.children[0].innerHTML = "";
                tip = true;
                //如果不符合要求 就没必要判断等级了 直接结束判断
                return false;
            }else{
                p.style.display = 'none';
            }
            //判断密码等级
            let res = level(str);
            //根据等级添加样式
            randerLevel(res);
        })
        //判断密码等级函数
        function level (str) {
            let level = 0;
            //当用户输入的字符串符合一定规则 让等级+1
            if(/\d+/.test(str)) {
                level ++;
            }
            if(/[a-zA-Z]+/.test(str)) {
                level ++;
            }
            if(/[\_\#\@\$\^\%\*\&\!\~\+\-]+/.test(str)) {
                level ++;
            }
            return level;
        }
        //添加样式函数
        function randerLevel (level) {
            //在添加样式前先清空样式
            removeClass(div);
            div.children[0].innerHTML = "";
            //根据等级添加对应的类名
            switch (level) {
                case 1 :
                    div.children[0].innerHTML = '低';
                    //元素存在不止一个类名 用 += 更好
                    div.className += ' low';
                    break;
                case 2 :
                    div.children[0].innerHTML = '中';
                    div.className += ' middle';
                    break;
                case 3 :
                    div.children[0].innerHTML = '高';
                    div.className += ' high';
                    break;
            }
        }
        //去等级类名函数
        function removeClass(ele){
            let reg = /low|middle|high/g;
            if(reg.test(ele.className)) {
                //不要忘记把值赋回去 replace返回的是新字符串
                ele.className = ele.className.replace(reg , "");
            }
        }
    </script>
当密码等级为低时 给予红色反馈

————————————————
版权声明:本文为CSDN博主「豆浆不好喝」的原创文章,遵循 CC 4.0 BY-SA 版权协议,转载请附上原文出处链接及本声明。
原文链接:https://blog.csdn.net/weixin_45178648/article/details/104885417
这是HTML学习总结系列的第二篇,第一篇在这里:
HTML 学习总结1入门 基本概念、格式 文字标签 图片标签 链接标签 表格标签 注释
这次的学习内容相较第一次分类少,但是比较杂。
框架集标签
框架标签是将网页设置成网页框架的一种双标签,被设计成框架的网页被切分成若干区域,没有实际的内容,只当做框架用于镶嵌其它的网页。
那么,这个标签是:
<frameset></frameset>
框架集标签的属性
使用的时候需要将HTML文件中的body标签部分替换为框架标签,写成这样:
<html> <head></head> <frameset rows="500,*" border="3" noresize="noresize"> </frame> </html>看上面的代码,用frameset替换掉body不难理解,毕竟我们约定做框架的网页不具有实体内容 接着,这里提到了框架标签的三个属性,分别为: rows/cols 框架的分行或分列 border 分隔框的宽度 noresize 大小是否可调 现在来分别解释一下 第一个,rows 或cols 属性,代表了框架的分行或分列的情况,在引号内书写该属性的值的时候,不需要指明分成几栏,只需要指明每一栏占据的宽度或高度(单位为像素)并使用逗号隔开。浏览器在解析的时候会计算到底分成了几栏。另外,不指定宽度而使其占据剩余位置时,可以使用通配符 “ * ”。 第二个,border 属性,代表了分隔框的宽度,这是属性的数值单位是像素。所以如果你不想加入边框,则可以将它设置为零。 第三个,noresize 属性,表示我们的框架的大小是否可调,frameset标签默认为大小可调,当用户鼠标移动到边框上时,他可以拖拽改变大小。所以如果不想让用户随意改变框架大小,那么可以选择使用这个属性 (当然,也可以选择把边框的宽度设为零,让他找不到)。 这个属性的值同属性名称一样。 最后还需要说明的是:框架集标签是可以进行嵌套的,也就是说,在已经分出来的框架中,我们可以借着分栏。 在框架内镶嵌网页 刚刚我们使用 frameset 标签将网页变成框架并划分成了若干区域,每一个区域都是一个单独的可显示页面的子网页(笔者起的名)。现在,我们需要在这些区域内为它镶嵌上一个网页,这需要用到frame这个单标签在框架下添加网页,它的写法如下: <frame src="...." name="...." /> 1 这里可以看到 frame 标签的两个属性; src 和 name 。它们分别代表着添置连接(这是一个超链接,网页,HTML文件,图片等都是可以的。有关超链接的信息,可参照上一篇学习总结或者问问度娘 ),以及框架名称。 框架的命名,很主要的一个原因在于可以重复利用一个框架,即在其他标签使用时,可以在某个框架上显示相应内容。还记得上一篇中,我们提到的链接标签 target 属性中的 “某框架名称” 这个值吗?在为框架命名后,就可以使用上述的 target 用法,将打开的网页放在某个框架中了。 综上,举个例子: 先来创造一个带有嵌套的框架<!--frame--> <html> <head></head> <frameset rows="200,*" border="5" noresize="noresize"> <frame src="title.html" name="title" /> <frameset cols="200,*"> <frame src="selection_bar.html" /> <frame name="output_page" /> </frameset> </frameset> </html><!--title--> <html> <head></head> <body> <font size="7" color="blue"> The test page </font> </body> </html>
<!--selection_bar--> <html> <head></head> <body> <font size="5" color="red"> Please select websites. </font> <br /><br /> <a href="http://www.baidu.com" target="output_page"/>百度一下<br /><br /> <a href="https://www.csdn.net" target="output_page"/>CSDN <br /><br /> </body> </html>
最后来看下结果:
复制到浏览器即可使用,注意别忘了引入vue哦
<div id="app">
    <div>{{pmsg}}</div>
    <menu-item :title='ptitle' :content='ptitle'></menu-item>
</div>
<script type="text/javascript" src="vue.js"></script>
<script type="text/javascript">
    //父组件向子组件传值-基本使用
    Vue.component('menu-item', {
        props: ['title', 'content'],
        data: function() {
            return {
                msg: '子组件本身的数据'
            }
        },
        template: `<div>
      <p>{{msg}}</p>
      <p>{{title}}</p>
      <p>{{content}}</p>
      </div>`
    });
    var vm = new Vue({
        el: '#app',
        data: {
            pmsg: '父组件中内容',
            ptitle: '动态绑定属性'
        }
    });
</script>
————————————————
版权声明:本文为CSDN博主「温柔的坚持」的原创文章,遵循 CC 4.0 BY-SA 版权协议,转载请附上原文出处链接及本声明。
原文链接:https://blog.csdn.net/weixin_43745003/article/details/104908639
前言
在学习JS中的原型,原型链,继承这些知识之前,我们先学习下基础知识:函数和对象的关系。
我们一直都知道,函数也是对象的一种,因为通过instanceof就可以判断出来。但是函数和对象的关系并不是简单的包含和被包含的关系,这两者之间的关系还是有点复杂的。接下来我们就来捋一捋。
首先,阐述一点,对象都是通过函数创建的
对于下面这种类型的代码,一般叫做“语法糖”
var obj = {a:10,b:20};
var arr = [5, 'x', true];
但是,其实上面这段代码的实质是下面这样的:
//var obj = { a: 10, b: 20 };
//var arr = [5, 'x', true];

 var obj = new Object();
 obj.a = 10;
 obj.b = 20;

 var arr = new Array();
 arr[0] = 5;
 arr[1] = 'x';
 arr[2] = true;
function Fn() { }
   Fn.prototype.name = '张三';
    Fn.prototype.getAge = function () {
       return 12;
};
   var fn = new Fn();
   console.log(fn.name);
   console.log(fn.getAge ());
即,Fn是一个函数,fn对象是从Fn函数new出来的,这样fn对象就可以调用Fn.prototype中的属性。
但是,因为每个对象都有一个隐藏的属性——“proto”,这个属性引用了创建这个对象的函数的prototype。即:fn.proto === Fn.prototype
那么,这里的_proto_到底是什么呢?
其实,这个__proto__是一个隐藏的属性,javascript不希望开发者用到这个属性值,有的低版本浏览器甚至不支持这个属性值。
var obj = {};
console.log(obj.__proto__);

isPrototypeOf()函数,用于检测两个对象之间似乎否存在原型关系,使用方法如下:
  // 查看 Fn 的 prototype 对象,是否是 f 原型
  Fn.prototype.isPrototypeOf(f);
 //// 查看 f 对象是否是构造函数 Fn 的实例
 //console.log(f instanceof Fn);
 //// 查看 f 对象是否是构造函数 Fn 的实例
 //console.log(f instanceof Object);

    function Fn(){}
    function Fun(){}
    var f = new Fn();
    console.log( f.__proto__ === Fn.prototype );            // t

    console.log( Fn.prototype.isPrototypeOf(f) );           // t
    console.log( Fun.prototype.isPrototypeOf(f) );          // f
    console.log( Object.prototype.isPrototypeOf(f) );       // t

    console.log( f instanceof Fn );         // t
    console.log( f instanceof Fun );        // f
    console.log( f instanceof Object );     // t
//两种使用,如果是返回ture,如果不是返回false;
//注意:instanceof运算符右侧为构造函数,并且js中所有原型都来自Object构造函数。
JS解析器访问属性顺序
当访问实例 f 的属性或方法时,会先在当前实例对象 f 中查找,如果没有,则沿着__proto__继续向上寻找,如果找到最顶头的Object还是找不到,则会抛出undefined。如果在实例中找到,或某层原型中找到,就会读取并使用,同时停止向上找寻。
由此可见,解析器的解析顺序遵循就近原则,如果在最近的位置发现属性存在,便不会继续向上找寻。
原型的应用
数组去重:
Array.prototype.noRepeat = function(){
    var m = [];
    for(var i=0;i<this.length;i++){
        if(m.indexOf(this[i]) == -1){
            m.push(this[i]);
        }
    }
    return m;
}
var arr = [3,4,5,6,7,6,5,4,3,2,1];
var res = arr.noRepeat();
console.log(res);

var arr1 = ["a","b","c","b","a"];
var res1 = arr1.noRepeat();
console.log(res1);
function Parent(){

}
Parent.prototype.show = function(){
    console.log("哈哈哈");
}

function Child(){

}
for(var i in Parent.prototype){
    Child.prototype[i] = Parent.prototype[i];
}
Child.prototype.show = function(){
    console.log("hello");
}

var p = new Parent();
p.show();
console.log(p.name);

var c = new Child();
c.show();
console.log(c.name);
var newvue = new Vue()
        触发事件


newvue.$emit('自定义事件名', 参数)
        监听事件


newvue.on('自定义事件名', 触发方法名)
        销毁事件


newvue.off('自定义事件名')

        案例


        放在html页面上即可显示,注意要引入vue


<!DOCTYPE html>
<html lang="en">
<head>
  <meta charset="UTF-8">
  <title>Document</title>
</head>
<body>
  <div id="app">
    <div>父组件</div>
    <div>
      <button @click='handle'>销毁事件</button>
    </div>
    <test-tom></test-tom>
    <test-jerry></test-jerry>
  </div>
  <script type="text/javascript" src="js/vue.js"></script>
  <script type="text/javascript">
    /*
      兄弟组件之间数据传递
    */
    // 提供事件中心
    var hub = new Vue();

    Vue.component('test-tom', {
      data: function(){
        return {
          num: 0
        }
      },
      template: `
        <div>
          <div>TOM:{{num}}</div>
          <div>
            <button @click='handle'>点击</button>
          </div>
        </div>
      `,
      methods: {
        handle: function(){
          hub.$emit('jerry-event', 2);
        }
      },
      mounted: function() {
        // 监听事件
        hub.$on('tom-event', (val) => {
          this.num += val;
        });
      }
    });
    Vue.component('test-jerry', {
      data: function(){
        return {
          num: 0
        }
      },
      template: `
        <div>
          <div>JERRY:{{num}}</div>
          <div>
            <button @click='handle'>点击</button>
          </div>
        </div>
      `,
      methods: {
        handle: function(){
          // 触发兄弟组件的事件
          hub.$emit('tom-event', 1);
        }
      },
      mounted: function() {
        // 监听事件
        hub.$on('jerry-event', (val) => {
          this.num += val;
        });
      }
    });
    var vm = new Vue({
      el: '#app',
      data: {

      },
      methods: {
        handle: function(){
          hub.$off('tom-event');
          hub.$off('jerry-event');
        }
      }
    });
  </script>
</body>
</html>

————————————————

版权声明:本文为CSDN博主「温柔的坚持」的原创文章,遵循 CC 4.0 BY-SA 版权协议,转载请附上原文出处链接及本声明。

原文链接:https://blog.csdn.net/weixin_43745003/article/details/104919633
环境准备
创建项目
npx create-react-app my-react
进入项目并启动
cd my-react && npm start
1
src/index.js
先把src里面的东西全部删掉,重写了index.js
import React from 'react';
import ReactDOM from 'react-dom';
class App extends React.Component{
render(){
return (
<div>Hellow, World</div>
)
}
}
ReactDOM.render(<App/>, document.getElementById('root'));
JSX
一个React组件中,render方法中return出去的内容就是这个组件将要渲染的内容,然后Babel 会把 JSX 转译成一个名为 React.createElement() 函数调用。
React.createElement(
'div',
{},
'Hello, World'
)
React.createElement() 接收三个参数:
第一个参数是必填,传入的是似HTML标签名称: ul, li, div;
第二个参数是选填,表示的是属性: className;
第三个参数是选填, 子节点: 要显示的文本内容;
React.createElement() 会预先执行一些检查,以帮助你编写无错代码,但实际上它创建了一个这样的对象:
// 注意:这是简化过的结构
const element = {
type: 'div',
props: {
className: '',
children: 'Hello, world!'
}
};
元素渲染
与浏览器的 DOM 元素不同,React 元素是创建开销极小的普通对象。React DOM 会负责更新 DOM 来与 React 元素保持一致。
想要将一个 React 元素渲染到根 DOM 节点中,只需把它们一起传入 ReactDOM.render():
const element = <h1>Hello, world</h1>;
ReactDOM.render(element, document.getElementById('root'));
render方法接收两个参数,第一个参数为我们的 React 根级组件,第二个参数接收一个 DOM 节点,代表我们将把和 React 应用挂载到这个 DOM 节点下,进而渲染到浏览器中。
组件 & props
组件,从概念上类似于 JavaScript 函数。它接受任意的入参(即 “props”),并返回用于描述页面展示内容的 React 元素。
函数组件:
function Welcome(props){
renter (
<h1> Hello, {props.name} </h1>
)
}
<Welcome name="World"/>
该函数是一个有效的 React 组件,因为它接收唯一带有数据的 “props”(代表属性)对象与并返回一个 React 元素。这类组件被称为“函数组件”,因为它本质上就是 JavaScript 函数。
class组件:
class Welcome extends React.Component {
render(){
renter (
<h1> Hello, {thhis.props.name} </h1>
)
}
}
<Welcome name="World"/>
组件名称必须以大写字母开头。
组件无论是使用函数声明还是通过 class 声明,都决不能修改自身的 props。
State & 生命周期
State 与 props 类似,但是 state 是私有的,并且完全受控于当前组件。
class Clock extends React.Component {
constructor(props){
super(props)
this.state = {
date : new Date()
}
}
componentDidMount() {
//这里是Clock组件第一次被渲染到DOM时会调用,也就是挂载
}
componentWillUnmount() {
//当DOM组件Clock被删除时,会调用,也就是卸载
}
render(){
return (
<div>
<h1>Hello, World</h1>
<h2>It's {this.state.date.toLocaleTimeString()}</h2>
</div>
)
}
}
修改state中数据:
class Clock extends React.Component {
constructor(props){
super(props)
this.state = {
date: new Date()
}
}
componentDidMount() {
//这里是Clock组件第一次被渲染到DOM时会调用,也就是挂载
this.timer = setInterval(()=>{
this.tick()
},1000)
}
tick(){
this.setState({
date: new Date()
})
}
componentWillUnmount() {
//当DOM组件Clock被删除时,会调用,也就是卸载
clearInterval(this.timer)
}
render(){
return (
<div>
<h1>Hello, World</h1>
<h2>It's {this.state.date.toLocaleTimeString()}</h2>
</div>
)
}
}
不要直接修改 State,构造函数是唯一可以给 this.state 赋值的地方
this.setState({name: 'World'})
1
State 的更新可能是异步的,要解决这个问题,可以让setState接受一个函数而不是一个对象,这个函数用上一个 state 作为第一个参数,将此次更新被应用时的 props 做为第二个参数:
this.setState((state, props) => ({
counter: state.counter + props.increment
}));
事件处理
React 事件的命名采用小驼峰式(camelCase),而不是纯小写。
使用 JSX 语法时你需要传入一个函数作为事件处理函数,而不是一个字符串。
在 React 中一个不同点是你不能通过返回 false 的方式阻止默认行为。你必须显式的使用 preventDefault 。例如,传统的 HTML 中阻止链接默认打开一个新页面,你可以这样写:
<a href="#" onclick="console.log('The link was clicked.'); return false">
Click me
</a>
在 React 中,可能是这样的:
function ActionLink() {
function handleClick(e) {
e.preventDefault();
console.log('The link was clicked.');
}
return (
<a href="#" onClick={handleClick}>
Click me
</a>
);
}
class函数中绑定this
class LoggingButton extends React.Component {
handleClick() {
console.log('this is:', this);
}
render() {
// 此语法确保 handleClick 内的 this 已被绑定。
return (
<button onClick={() => this.handleClick()}>
Click me
</button>
);
}
}
在循环中,通常我们会为事件处理函数传递额外的参数
<button onClick={(e) => this.deleteRow(id, e)}>Delete Row</button>
<button onClick={this.deleteRow.bind(this, id)}>Delete Row</button>
1
2
列表和key
function ListItem(props) {
return <li>{props.value}</li>;
}
function NumberList(props) {
const numbers = props.numbers;
const listItems = numbers.map((number) =>
<ListItem key={number.toString()} value={number} />
);
return (
<ul>
{listItems}
</ul>
);
}
const numbers = [1, 2, 3, 4, 5];
ReactDOM.render(
<NumberList numbers={numbers} />,
document.getElementById('root')
);
语法
在 JSX 中所有的属性都要更换成驼峰式命名,比如 onclick 要改成 onClick,唯一比较特殊的就是 class,因为在 JS 中 class 是保留字,我们要把 class 改成 className 。
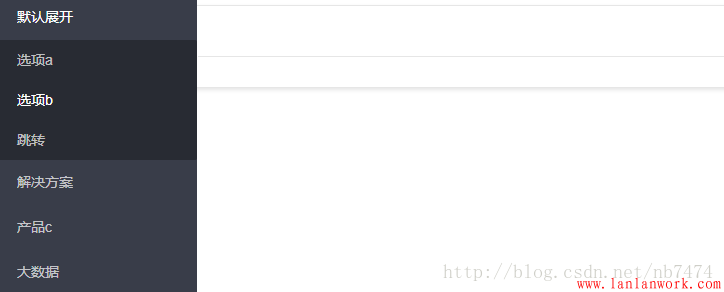
这是一个最基本的左侧菜单栏,实现的过程很简单,官方的说明文档就有,但是我在导入layer.js之后,直接复制这段官方代码到我的编辑器上时,发现页面是这样的:

发现,绑定属性的菜单并没有下拉选项,这个问题在我导入layer.all.js之后解决了,而且发现如果是在页面的最上方导入的话也没有下拉选项,只有在html代码下面导入,才可以显示 ,不知道是什么原因。
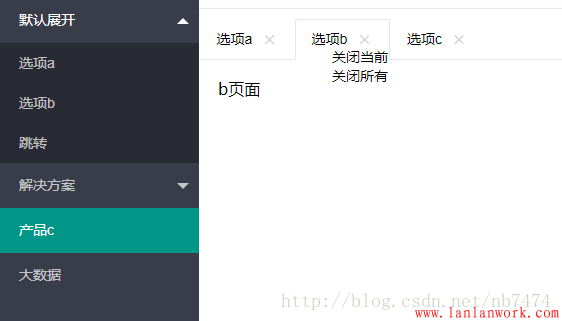
页面截图:
tab项右键菜单:

这里右键菜单的样式并没有做太多的美化。
html代码:(页面中关于引入js和css文件的部分被我省略了,还有要注意jQuery的引入顺序)
<div class="layui-tab layui-tab-card site-demo-button" style="position: relative;">
            <ul class="layui-nav layui-nav-tree layui-nav-side">
                <li class="layui-nav-item layui-nav-itemed">
                    <a href="javascript:;">默认展开</a>
                    <dl class="layui-nav-child">
                        <dd>
                            <a data-url="a" data-id="11" data-title="选项a" href="#" class="site-demo-active" data-type="tabAdd">选项a</a>
                        </dd>
                        <dd>
                            <a href="#" data-url="b" data-title="选项b"  data-id="22" class="site-demo-active" data-type="tabAdd">选项b</a>
                        </dd>
                        <dd>
                            <a href="">跳转</a>
                        </dd>
                    </dl>
                </li>
                <li class="layui-nav-item">
                    <a href="javascript:;">解决方案</a>
                    <dl class="layui-nav-child">
                        <dd>
                            <a href="">移动模块</a>
                        </dd>
                        <dd>
                            <a href="">后台模版</a>
                        </dd>
                        <dd>
                            <a href="">电商平台</a>
                        </dd>
                    </dl>
                </li>
                <li class="layui-nav-item">
                    <a href="#" data-url="c" data-title="选项c"  data-id="33" class="site-demo-active" data-type="tabAdd">产品c</a>
                </li>
                <li class="layui-nav-item">
                    <a href="">大数据</a>
                </li>
            </ul>

            <div class="layui-tab" lay-filter="demo" lay-allowclose="true" style="margin-left: 200px;">
                <ul class="layui-tab-title">
                </ul>
                <ul class="rightmenu" style="display: none;position: absolute;">
                    <li data-type="closethis">关闭当前</li>
                    <li data-type="closeall">关闭所有</li>
                </ul>
                <div class="layui-tab-content">
                </div>
            </div>

        </div>
js代码:
layui.use('element', function() {
            var $ = layui.jquery;
            var element = layui.element; //Tab的切换功能,切换事件监听等,需要依赖element模块

            //触发事件
            var active = {
                //在这里给active绑定几项事件,后面可通过active调用这些事件
                tabAdd: function(url,id,name) {
                    //新增一个Tab项 传入三个参数,分别对应其标题,tab页面的地址,还有一个规定的id,是标签中data-id的属性值
                    //关于tabAdd的方法所传入的参数可看layui的开发文档中基础方法部分
                    element.tabAdd('demo', {
                        title: name,
                        content: '<iframe data-frameid="'+id+'" scrolling="auto" frameborder="0" src="'+url+'.html" style="width:100%;height:99%;"></iframe>',
                        id: id //规定好的id
                    })
                     CustomRightClick(id); //给tab绑定右击事件
                     FrameWH();  //计算ifram层的大小
                },
                tabChange: function(id) {
                    //切换到指定Tab项
                    element.tabChange('demo', id); //根据传入的id传入到指定的tab项
                },
                tabDelete: function (id) {
                element.tabDelete("demo", id);//删除
                }
                , tabDeleteAll: function (ids) {//删除所有
                    $.each(ids, function (i,item) {
                        element.tabDelete("demo", item); //ids是一个数组,里面存放了多个id,调用tabDelete方法分别删除
                    })
                }
            };

            //当点击有site-demo-active属性的标签时,即左侧菜单栏中内容 ,触发点击事件
            $('.site-demo-active').on('click', function() {
                var dataid = $(this);

                //这时会判断右侧.layui-tab-title属性下的有lay-id属性的li的数目,即已经打开的tab项数目
                if ($(".layui-tab-title li[lay-id]").length <= 0) {
                    //如果比零小,则直接打开新的tab项
                    active.tabAdd(dataid.attr("data-url"), dataid.attr("data-id"),dataid.attr("data-title"));
                } else {
                    //否则判断该tab项是否以及存在

                    var isData = false; //初始化一个标志,为false说明未打开该tab项 为true则说明已有
                    $.each($(".layui-tab-title li[lay-id]"), function () {
                        //如果点击左侧菜单栏所传入的id 在右侧tab项中的lay-id属性可以找到,则说明该tab项已经打开
                        if ($(this).attr("lay-id") == dataid.attr("data-id")) {
                            isData = true;
                        }
                    })
                    if (isData == false) {
                        //标志为false 新增一个tab项
                        active.tabAdd(dataid.attr("data-url"), dataid.attr("data-id"),dataid.attr("data-title"));
                    }
                }
                //最后不管是否新增tab,最后都转到要打开的选项页面上
                active.tabChange(dataid.attr("data-id"));
            });

            function CustomRightClick(id) {
                //取消右键  rightmenu属性开始是隐藏的 ,当右击的时候显示,左击的时候隐藏
                $('.layui-tab-title li').on('contextmenu', function () { return false; })
                $('.layui-tab-title,.layui-tab-title li').click(function () {
                    $('.rightmenu').hide();
                });
                //桌面点击右击
                $('.layui-tab-title li').on('contextmenu', function (e) {
                    var popupmenu = $(".rightmenu");
                    popupmenu.find("li").attr("data-id",id); //在右键菜单中的标签绑定id属性

                    //判断右侧菜单的位置
                    l = ($(document).width() - e.clientX) < popupmenu.width() ? (e.clientX - popupmenu.width()) : e.clientX;
                    t = ($(document).height() - e.clientY) < popupmenu.height() ? (e.clientY - popupmenu.height()) : e.clientY;
                    popupmenu.css({ left: l, top: t }).show(); //进行绝对定位
                    //alert("右键菜单")
                    return false;
                });
            }

            $(".rightmenu li").click(function () {

                //右键菜单中的选项被点击之后,判断type的类型,决定关闭所有还是关闭当前。
                if ($(this).attr("data-type") == "closethis") {
                    //如果关闭当前,即根据显示右键菜单时所绑定的id,执行tabDelete
                    active.tabDelete($(this).attr("data-id"))
                } else if ($(this).attr("data-type") == "closeall") {
                    var tabtitle = $(".layui-tab-title li");
                    var ids = new Array();
                    $.each(tabtitle, function (i) {
                        ids[i] = $(this).attr("lay-id");
                    })
                    //如果关闭所有 ,即将所有的lay-id放进数组,执行tabDeleteAll
                    active.tabDeleteAll(ids);
                }

                $('.rightmenu').hide(); //最后再隐藏右键菜单
            })
            function FrameWH() {
                var h = $(window).height() -41- 10 - 60 -10-44 -10;
                $("iframe").css("height",h+"px");
            }

            $(window).resize(function () {
                FrameWH();
            })
        });
tab项是放在<div class="layui-tab" lay-filter="demo" lay-allowclose="true" style="margin-left: 200px;"> 这个div中的,其中有一个重要的属性lay-filter,在js中调用的tabAdd,tabDelete等多种方法都携带了这个参数,我对此的理解是相当于一个判断拦截功能,将tab项放在lay-filter=‘demo’的div中。可以借助该参数,完成指定元素的局部更新。
其中还有关于element的操作,var element = layui.element
element模块的实例
返回的element变量为该实例的对象,携带一些用于元素操作的基础方法,我们就是用这些方法进行tab项的新增和删除还有切换。
这是element 中的tabAdd方法,其中的content可以是一个iframe页面,在此例中,我就是传递了一个简单的页面,这就实现了不同页面间的一些切换。
element.tabAdd('demo', {
  title: '选项卡的标题'
  ,content: '选项卡的内容' //支持传入html
  ,id: '选项卡标题的lay-id属性值'
});
————————————————
版权声明:本文为CSDN博主「nb7474」的原创文章,遵循 CC 4.0 BY-SA 版权协议,转载请附上原文出处链接及本声明。
原文链接:https://blog.csdn.net/nb7474/article/details/79413460/
要实现JavaScript的拖拽效果,首先我们需要知道事件对象几个有关于实现拖拽效果的坐标
获取事件对象 var e = e || window.event;
根据需求需要用到的拖拽效果的坐标
clientX:鼠标点击位置相对于浏览器可视区域的水平偏移量(不会计算水平滚动的距离)
clientY:鼠标点击位置相对于浏览器可视区域的垂直偏移量(不会计算垂直滚动条的距离)
offsetX:鼠标点击位置相对于触发事件对象的水平距离
offsetY:鼠标点击位置相对于触发事件对象的垂直距离
pageX:鼠标点击位置相对于网页左上角的水平偏移量,也就是clientX加 上水平滚动条的距离
pageY:鼠标点击位置相对于网页左上角的垂直平偏移量,也就是clientY加上垂直滚动条的距离
offsetLeft:如果父元素中有定位的元素,那么就返回距离当前元素最近的定位元素边缘的距离
offsetTop:如果父元素中没有定位元素,那么就返回相对于body左边缘距离
获取元素自身大小:offsetWidth和offsetHeight / clientWidth和clientHeight
offsetWidth和clientWidth的区别:就是offsetWidth包含边框,clientWidth不包含边框
实现拖拽需要用到:clientWidth、clientHeight、clientX、clientY、offsetLeft、offsetTop
首先搭建好html结构和css样式
 <div class="wrap">
        <div class="cover">

        </div>
    </div>
* {
            margin: 0;
            padding: 0;
        }

        .wrap {
            width: 500px;
            height: 500px;
            border: 1px solid deeppink;
            position: relative;
            margin: 50px auto;
        }

        .cover {
            width: 150px;
            height: 150px;
            background: rgba(200, 7, 99, 0.5);
            display: none;
            position: absolute;
            left: 0;
            top: 0;
            cursor: move;
        }
注意:需要给大盒子和小盒子进行定位:子绝父相
<script>
    var wrap = document.querySelector(".wrap");
    var cover = document.querySelector(".cover");
    wrap.onmouseover = function() {
        cover.style.display = "block";
        wrap.onmousemove = function(e) {
            var e = e || window.event;
            var x1 = e.clientX;
            var y1 = e.clientY;
//这里获取到的e.clientX和e.clientY,可以看情况和需求改为e.pageX和e.pageY
            var halfWidth = cover.clientWidth / 2;
            var halfHeight = cover.clientHeight / 2;
            var wrapLeft = wrap.offsetLeft;
            var wrapTop = wrap.offsetTop;
            var l = x1 - wrapLeft - halfWidth;
            var t = y1 - wrapTop - halfHeight;

            if (l <= 0) {
                l = 0
            }
            if (l >= wrap.clientWidth - cover.clientWidth) {
                l = wrap.clientWidth - cover.clientWidth
            }
            if (t <= 0) {
                t = 0
            }
            if (t >= wrap.clientHeight - cover.clientHeight) {
                t = wrap.clientHeight - cover.clientHeight
            }
            cover.style.left = l + "px";
            cover.style.top = t + "px"
        }
    }
    wrap.onmouseout = function() {
        cover.style.display = "none";
    }
</script>
  var halfWidth = cover.clientWidth / 2;
            var halfHeight = cover.clientHeight / 2;
            var wrapLeft = wrap.offsetLeft;
            var wrapTop = wrap.offsetTop;
            var l = x1 - wrapLeft - halfWidth;
            var t = y1 - wrapTop - halfHeight;
            //限制范围
             if (l <= 0) {
                l = 0
            }
            if (l >= wrap.clientWidth - cover.clientWidth) {
                l = wrap.clientWidth - cover.clientWidth
            }
            if (t <= 0) {
                t = 0
            }
            if (t >= wrap.clientHeight - cover.clientHeight) {
                t = wrap.clientHeight - cover.clientHeight
            }
注意:这里要限制小盒子在大盒子之间移动的范围,左上角的限制,当小盒子超出范围时,将0赋值给l和t。右下角小盒子移动的范围在大盒子宽度减去小盒子的宽度。
css面试题@响应式布局如何实现
1为什么要使用响应式布局
响应式布局可以让网站同时适配不同分辨率和不同的手机端,让客户有更好
的体验。

2如何实现
方案一:百分比布局
利用对属性设置百分比来适配不同屏幕,注意这里的百分比是相对于父元素; 能够设置的属性有width,、height、padding、margin,其他属性比如border、 font-size不能用百分比来设置的
由于没办法对font-size进行百分比设置,所以用的最多就是对图片和大块布局进行百分比设置。

方案二:使用媒体查询 (CSS3@media 查询)
利用媒体查询设置不同分辨率下的css样式,来适配不同屏幕。
媒体查询相对于百分比布局,可以对布局进行更细致的调整,但需要在每个分辨率下面都写一套css样式。
该布局的话适用于简单的网页,可以使移动端和pc端使用一套网址。从而节约成本。也方便后期的维护,bootcss就是用了CSS3的media来实现响应的 但是相对于复杂的网页就不适合了(如:淘宝,京东)等等

方案三.rem 响应式布局
rem布局的原理
rem:相对于根元素(即html元素)font-size计算值的倍数。
如 html的font-size为100px;那么2rem就为200px。
通俗的来讲的话rem就是通过JavaScript来获取页面的宽度,从而动态的计算rem。这样就会使不同分辨率下展现出相同的效果。
//代码展示
css面试题@响应式布局如何实现 1为什么要使用响应式布局 响应式布局可以让网站同时适配不同分辨率和不同的手机端,让客户有更好 的体验。 2如何实现 方案一:百分比布局 利用对属性设置百分比来适配不同屏幕,注意这里的百分比是相对于父元素; 能够设置的属性有width,、height、padding、margin,其他属性比如border、 font-size不能用百分比来设置的 由于没办法对font-size进行百分比设置,所以用的最多就是对图片和大块布局进行百分比设置。 方案二:使用媒体查询 (CSS3@media 查询) 利用媒体查询设置不同分辨率下的css样式,来适配不同屏幕。 媒体查询相对于百分比布局,可以对布局进行更细致的调整,但需要在每个分辨率下面都写一套css样式。 该布局的话适用于简单的网页,可以使移动端和pc端使用一套网址。从而节约成本。也方便后期的维护,bootcss就是用了CSS3的media来实现响应的 但是相对于复杂的网页就不适合了(如:淘宝,京东)等等 方案三.rem 响应式布局 rem布局的原理 rem:相对于根元素(即html元素)font-size计算值的倍数。 如 html的font-size为100px;那么2rem就为200px。 通俗的来讲的话rem就是通过JavaScript来获取页面的宽度,从而动态的计算rem。这样就会使不同分辨率下展现出相同的效果。 //代码展示上述代码中 7.5为动态的值,根据设计图的宽度进行动态的改变。window.onresize的作用是:当页面的宽度或高度发生改变时,再次进行调用rem函数。
如何在网页前端里可视化你的知识图谱
最近费尽千辛万苦构造了一份可以用(大概)的知识图谱,并且把要利用知识图谱做的领域命名实体识别和一些推荐的功能做成Web版的demo,顺带想实现一些可视化知识图谱的功能。
(凭啥知识图谱就只能在Neo4j里自嗨,不能来前端show一下,歧视吗(¬_¬))
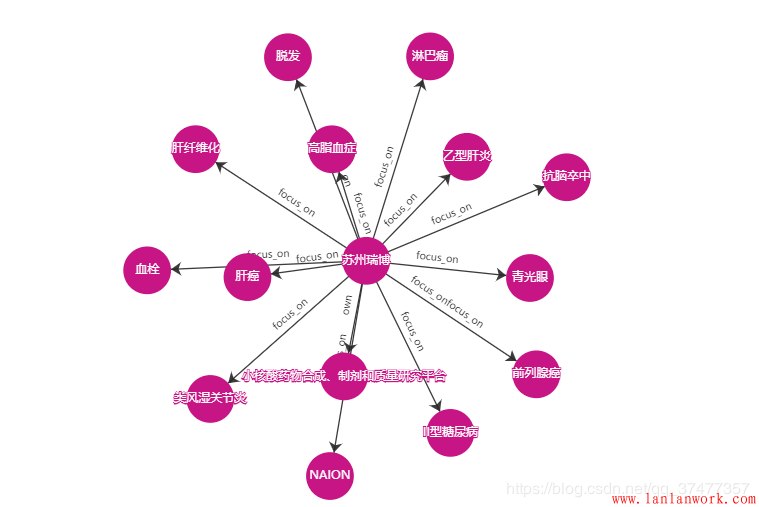
找了做前端图表展示的开源库,D3.js和Echarts都能做,我拿Echarts实现了一下功能,先看一下在现在项目里一个基于知识图谱查询的实际效果:

接下里看看如何的实现:
 <script src="/static/js/echarts.common.min.js"></script>
    <script type="text/javascript" src="https://cdn.jsdelivr.net/npm/echarts@4.5.0/dist/echarts.min.js"></script>
给要展示的图准备一个Dom:
<!-- 为ECharts准备一个具备大小的Dom -->
    <div class = "col-md-12">
        <div class="panel panel-default ">
            <header class="panel-heading">
                关系图 :
            </header>
            <div class = "panel-body ">
                <div id="graph" style="width: 100%;height:600px;"></div>
            </div>
        </div>
    </div>
data = [
        {name:'苹果',category:1,id:0},
        {name:'梨子',catagory:1,id:1},
        {name:'水果',category:2,id:2}
        ]
    links = [
        {source:0,target:2,category:0,value:'属于',symbolSize:10},
        {source:1,target:2,category:0,value:'属于',symbolSize:10}
    ]
var myChart = echarts.init(document.getElementById('graph'));

    option = {
        title: {
            text: ''
        },
        tooltip: {},
        animationDurationUpdate: 1500,
        animationEasingUpdate: 'quinticInOut',
        label: {
            normal: {
                show: true,
                textStyle: {
                    fontSize: 12
                },
            }
        },
        legend: {
            x: "center",
            show: false
        },
        series: [

            {
                type: 'graph',
                layout: 'force',
                symbolSize: 45,
                focusNodeAdjacency: true,
                roam: true,
                edgeSymbol: ['none', 'arrow'],
                categories: [{
                    name: '查询实体',
                    itemStyle: {
                        normal: {
                            color: "#009800",
                        }
                    }
                }, {
                    name: 'instance',
                    itemStyle: {
                        normal: {
                            color: "#4592FF",
                        }
                    }
                }, {
                    name: 'class',
                    itemStyle: {
                        normal: {
                            color: "#C71585",
                        }
                    }
                }],
                label: {
                    normal: {
                        show: true,
                        textStyle: {
                            fontSize: 12,
                        },
                    }
                },
                force: {
                    repulsion: 1000
                },
                edgeSymbolSize: [4, 50],
                edgeLabel: {
                    normal: {
                        show: true,
                        textStyle: {
                            fontSize: 10
                        },
                        formatter: "{c}"
                    }
                },
                data: data,
                links: links,
                lineStyle: {
                    normal: {
                        opacity: 0.9,
                        width: 1.3,
                        curveness: 0,
                        color:"#262626",
                    }
                }
            }
        ]
    };
    // 使用刚指定的配置项和数据显示图表。
    myChart.setOption(option);
这样就成功实现了一个简单的图谱可视化:
————————————————
版权声明:本文为CSDN博主「游离态GLZ不可能是金融技术宅」的原创文章,遵循 CC 4.0 BY-SA 版权协议,转载请附上原文出处链接及本声明。
原文链接:https://blog.csdn.net/qq_37477357/article/details/104857495
蓝蓝设计的小编 http://www.lanlanwork.com